AUTO-DEFROST ALL-REFRIGERATORS Models: M405 CM411L CFF61WBI FF63BKBI Instruction Manual BEFORE USE, PLEASE READ AND FOLLOW ALL SAFETY RULES AND OPERATING INSTRUCTIONS Write Model and Serial Numbers here: Model _________________________ Serial No. ______________________ FELIX STORCH, INC. Summit Appliance Division ISO 9001:2015 registered 770 Garrison Avenue Bronx, NY10474 www.summitappliance.
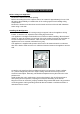
Important Safeguards Your safety and the safety of others are very important. Before the refrigerator is used, it must be properly positioned and installed as described in this manual, so read the manual carefully. To reduce the risk of fire, electrical shock or injury when using the appliance, follow basic precautions, including the following: Plug into a grounded 3-prong outlet. Do not remove grounding prong, do not use an adapter, and do not use an extension cord.
The appliance must be installed with all electrical connections in accordance with state and local codes. A standard electrical supply (115V AC only, 60 Hz), properly grounded in accordance with the National Electrical Code and local codes and ordinances, is required. Do not kink or pinch the power supply cord of the appliance. The fuse (or circuit breaker) size should be 15 amperes. It is important for the refrigerator to be leveled in order to work properly.
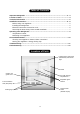
Table of Contents Important Safeguards ................................................................................................... 2 - 3 Location of Parts ................................................................................................................ 4 Technical Information ........................................................................................................ 5 Installation Instructions ...............................................................................
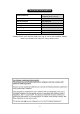
Technical Information Model Numbers FF61WBI (white) FF63BKBI (black exterior) Capacity 5.5 cu. ft. Electrical Input 115V AC/60Hz Rated Current 1.4A Refrigerant R600a Unit Weight 86 lbs. Installation Built-in Unit Dimensions (W x D x H) 23.63" x 23.5" x 33.5"* *Models with the suffix ADA are sized at 32” high for use in ADA compliant settings. NOTE: Specifications are subject to change without notice.
Installation Instructions Before Using Your Appliance: Remove the exterior and interior packing. Before connecting the unit to a power source, let it stand for approximately 2 hours. This will reduce the possibility of a malfunction in the cooling system from handling during transportation. Remove the shelves and clean them and the interior surfaces of the unit with lukewarm water using a soft cloth.
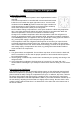
Electrical Connection: Improper use of the grounded plug can result in the risk of electrical shock. If the power cord is damaged, have it replaced by the manufacturer, its service agent or similarly qualified persons in order to avoid a hazard. This unit should be properly grounded for your safety. The power cord of this unit is equipped with a three-prong plug which mates with a standard three-prong wall outlet to minimize the possibility of electrical shock.
Reversing the Door Swing: NOTE: Models with professionally installed door handles are not user-reversible. If you find the direction of opening the door of the appliance inconvenient, you can change it. Holes on the opposite side have already been prepared at the factory. This appliance can be opened from either the right side or the left. By default, the door hinge is on the right side. If you prefer it on the left, please follow these instructions: 1. 2. 3. 4. 5.
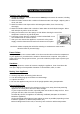
Operating Your Refrigerator Temperature Control: Your appliance’s evaporator system is out of sight behind the interior rear wall. The interior temperature is controlled with a thermostat knob located inside the unit, towards the upper right-hand corner. Turn the knob clockwise from the STOP (0) position toward the higher numbers for colder temperatures. Higher settings on the knob (higher numbers) mean lower temperatures (colder) in the refrigerator.
Care and Maintenance Cleaning Your Appliance: 1. Unplug the appliance, turn the thermostat to STOP (0) and remove all contents, including 2. 3. 4. 5. 6. 7. shelves and crisper. Wash the inside surfaces with a solution of lukewarm water and vinegar. Wipe dry with a clean, soft cloth. Wash the shelves and crisper with a mild detergent solution, then rinse and dry thoroughly. Wash the outside cabinet with a solution of warm water and mild liquid detergent. Rinse well and wipe dry with a clean soft cloth.
Troubleshooting When using this appliance, you may come across some problems that in many cases result from improper handling and can easily be eliminated. TROUBLESHOOTING GUIDE The appliance fails to operate after being connected to the power source. Check whether the power supply is active and that the thermostat is not set to the STOP (0) position. The compressor is running continuously. The door was opened frequently or it was left open too long.
Limited Warranty ONE-YEAR LIMITED WARRANTY Within the 48 contiguous United States, for one year from the date of purchase, when this appliance is operated and maintained according to instructions attached to or furnished with the product, warrantor will pay for factoryspecified parts and repair labor to correct defects in materials or workmanship. Service must be provided by a designated service company. Outside the 48 states, all parts are warranted for one year from manufacturing defects.