
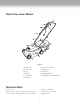
Product Manual


2. Place the bulk of the extension cord on the lawn close to
the starting point.
Note: The directional method of operation is recommended
to obtain the maximum cutting performance and reduce
the risk of the electrical extension cord entering the
cutting path.
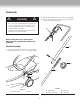
3. Hold the handle assembly with both hands.
4. Tilt the handle downwards to slightly raise the front of the
mower. This will reduce the risk of lawn damage during
start-up.
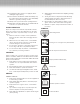
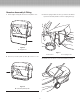
5. Depress the Safety Lock-off Button (A) and pull the Switch
Lever (B) towards you.
9
START
S
TOP
A
B
6. After the mower starts, press and release the Safety
Lock-off Button.
7. Lower the mower down into the cutting position.
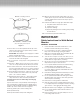
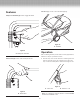
8. Follow these instructions to mow the cutting area:
A. Proceed to cut as shown in Fig 10, working from
position 1 towards position 2.
B. At position 2, turn right and proceed to position 3.
C. Continue to the end of the cutting area, turn left and
proceed to position 4.
D. Proceed as shown in Figure 10, always working away
from the electric extension cable.
9. Release the Switch Lever to stop the mower.
Important: The mower blade will continue to rotate as
you are pulling the Switch Lever. Do not reach inside the
blade housing or attempt to lift the mower until the blade
has completely stopped and the electrical supply to the
mower has been disconnected.
SSTTAARTRT
SSTTOOPP
A
Figure 12
1
3
4
2
Figure 13
A. Safety lock-off button
Figure 14
A. Safety lock-off button B. Switch lever