
Replacement Part List


8
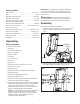
3. Slide the cord holder into position (Fig. 3).
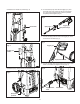
4. Slide the trigger gun holder into position (Fig. 4).
5. Slide the spray wand protector into position (Fig. 5).
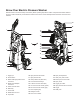
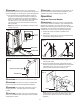
6. To connect the spray wand with the trigger gun, press
the wings of the spray wand into the slot of the trigger
gun, then twist counterclockwise until the 2 parts are
completely locked together (Fig. 6).
7. Connect the high-pressure hose to the trigger gun. Twist
to secure the connection (Fig. 7).
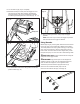
8. Connect the other end of high-pressure hose to the water
outlet on the washer and tighten securely (Fig. 8).
Fig. 3
Cord holder
R
Fig. 4
Trigger gun
holder
Fig. 5
Spray wand
protector
Trigger gun
Spray wand
Fig. 6
Spray wand wings
Fig. 7
High-pressure hose
Trigger gun
R
Fig. 8
Water outletHigh-pressure
hose