
Replacement Part List
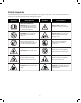

6
Unpacking
Carton Contents
• Electric grass shear + weeder housing
• Grass shear blade (pre-assembled)
• Grass shear blade sheath
• Auxiliary handle
• Handle knob + bolt
• Manual with registration card
1. Carefully remove the grass shear + weeder and check to
see that all of the above items are supplied.
2. Inspect the product carefully to make sure no breakage or
damage occurred during shipping. If you nd damaged or
missing parts, DO NOT return the unit to the store. Please
call the Snow Joe
®
+ Sun Joe
®
customer service center at
1-866-SNOWJOE (1-866-766-9563).
NOTE: Do not discard the shipping carton and packaging
material until you are ready to use your new grass shear
+ weeder. The packaging is made of recyclable materials.
Properly dispose of these materials in accordance with
local regulations.
IMPORTANT! The equipment and packaging material are
not toys. Do not let children play with plastic bags, foils
or small parts. These items can be swallowed and pose a
suocation risk!
Assembly
This grass shear + weeder comes completely assembled with
the grass shear blade pre-installed.
mCAUTION! Wear protective gloves before handling the
blades.
mWARNING! Make sure the unit is powered o before
handling the blades.
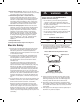
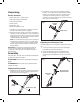
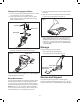
Fitting Auxiliary Handle
1. Assemble the auxiliary handle on the pole by inserting the
handle knob into the auxiliary handle and tightening the
handle with the bolt provided (Fig. 1).
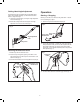
2. For maximum comfort and control, adjust the auxiliary
handle to t your height. Shorter users adjust the auxiliary
handle to a lower position (away from your body). Taller
users adjust the auxiliary handle to an upper position
(towards to your body). Make sure your forearm is straight
when using the machine (Fig. 2).
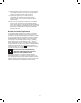
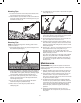
Adjusting the Telescopic Pole
The telescoping pole can be extended or shortened for ease of
use.
1. Loosen the telescoping pole by turning the telescoping
pole adjustment knob clockwise (Fig. 3).
2. Extend the telescoping pole to a comfortable height.
3. Tighten the the telescoping pole in position by turning
the telescoping pole adjustment knob counter-clockwise
(Fig. 3).
Fig. 1
Auxiliary
handle
Handle knob + bolt
Fig. 2
Auxiliary
handle
Handle knob
Fig. 3
Telescoping
pole
Telescoping pole
adjustment knob