
Installation Guide
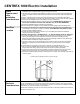

CENTREX 1000 NE (Non-Electric) Installation
- 7 –
Space
Required and
other
Installation
Considerations
Vent Pipe
Location
Vent Inlet
Coupling
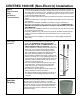
1. Compost will be removed from the finishing drawer. Ensure that there is at least 15”
in front of the CENTREX 1000 NE so that the drawer may be removed from the unit.
2. The safety drain is necessary for ALL installations. Install the unit in a location where
the safety drain can be connected. This drain exits from the left side of the unit and
must slope downward at all points.
3. Install in a location where the vent pipe can be attached as per the instructions listed
below.
4. Install in a location that is not air tight. The toilet must be able to vent to ensure odor
free operation.
5. Ensure that the CENTREX 1000 NE is accessible for ongoing maintenance.
6. Ensure that the installation area is a minimum of 28” in height. DIGGING BELOW
GROUND TO FACILITATE THE INSTALLATION OF THE CENTREX 1000 IS NOT
RECOMMENDED.
7. Bends in the vent, installation near hills or over hanging trees may cause down draft.
A 12 volt fan may be necessary.
8. Competing appliances (ie. wood stove) may require an air intake installed from the
outdoors if the unit is installed in an enclosed basement. A 12 volt fan may be
required.
9. Ensure that the unit is installed on a level surface or sloping slightly towards the
safety drain.
1. All vent should be vertically installed.
2. Limit bends in the vent stack to no more than 2 - 45 °
bends. NO HORIZONTAL SECTIONS OF VENT.
3. INSTALL VENT SO THAT IT TERMINATES 24” - 30”
ABOVE HIGHEST PEAK OF THE ROOF. If the vent
is being installed on a steeply pitched roof where snow
shear may occur; Install a heavier pipe through the
roof and feed the enclosed vent through the heavier
pipe. Seal between the pipes with expanding foam or
other such water-tight material. The heavier pipe
should be able to withstand the weight of sliding snow.
4. If there is more than 36” of vent needed above the roof
line to reach 24-30” above the highest peak of the roof
(diffusor included in measurement), use guy wires to
secure the vent above the roof.
5. The vent must be installed separately from ALL other
household vents. Venting cannot be merged with
other venting. Doing so will prevent the unit from
operating in an odorless fashion.
6. All connectors in the vent pipe should be sealed. Use
silicone caulking to seal the connections.
7. The diffusor should be glued vertically on to the top of
the vent pipe. This assembly helps draw air up the
vent pipe.
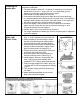
Place the vent inlet coupling into the hole on the top of
the unit for the 4” vent and so that the 1” of smaller
diameter pipe is protruding into the hole. This is the first
piece of the venting. Once you have finished assembling
the vent, run a bead of silicone around where the inlet
coupling meets the top of the composting unit to prevent
odor from escaping.