
Installation Guide

– 9 –
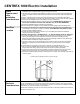
Installing the
waste pipe
Installing the
Ultra Low
Flush Toilet
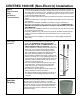
When installing the waste pipe from the toilet to the unit, the following
should be considered:-
1. The pipe should be either 45 ° or vertical (if composting unit is directly
below toilet), or at a 2-3 ° angle (1/8”-1/4” or 3-13mm drop per foot
maximum) so that the waste travels with the liquid.
2. Pipe should not slope upwards at any point.
3. Connections should be snug so that waste does not cause blockage.
4. It is recommended that the waste pipe be no longer than 15 feet (460cm)
without installing a clear out port(a Y fitting with screw on end cap) near
the toilet to provide easy access should it be required.
5. Use a soft sealant, such as silicone for the connection of the waste
pipe to the unit so that the unit can be moved for servicing or other
reasons should this ever be required.
6. Insulate pipe if unit is to be used during the winter.
7. For longer installations of waste pipe, ensure the waste pipe is supported
to prevent sagging.
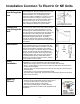
1. Make sure the center of the floor flange is at
least 11 inches (280mm) from the back wall.
2. When Installing a new floor flange, ensure
that the toilet mounting bolts align properly
with ultra low flush toilet mounting pattern.
3. Secure flange to floor using flat head screws
through counter-sunk holes in flange. Insert
bolts into slotted holes in flange(Fig. A)
4. Position floor seal by pressing the floor bolts
up through the holes in the seal.
5. Set toilet in place with bolts protruding up
through mounting holes in base (Fig C).
6. Install washers and hex nuts provided with
toilet. Tighten
nuts down equally with
standard 7/16” (12mm) open end wrench.
7. Connect water supply line to water valve (1/2”
or 13mm MPT) inlet using appropriate fittings
(Fig D)
8. Turn on water supply and flush toilet to test
for leaks.
9. Attach pedestal and pedal covers to toilet
base. See instructions
below.