BREADMAKER U M R FABRICADOR DE P AN Y MASA M I R SER ANUAL WITH ECIPES ANUAL DE NSTRUCCIONES CON ECETAS ©2003 Sunbeam Products, Inc. All rights reserved. SUNBEAM® and ExpressBake® are registered trademarks of Sunbeam Products, Inc. Distributed by Sunbeam Products, Inc., Boca Raton, Florida 33431. ©2003 Sunbeam Products, Inc. Todos los derechos reservados. SUNBEAM® y ExpressBake® son marcas registradas de Sunbeam Inc. Distribuido por Sunbeam Products, Inc., Boca Raton, Florida 33431.
CONGRATULATIONS! You are the owner of a SUNBEAM® Breadmaker. Please read all of the instructions in this manual carefully before you begin to use this appliance. Proper care, usage and maintenance will ensure the long life of this appliance and its trouble-free operation. Save these instructions and refer to them often for cleaning and care tips. SPECIAL CORD SET INSTRUCTIONS 1. A short power supply cord is provided to reduce the hazards resulting from becoming entangled in or tripping over a longer cord.
IMPORTANT SAFEGUARDS ❑ Avoid contact with moving parts. ❑ Do not use attachments not recommended by Sunbeam; they may cause fire, electric shock or injury. ❑ Do not use outdoors or for commercial purposes. ❑ Do not place the appliance near a hot gas or electric burner, or in a heated oven. ❑ To unplug, press the “STOP” button, grip plug and pull from wall outlet. Never pull on the cord.
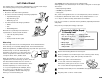
Features of Your Breadmaker Overview of Breadmaker Features A 1 Menu Press this button to select the kind of bread you want to make. Each time you press the button you will hear a beep. The display shows a number for each setting. For example, Basic is 1, French is 2, Whole Wheat is 3, etc. 1. Basic 2. French 3. Whole Wheat 4. Quick 5. Sweet 6. ExpressBake 1.5 lb. 7. ExpressBake 2.0 lb. 8. Dough ® ® 9. Jam 10. Cake 11. Sandwich 12. Bake C Color Light Medium Dark 1.5 lb. 2.0 lb. B 3 2 D 5. Sweet 6.
3 Display 1 Basic The Display shows the following settings: • The number of the bread setting cycle • The color setting • The time remaining while your bread is kneading or baking Once you press the “Start/Stop” button to begin, the display will show the remaining time until your bread is baked. When the display reads “0:00” the bread is baked. 4 Timer Set Buttons Press these buttons to delay the time for your breadmaker to start.
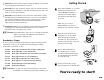
Getting Started ❃ IMPORTANT: Use the “Timer” button to delay the baking of your bread. You may delay the start time up to 13 hours. ❃ IMPORTANT: Press the “Start/Stop” button and your machine will start making bread. If delay bake is selected, the remaining time will count down in one-minute increments. 1 ❃ IMPORTANT: The breadmaker has an automatic “keep warm” setting that will keep your bread warm for up to one hour. To turn warmer off, press the “Start/Stop” button and hold until you hear a beep.
Let’s Bake Bread The simplest way to learn how to bake bread is to follow a basic recipe. The following recipe is easy and the bread is delicious. Before You Begin: • Be sure to start with fresh ingredients. • Be sure to have the following measuring equipment: — Liquid measuring cup — Dry measuring cups — Measuring spoons • You will need the following ingredients: — Water The SECOND most important secret of making bread: Add ingredients into the bread pan in the exact order given in the recipe.
6 7 Press the Menu button until the “Basic” program is selected. Press the Color button for the desired crust color. Depending on the crust color you select, the display will read as follows: Light: L Medium: P Dark: H Press the “Color” button until “P” (medium) appears in the display window. 8 9 10 11 ☞ ExpressBake® Setting: Making Bread In Under 1 Hour Your SUNBEAM® breadmaker can bake great bread in under 1 hour. This is called the “ExpressBake®” setting.
® ExpressBake Setting Tips and Hints ® ExpressBake Traditional-Style White Bread 1.5-Pound Loaf Yeast Always use a fast-rising yeast. DO NOT use 5. Sweet 6. ExpressBake® active dry yeast for ExpressBake® settings t 7. ExpressBake® because the loaves will be much shorter 8. Dough when baked. Liquids 1.5 lb. 2.0 lb. 9. J 10. C 11. S 12. B 1 cup and 2 tablespoons 1 teaspoon salt (9 ounces total) of hot water 3 cups bread machine flour (115°–125°F or 46°–52°C) Light Medium Dark 1 5 lb. 2.0 lb.
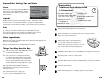
9 ☞ Open the lid and while using oven mitts, firmly grasp the bread pan handle and gently pull the pan straight up and out of the machine. CAUTION: The breadmaker and pan may be very hot! Using the Delay Timer You can delay the time your breadmaker starts to have fresh bread ready when you get up in the morning or when you come from work. We recommend that before you use the Delay Timer, you try out a few recipes. Use recipes that have produced good results for you in the past. Always handle with care.
Tips and Hints Check the Doughball Experienced cooks consider breadmaking to be as much art as science. Keep in mind that some recipes may require a little experimentation before they are exactly the way you want them. Just don’t give up. Still, there are special hints to ensuring quality bread almost every time. This is a secret well known to people who make bread the old-fashioned way.
For Baking at High Altitudes If you live above 3000 feet, you probably already know how to adjust other recipes like cakes and muffins. Higher altitudes tend to: ➢ make dough rise faster ➢ make flour drier To compensate for high altitude baking, we recommend the following: Measurement Equivalency Chart The following chart will help you convert measurements used in the recipes. For example: as 2 – 4 Tbsp. per cup. 3 tsp. 1/2 Tbsp. = 1- 1/2 tsp.
Taking Care of Your Breadmaker ☞ CAUTION: Do not put the breadmaker in water or in a dishwasher. Do not use benzene, scrubbing brushes or chemical cleaners as these will damage the machine. Use only a mild, non-abrasive cleanser to clean the breadmaker. General Cleaning 1 Remove all bread crumbs by wiping them away with a slightly damp cloth. 2 DO NOT bend the heating element which is located on the inside of the breadmaker.
Troubleshooting (cont’d) B AKING P ROBLEM S OLUTION B AKING P ROBLEM The bread has a floured top. This is usually a result of using too much flour or not enough water. Try using less flour (a tsp. less at a time), or try using more water (1/4 tsp. more at a time). The bread has a heavy, thick texture. Try using less flour (a tsp. at a time), or more yeast (1/4 tsp. at a time). This could also be the result of using old flour or the wrong type of flour for the recipe. The bread is too brown.
Recipes ® ® B ASIC S ETTING R ECIPES Traditional White Bread Recipes 28 1.5-POUND LOAF INGREDIENTS 2-POUND LOAF 1 cup + 2 Tbsp. Water (75°– 85°F or 24°– 30°C) 1-1/3 cups 1 Tbsp. Butter or margarine, softened 4 tsp. 2 Tbsp. Sugar 2 Tbsp. 1 Tbsp. Non-fat dry milk powder 4 tsp. 1-1/2 tsp. Salt 2 tsp. 3 cups Bread flour 4 cups 2-1/2 tsp. Bread machine yeast 2 tsp.
1 Attach the kneading blade in the bread pan. French Setting Recipe 2 Place ingredients into the bread pan in the following order: water, butter or margarine, sugar, milk powder, salt and flour. 3 With finger, make a small indentation on one side of the flour. Add yeast to indentation, making sure it does not come into contact with the liquid ingredients. 4 Carefully insert bread pan into breadmaker and gently close the lid. 5 Plug the power cord into a wall outlet.
Whole Wheat Setting Recipe Sweet Setting Recipe Whole Wheat Bread Banana-Pecan Bread 1.5-POUND LOAF INGREDIENTS 2-POUND LOAF 1 cup + 2 Tbsp. 1 Tbsp. + 1-1/2 tsp. 1/4 cup 1-1/4 tsp. 3-1/2 cups 2-1/4 tsp. 1-2/3 cups 2 Tbsp. 1/3 cup 2 tsp. 4-2/3 cups 3 tsp. Water (75°– 85°F or 24°– 30°C) Butter or margarine, softened Firmly packed light brown sugar Salt Whole wheat flour Bread machine yeast 1 Attach the kneading blade in the bread pan.
ExpressBake 2-lb. Setting Recipe ® Quick Breads Setting Recipe Oatmeal Date Bread Chock Full o’ Chocolate Walnut-Zucchini Bread 1-1/2 cups hot water (115°-125°F) 2 Tbsp. canola or vegetable oil 1/4 cup packed brown sugar 1 tsp. salt 3 cups bread flour 1-1/2 cups instant oatmeal 1/2 cup finely chopped dates 2 Tbsp. fast-rising yeast 1/2 cup chopped walnuts 3/4 cup sugar 1/2 cup semi-sweet chocolate pieces 1 tsp. ground cinnamon 2 cups all-purpose flour, divided 1 tsp.
Dough Setting Recipe Cake Setting Recipe Orange-Anise Braided Ring Standard Cake Mix 1/3 cup water (75°– 85°F or 24°– 30°C) 1/3 cup whole milk 3 eggs, lightly beaten 1/2 cup (1 stick) butter or margarine, softened and cut into 6 pieces Grated zest of 1 orange 1/2 cup sugar 4 cups bread flour 1-1/2 tsp. anise seeds, crushed 1 tsp. salt 1/2 tsp. ground nutmeg 2-1/2 tsp. bread machine yeast Egg wash (1 egg, lightly beaten with 1 Tbsp. water) 1/4 cup butter (melted) 1/2 tsp. vanilla 3 eggs 2 tsp.
Sandwich Setting Recipe Jam Setting Recipe Sandwich Loaf Year ‘Round Spiced Peach Jam 1 cup water 1-1/2 Tbsp. soft margarine or butter 1/2 tsp. salt 1-1/2 Tbsp. non-fat milk powder 3 Tbsp. sugar 3 cups high-gluten bread flour* 3/4 tsp. fast action yeast 1 cup sugar 1 Tbsp. low-sugar fruit pectin 2 cups thawed frozen sliced peaches 1/2 tsp. ground cloves 1/4 tsp. ground nutmeg 2 tsp. lemon juice 1 Attach kneading blade in the bread pan.
Glazes Citrus Glaze Mix until thin enough to drizzle: After rolls rise, just before baking, gently apply desired glaze with a pastry brush. Bake as directed in the recipe. 1/2 cup powdered sugar 1 tsp. grated lemon or orange peel 2 tsp. lemon or orange juice • For a shiny golden crust, use Egg Glaze or Egg Yolk Glaze. • For a shiny chewy crust, use Egg White Glaze (crust will be lighter in color). Creamy Vanilla Glaze Mix until thin enough to drizzle: 1/2 cup powdered sugar Egg Glaze 1/4 tsp.
Choco-Banana Spread Mix: 1/3 cup mashed ripe banana 1/2 cup semi-sweet chocolate chips, melted Recipe Index PAGE Homestyle White Bread . . . . . . . . . . . . . . . . . . . . . . . . . . . .13 Ham and Swiss Spread ExpressBake® 1.5-lb. Traditional-Style White Bread . . . . . . . . 17 Mix: Traditional White Bread . . . . . . . . . . . . . . . . . . . . . . . . . . . . . 29 1 package (3 oz.) cream cheese, softened 2 Tbsp. finely chopped, fully cooked, smoked ham 1 Tbsp. shredded Swiss cheese 1/2 tsp.
1 Y EAR L IMITED WARRANTY Sunbeam Products, Inc, or if in Canada, Sunbeam Corporation (Canada) Limited (collectively “Sunbeam”) warrants that for a period of one year from the date of purchase, this product will be free from defects in material and workmanship. Sunbeam, at its option, will repair or replace this product or any component of the product found to be defective during the warranty period. Replacement will be made with a new or remanufactured product or component.