
Installation Guide

WARNING
To reduce the risk of fire, electric shock or injury to persons, observe all instructions. The ZoneMaster™ has been designed to
operate on 24 Volt AC, 60 Hz. The only 110/120 Volt AC connection needed is for the power supply Transformer.
Before installing the Transformer, confirm that the electric power is off at the junction box where you will be making the
Transformer 110/120 Volt connections. Observe the following clearance to combustible materials or surfaces: For both the
Transformer and the Damper electric motor: a minimum of 4” (10 cm) is required.
IMPORTANT NOTES
The following will be required to complete the installation: • A standard low voltage Heat-Cool wall thermostat, designed
for gas furnaces. • Electrical wire, 2-conductor, 20 Gauge (CL-2 or Bell Wire) to connect the Transformer to the Damper via the wall
thermostat. If the total length of wire exceeds 80 feet (25 m), use 18 Gauge wire. • A cover plate with knockout for the electrical
box that the Transformer will be mounted on. • If you are mounting the Damper between floor joists in flexible duct, you will need
two duct supports. • Duct tape.
BENEFITS
The ZoneMaster™ will allow you to individually control the temperature of a room in your home. e.g. An unused room does not
have to be heated or cooled to the same temperature as the remainder of the home. In the winter you may want a bedroom a
little cooler than the rest of the home. The baby’s room you may want a little warmer than the rest of the home in the summertime.
You control your comfort and save significantly on energy use.
INSTALLATION INSTRUCTIONS
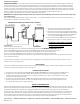
Consult the Wiring Diagram when planning the installation. Begin by determining the location of the Damper, the thermostat
and the Low Voltage Transformer. Then determine the route you will be running the wires from the Transformer to the thermostat
and onwards to the Damper. Once you have this planned, proceed as follows.
DAMPER UNIT INSTALLATION
For metal duct, remove a 6” (15 cm) section of duct at an existing joint so you will have one crimped duct end and one straight duct
end. Slide the Damper unit in place so that the ends are inserted at least 1” (2.5 cm) at each end. The Damper is non-directional so it
may be installed facing either direction of the airflow. Rotate the Damper so that you can easily access the electric terminal block.
Complete the installation by securing the Damper with the #6 sheet metal screws supplied. Then wrap each joint with a good
quality duct tape to avoid air leakage.
For flexible duct, cut the flexible duct and slide the ends over the ends of the Damper unit. You will need to support the Damper
with a couple of standard duct supports available at Home Centers. Finish the installation by wrapping a good quality duct tape
over the seams at both ends of the Damper to minimize air leaks.
THERMOSTAT INSTALLATION: (THERMOSTAT NOT INCLUDED)
Mark the location of the thermostat mounting hole in the back plate of the thermostat and install the fastening hardware normally
supplied with the thermostat. Do not mount the thermostat on an outside wall. Locate the thermostat approximately 5’ (1.5 m)
above the floor and away from drafts and direct sunlight. DO NOT screw the thermostat to the wall at this time.
INSTALLATION INSTRUCTIONS FOR ZONEMASTER™
READ AND SAVE THESE INSTRUCTIONS
IMPORTANT SAFETY INSTRUCTIONS
For general ventilation control use only.
Do not use to control the flow of hazardous, corrosive, flammable or explosive materials and vapors.
Never expose this product to temperatures exceeding 140˚F (60˚C).
Always leave this product accessible for maintenance, cleaning and repair.
Before installing or servicing this product, switch power off at the service panel
and lock service to prevent power from being switched on accidentally.
Suncourt® Inc. assumes no responsibility for the installation of the ZoneMaster™.
Suncourt® does not provide electrical connection information beyond what is provided herein.
If in doubt, contact a competent contractor.
For your safety and protection follow all instructions and adhere to applicable building and electrical codes.