
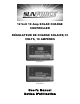
Use and Care Manual
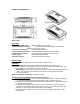
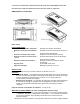
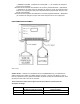

CONTROLLER DIMENSIONS
60031 Shown
FEATURES
• Digital Meter (60031 only) – Battery voltage is shown digitally.
• Protect and Maintain battery – Protect batteries from overcharging and maintains
batteries in fully charged state.
• Safety circuit protection – Reverse polarity protection
• Reverse leakage protection – Protect batteries from discharge by solar panel
• Temperature Protection– Over temperature protection and auto-resume
• Status Lights – Easy reading LED indicators.
• Mounting Options – Panel mounting / wall mounting.
INSTALLATION
The solar controller is designed to be panel mounted or wall mounted.
Installation
• Panel Mounted - The charge controller may be mounted flush with the wall.
Flush mounting requires a rectangular cutout in the mounting surface with sufficient space (2-3
inches) behind to accommodate the controller and wiring.
• Wall Mounted - The charge controller may also be mounted to the wall without making a
cutout. The controller will be raised from the wall; this is the quickest and easiest
mounting procedure.
Recommended Battery Capacity: 12V 35AH minimum.
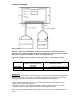
CONNECTION PROCEDURES (refer to Connection diagram)
• Connect the solar panel positive side to the solar controller ARRAY + (this is marked by a
“+” tag) using a suitable wire (Be careful DO NOT short circuit the solar array.)
• Connect the solar panel negative side to the solar controller ARRAY – (this is marked by a
“-“ tag) with a suitable wire.
• Connect the battery positive side to the solar controller BATTERY positive side (this is
indicated by a red collar) with either the provided “O” rings or a suitable wire (you may
strip the “O” rings from the wire without voiding your warranty).
• Connect the battery negative side to the solar controller BATTERY NEGATIVE – with a
suitable wire.