
Owner manual


6
COMPLETE TROUBLESHOOTING GUIDE
Day & Night Thermostat
TP1
1 – Before you start
***IMPORTANT: READ AND FOLLOW THESE INSTRUCTIONS BEFORE
STARTING THE TEST.
• THE UNIT MUST BE UNPLUGGED
• DO NOT PLUG A LOAD INTO THE OUTLET UNTIL STEP 6
• LIGHTING CONDITION: Perform this test in a room with enough light
for the controller to detect a DAY condition. A dark location should
be avoided.
• TEMPERATURE: Perform this test in a room where ambient
temperature is between 65°F and 85°F (18°C and 30°C).
• DEFINITIONS: CW = clockwise, CCW = counterclockwise
• TURN BOTH KNOBS FULLY CW BEFORE GOING TO STEP 1
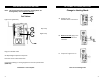
2 – Test
STEP HANDLING AND TEST DESCRIPTION EXPECTED RESULTS
1
•
Plug the unit into the power outlet
• WITHIN 5 SECONDS, turn BOTH
KNOBS fully CCW .
Output On indicator
will turn ON
2
• Turn UPPER KNOB fully CW.
Output On
indicator
will turn OFF.
3
•
Cover the Light Sensor completely
with the palm of your hand or black
electrical tape(a single finger will
NOT cover the sensor
appropriately)
Output On indicator
will turn ON after 6 to
8 seconds.
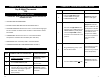
7
COMPLETE TROUBLESHOOTING GUIDE
STEP HANDLING AND TEST DESCRIPTION EXPECTED RESULTS
4
• Keep the Light Sensor fully
covered while turning the
LOWER KNOB fully CW
Output On indicator
will turn OFF again.
5
• Uncover the Light Sensor and
wait 6 to 8 sec. THEN rotate the
UPPER KNOB very slowly CCW
until the Output ON indicator
turns ON : leave the knob in this
position.
Output On indicator
will turn ON when the
knob pointer indicates
a temperature close to
the ambient room
temperature. Make
sure this temperature
indication makes
sense.
6
• Plug a load (lamp, pump..) into
the TP1 front outlet.
The load will turn ON
(the load ON/OFF
switch, if any, must be
in the ON position).
7
• Turn the UPPER KNOB fully CW.
Output On indicator
and the load will turn
OFF.