MOTION AIR BIKE SF-B2916 USER MANUAL IMPORTANT! Please retain owner’s manual for maintenance and adjustment instructions. Your satisfaction is very important to us, PLEASE DO NOT RETURN UNTIL YOU HAVE CONTACTED US: support@sunnyhealthfitness.com or 1-877-90SUNNY (877-907-8669).
IMPORTANT SAFETY INFORMATION We thank you for choosing our product. To ensure your safety and health, please use this equipment correctly. It is important to read this entire manual before assembling and using the equipment. Safe and effective use can only be achieved if the equipment is assembled, maintained and used properly. It is your responsibility to ensure that all users of the equipment are informed of all warnings and precautions. 1.
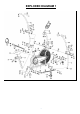
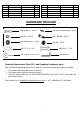
EXPLODED DIAGRAM 1 2
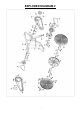
EXPLODED DIAGRAM 2 3
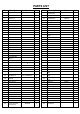
PARTS LIST No. Description Spec. Qty. No. 1 Main Frame 1 43 2 Meter Frame Tube 1 44 3 Seat Post 1 45 Description Hex Socket Pan Head Screw Arc Washer Hex Socket Pan Head Screw Spring Washer D Shape Washer Foam Grip Cross Head Screw Wave Washer Cap Sleeve Foot Supporting Tube Protective Cage Chain Cover Crank Cover Hex Nut Washer Two Slot Nut Ball Rack Axle Bowl Three Slot Nut Flat Washer Spec. Qty. M8X15 4 D8X1.
No. Description Spec. Qty. No. 85 86 87 88 89 Bolt Cross Head Screw Cross Head Screw Flat Washer Flat Washer ST4.2X18 M5X15 M6X30 D5XФ10X1.0 D6XФ12X1.2 8 3 1 3 1 90 91 92 93 94 Description Nylon Nut Wrench Wrench Spanner Allen Wrench Spec. Qty. M5 S17,19 S13,14 S10,13,14,15,17 S6 3 1 1 1 2 HARDWARE PACKAGE #20 M10XL57 4PCS #24 Ф10X1.5XФ25XR28 #25 M10 #32 4PCS #33 D8XФ16X1.
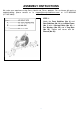
ASSEMBLY INSTRUCTIONS We value your experience using Sunny Health and Fitness products. For assistance with parts or troubleshooting, please contact us at support@sunnyhealthfitness.com or 1-877-90SUNNY (877-907-8669). STEP 1: Attach the Front Stabilizer (No. 9) and Rear Stabilizer (No. 10) to the Main Frame (No. 1) with 4 Carriage Bolts (No. 20), 4 Arc Washers (No. 24) and 4 Cap Nuts (No. 25). Tighten and secure with the Wrench (No. 91).
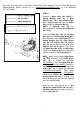
We value your experience using Sunny Health and Fitness products. For assistance with parts or troubleshooting, please contact us at support@sunnyhealthfitness.com or 1-877-90SUNNY (877-907-8669). STEP 2: Remove 2 Hex Socket Pan Head Screws (No. 42), 2 Spring Washers (No. 46), 2 Flat Washers (No. 40), 2 D Shape Washers (No. 47), and 2 Wave Washers (No. 50) from the Long Axle (No. 38) using Allen Wrench (No. 94). Insert the Long Axle (No. 38) to the Main Frame (No. 1), then attach the Swing Tubes (No.
We value your experience using Sunny Health and Fitness products. For assistance with parts or troubleshooting, please contact us at support@sunnyhealthfitness.com or 1-877-90SUNNY (877-907-8669). STEP 3: Remove 2 Nylon Nuts (No. 26L/R), 2 Spring Washers (No. 27), 2 Alloy Sleeves (No. 28), 2 Flat Washers (No. 29), 2 Sleeves (No. 52) from the Pedal (No. 11L/R) using Wrench (No. 91). NOTE: 2 Bearings (No. 30) are preassembled to the Connecting Boards (No. 7L/R). Insert the Pedal (No. 11R) with Bearing (No.
We value your experience using Sunny Health and Fitness products. For assistance with parts or troubleshooting, please contact us at support@sunnyhealthfitness.com or 1-877-90SUNNY (877-907-8669). STEP 4: Remove 4 Hex Socket Pan Head Screws (No. 43), 4 Spring Washers (No. 41) and 4 Arc Washers (No. 44) from the Swing Tubes (No. 5) using Allen Wrench (No. 94). Attach the Armrests (No. 6L/R) to the Swing Tube (No. 5) with 4 Hex Socket Pan Head Screws (No. 43), 4 Spring Washers (No. 41) and 4 Arc Washers (No.
We value your experience using Sunny Health and Fitness products. For assistance with parts or troubleshooting, please contact us at support@sunnyhealthfitness.com or 1-877-90SUNNY (877-907-8669). STEP 5: Remove 2 Hex Socket Pan Head Screws (No. 45), 2 Spring Washers (No 41) and 2 Flat Washers (No. 33) from the Main Frame (No. 1) using Allen Wrench (No. 94). Connect the Sensor Wire (No. 36) and Extension Wire (No. 37). Attach the Meter Frame Tube (No. 2) to the Main Frame (No.
We value your experience using Sunny Health and Fitness products. For assistance with parts or troubleshooting, please contact us at support@sunnyhealthfitness.com or 1-877-90SUNNY (877-907-8669). STEP 6: Remove the Spring Knob (No. 8) from the Main Frame (No. 1). Insert the Seat Post (No. 3) to the tube of Main Frame (No. 1), then secure with Spring Knob (No. 8) after adjusting to the proper position. Remove the Flat Washer (No. 18) and Knob (No. 19) from the Seat Slider (No. 4).
ADJUSTMENT GUIDE ADJUSTING THE SEAT The Seat (No. 16) of this bike is fully adjustable as it moves Up, Down, Fore (forward), Aft (backward). To adjust the height of the Seat Post (No. 3), loosen and pull the Spring Knob (No. 8) outward, then raise or lower the Seat (No. 16) to the desired height. Once adjusted, re-insert and tighten the Spring Knob (No. 8) to secure the Seat Post (No. 3) in place. To adjust the Seat (No. 16) back and forth, loosen Knob (No. 19), then slide the Seat Slider (No.
BATTERY INSTRUCTION BATTERY INSTALLATION The meter uses 2 AAA 1.5V batteries. Open the battery cover from the back of meter, then put 2 batteries into the battery compartment. Make sure the (+) and (-) ends of the batteries are in the correct position. Put the battery cover back. BATTERY REPLACEMENT If there is a problem with the display, try changing the batteries first. Open the battery cover, remove the old batteries, and replace with new batteries.
OPERATING INSTRUCTIONS FUNCTION BUTTONS MODE: 1. Press the button to select TIME, DISTANCE and CAL to preset. 2. Press the button to select any function display values on LCD or enter any values to preset. 3. Press and hold the button for 2 seconds to reset all the values to 0 except the Odometer. (When the user replaces batteries, all the values will reset to ZERO automatically.) SET: To set up the target value of TIME, DISTANCE and CAL. Press and hold the button for 2 seconds to speed up the increment.
3. SPEED: Display the current training speed from 0.00 to 99.9 KPH or MPH. 4. DISTANCE: Accumulates total distance from 0.00 up to 9999. The user may preset target distance by pressing SET & MODE button. Each increment is 0.1 KM or M. Automatically count down from targeting value during exercise. 5. TIME: Accumulates total time from 00:00 up to 99:59. The user may preset target time by pressing SET & MODE button. Each increment is 1 minute. Automatically count down from targeting value during exercise. 6.
16
17
18