
Use and Care Manual


8
We value your experience using Sunny Health and Fitness products. For assistance with parts or
troubleshooting, please contact us at support@sunnyhealthfitness.com or 1-877-90SUNNY
(877-907-8669).
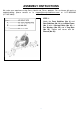
STEP 3:
Remove 2 Nylon Nuts (No. 26L/R), 2
Spring Washers (No. 27), 2 Alloy
Sleeves (No. 28), 2 Flat Washers (No.
29), 2 Sleeves (No. 52) from the Pedal
(No. 11L/R) using Wrench (No. 91).
NOTE: 2 Bearings (No. 30) are
preassembled to the Connecting Boards
(No. 7L/R).
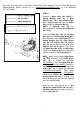
Insert the Pedal (No. 11R) with Bearing
(No. 30) into the Connecting Board (No.7
R), then attach to the Crank (No. 14) with
Spring Washer (No. 27), Alloy Sleeve
(No. 28), Flat Washer (No. 29), Sleeve
(No. 52) and that were just removed using
Spanner (No. 93) to tighten. Then screw
the Nylon Nut (No. 26 R) to Pedals (No.
11 R) using Wrench (No. 91). Repeat the
same assembly for left Pedal (No.11L).
NOTE:Make sure to attach Right Pedal
(No. 11R), marked R, to the Right Crank
(No. 14). It should be tightened
CLOCKWISE. Then screw Nylon Nut (No.
26R) COUNTER-CLOCKWISE. Attach the
Left Pedal (No. 11L), marked L, to the Left
Crank (No. 14). It should be tightened
COUNTER-CLOCKWISE. Then screw
Nylon Nut (No. 26L) CLOCKWISE.
Attaching the Pedals (No. 11L/R) to the
wrong Cranks (No. 14) or turning it the
wrong direction will permanently damage
the crank and the pedal.
Now you can fully tighten the 2 Hex
Socket Pan Head Screws (No. 42) and 2
Hex Bolts (No. 32) from step 2, then cover
with 4 Caps (No. 51).