Jer OWNER'S MANUAL Thank you for the purchase of your new SPT product. Please thoroughly read and maintain this manual for future reference. CAUTION: 1. This appliance Is Intended for household only. 2. Never operate this unit if the cord is damaged. In case of damage, the cord must be replaced by the manufacturer, an authorized service agency of a similarly qualified electrician 3. Close supervision Is necessary when this tem Is used by or near hindrance. 4.
1 LEAK ER Ea ee WARNING: To reduce the risk of fire or electric shock, DO NOT use this fan with any solid-state speed control device. Do not operate any fan with a damaged cord or plug. Discard fan or return to an authorized service facility for examination and/or repair. Please read all instructions before using this product. Save theses instructions for easy reference.
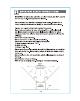
pill 1. Power connection and cutoff for the drop grid selling fan is based on the home electrical wiring. The home electrical wiring must be skipped with all-pole disconnection switch. Connect the black and white lead with live and neutral wire respectively. Adjust the all-pole disconnection switch to "OFF" position whenever the power of the fan needs io be cut off. 2. To search for a proper location for installation, it is suggested that there should be at least 7 5ft between the fan blade and the floor.
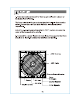
eh Kl i WARNING: Adjust the all-pole disconnection switch to "OFF" position 1.Place the fan on the 3. Run tha home clericalism wires selling grid. through a protection box* and connect with the terminals on the fan. Add insulation to the wines. Amm sof Supping sum 2.install the ceiling fan. 4. Secure the protection box at the location shown In the graphic by two 4mm self-tapping SCREWS. “Ths protection box is a separate component that can be purchased at stores.
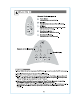
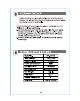
Remote Controller panel 4; Power Button: Press this button to tum convoy unit ## Circulate: Press this button to tum on or off the grille rotation ©: Off-Timer: Press the button to set up auto shut-off timer. The oft timer can be set up to 7 hours 4: Speed control button +: Press this button to Increase fan speed Speed control button -: Press this button to reduce fan speed Remote control display 1. Power: Switch the unit on by pressing "On/Off button. To turn off press the “On/Off” button again. 2.
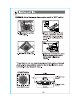
5 ELE Before servicing or cleaning the ceiling fan, tum off power at breaker and lock service disconnecting means to prevent power from being turned on accidentally. 1. Tum the fan off and unplug the power, verify that the fan blade is no longer spinning. 2. Remove the screws from the fan and clean fan with warm moistened soft cloth only. DO NOT pour or splash water on the fan. DO NOT use any abrasive or harsh cleaners, as this may damage the unit, 3.
this product is found to be faulty as a result of faulty materials or workmanship within one year from date of purchase, i will be repaired free of charge. This guarantee is subject to the following term: » Supervention must be notified of the fault. * Proof of purchase must be presented fo Allentown's nominated representative. » The warranty will be void if the product if modified, misused or repaired by an unauthorized parson.