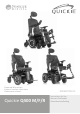
Powered Wheelchair Fauteuil roulant électrique Elektrische rolstoel Quickie Q400 M/F/R Q400 M/F/R Rev.B 000690780.
Wheelchair Components EN We at SUNRISE MEDICAL have been awarded the ISO-9001 certificate, which affirms the quality of our products at every stage, from R & D to production. This products meet the requirements in accordance with EC guidelines. Options or accessories shown are available at extra cost.
Sunrise Medical Thorns Road Brierley Hill West Midlands DY5 2LD England Phone: 0845 605 66 88 Fax: 0845 605 66 89 www.SunriseMedical.co.uk Contents 1.0 User information ��������������������������������������������������� 4 1.1 This user manual ��������������������������������������������������������������4 1.2 For further information ����������������������������������������������������4 1.3 Symbols used in this manual ��������������������������������������������4 2.
ENGLISH 1.0 User information Thank you for choosing a Sunrise Medical wheelchair. Sunrise Medical’s high-quality mobility products are designed to enhance independence and make your everyday life easier. As a part of our ongoing product improvement initiative, Sunrise Medical reserves the right to change specifications and design without notice. However, any changes to information provided for existing users shall be clearly communicated if they are safety critical.
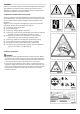
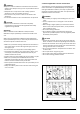
2.0 Safety ENGLISH Follow the instructions carefully next to these warning symbols! Not paying careful attention to these instructions could result in physical injury or damage to the wheelchair or the environment. Wherever possible, safety information is provided in the relevant chapter. 2.1 Symbols and labels used on the product Fig. 2.1 The signs, symbols and instructions affixed to the wheelchair comprise part of the safety facilities. They must never be covered or removed.
ENGLISH 2.3 Safety: Moving parts, (Fig.2.10) Fig.2.9.1 MWD Fig.2.9.2 FWD Fig.2.9.3 RWD DANGER! A wheelchair has moving and rotating parts. Contact with moving parts may result in serious physical injury or damage to the wheelchair. Contact with the moving parts of the wheelchair should be avoided. • Wheels (turning and castor) • Powered tilt in space adjustment • Powered seat elevator option • Powered recline adjustment • Swing-away bracket of the controller 2.
DANGER! This mobility aid uses small parts which under certain circumstances may present a choking hazard to young children. 2.6 Safety: Using a (vehicle mounted) wheelchair lift Wheelchair lifts are used in vans, buses and buildings to help you move from one level to another. DANGER! • Ensure that the user and all carers fully understand the lift manufacturer’s instructions for using the passenger lift. • Never exceed the lift manufacturer’s recommended safe working load and load distribution guidance.
ENGLISH 3.0 Intended use of the wheelchair Fig. 3.1 1 General description The Q400 range is a modular power wheelchair. A feature is the suspension system that allows you to have an ideal driving experince indoors as well as outdoors. Due to its modular design, simplicity and wide range of adjustments, the Quickie Q400 series is a perfect choice for easy service, refurbishment and recycle requirements.
• • • CAUTION! • The user of the wheelchair is at all times completely responsible for complying with the applicable local safety regulations and guidelines. Attendants When an Attendant Control Module is fitted, the Power Wheelchair may be operated by an assistant on behalf of the user. When a Dual Control Module is fitted the Power Wheelchair may be operated by the user, or control may be switched to an assistant to operate on behalf of the user.
ENGLISH 4.0 Setting up the wheelchair Sunrise Medical wheelchairs can be adjusted according to specific needs of the user. In this, we make a distinction between wheelchair settings and wheelchair seating adjustment options. Settings are carried out once, the first time the wheelchair is going to be used. They must be executed by qualified specialist, unless explicitly stated otherwise. Seating adjustment options can be carried out by the user. These adjustment options do not require the use of tools. 4.
DANGER! • Be aware that you may need to adjust the controller settings of your system. • Consult your authorised dealer to adjust the control settings immediately if you notice any change in your ability to: 1. Control the joystick 2. Hold your torso erect 3. Avoid running into objects. 5.1 Checking wheelchair before use Perform the following daily check routine before driving: CAUTION! Checking wheels & tyres • Are the tyres sufficiently inflated (Chapter 8.2).
ENGLISH 5.2 Making a transfer Sunrise Medical recommend that you consult your healthcare professional for assistance in developing your personal front or side transfer technique to best suit your needs and avoid any personal injury. Preparing for a forward transfer: DANGER! It is dangerous to transfer on your own. It requires good balance and agility. Be aware that there is a point during every transfer when the seating system seat is not below you.
• • • • • • DANGER! Remember that the last thing a car or lorry driver expects to see is a wheelchair backing off the kerb into the road. If in any doubt, do not risk crossing the road until you are certain that it is safe. Always cross the road as quickly as possible, there may be other traffic. Do not drive over anything that could cause punctures in the tyres. Ensure that there are no objects in your path that could possibly become lodged in your chair mechanism or in the spokes of the rear wheels.
ENGLISH 5.6 Driving on a slope Your wheelchair has been designed and tested to allow its use on slopes or gradients of up to: Q400 M: 8° (14%) in standard configuration. Q400 F: 8° (14%) in standard configuration. Q400 R: 10° (17.6%) in standard configuration. However, you have the option of adjusting your position with the seat elevator, tilt in space, powered recline or powered centre mount leg rest or a combination of these options.
DANGER! • Never descend a kerb backwards. • Do not attempt to climb or descend a series of steps or use on escalators. It is unsafe to do so and could cause personal injury or damage the chair. This wheelchair has only been designed to climb a single step or kerb. • We recommend that users with upper trunk instability wear restraint systems to keep the upright body position during descending or ascending ramps, kerbs or obstacles. Kerb climbing: Always approach a kerb at 90° (Fig. 5.5).
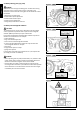
ENGLISH 5.8 Pushing the wheelchair The wheelchair can be moved by pushing. In order to do so, the motors must be disengaged using a freewheel lever. This feature was developed for the attendants of wheelchair users and also functions as an emergency freewheel lever. The freewheel lever has 2 positions 1. For driving the wheelchair. (Fig. 5.6). ‘Drive’ position: Turn the lever so that the lever at the drive wheel side is pointing upwards. 2. For disengaging the motors. (Fig. 5.7 - Fig.5.8).
5.9 (Powered) seating options ENGLISH The wheelchair can be equipped by the following mechanical and/or powered options to adjust your seating position. These options can be operated by the user without the use of tools. Powered adjustable seating options (Fig.5.9 - Fig.5.11). How to operate these powered seating options can be found in & Controller + & Seating: 1. Powered tilt function 2. Powered seat elevator 3. Powered backrest recline 4.
ENGLISH 6.0 Batteries, charging and range 6.1 Batteries Batteries are the power source for almost all of the modern mobility products available today. The design of batteries used in mobility products is significantly different to the batteries used to start a car for example. Car batteries are designed to release a large amount of power over a short period of time, whilst mobility batteries (commonly called deep cycle batteries) release their power evenly, over a long period of time.
Connecting the battery charger & Battery charger: Please read the owner’s manual with the charger supplied carefully. The general procedures and effects for the interference with the chair and the batteries remain valid. Procedure for connecting the charger and charging • Switch off the wheelchair controller. & Controller: • Connect the battery charger round output plug to the charging socket on the front of the joystick module.
ENGLISH Battery Charger 6.3 The range of your vehicle: The external charger has been designed to charge two 12V Gel type batteries connected in series (= 24 V). Please refer to the specification tables at the back of this manual for Energy Consumption, (Maximum Range), information. The chargers have features which prevent hazards or accidents occurring as a result of connecting batteries the wrong way round, overheating caused by fault conditions or attempting to charge wrong voltage batteries.
6.4 Battery warranty: Fig. 6.2 ENGLISH Battery warranties are subject to periods set by the manufacturers. However, most of these warranties are subject to a wear and tear clause, and if you genuinely wear out your batteries in 6 months, it will not be possible to obtain a replacement under warranty. 6.5 Replacing batteries The wheelchair uses two 12V non-spillable ‘dry’ gel batteries in series, these batteries are fully sealed and require no maintenance.
ENGLISH To disconnect the batteries on Front and Rear-wheel drive: • Release the two handle screws under the mid of the seat frame, that connect the seat frame with the seat module interface (step 1) and release the lever (step 2) (Fig.6.6.1 - 6.6.2). • Flip the seat frame backwards (Fig.6.3). • Ensure the seat is secured with the seat stay in place, before letting go, (Fig.6.7 Front - Fig.6.8 Rear). • Lift off the battery box lid, (Fig. 6.4 - B).
7.0 Transportation ENGLISH 7.1 Transport of the wheelchair in a car Getting in and out of the vehicle DANGER! • Confirm that the vehicle is suitably equipped to transport a passenger in a wheelchair, and ensure the method of access/ egress is suitable for your wheelchair type. The vehicle should have the floor strength to take the combined weight of the occupant, the wheelchair and accessories.
ENGLISH • • • • DANGER! The wheelchair can only be secured by using the tie-down points on the wheelchair’s frame (Fig. 7.3). The tie-down points (2 in the front, 2 in the back) are indicated by the tie-down symbol (Fig. 7.2). Fit the front straps first, then the rear. Tension the straps to secure the wheelchair. The wheelchair may not be secured onto any accessories (wishbones, armrests, anti-tip brackets etc.).
A wheelchair secured in a vehicle will not provide the equivalent level of safety and security as a vehicle seating system. Sunrise Medical recommends that the user transfers to the vehicle seating and uses the vehicle-installed restraint system wherever possible.
ENGLISH 7.3 Special transport requirements Using your wheelchair on the train. Before you travel, please contact the train operator. They will be able to supply details of any special requirements/instructions.
The wheelchair’s lifespan is dependent on it being well maintained. For information concerning specific settings, maintenance or repair work, please contact your authorized Sunrise dealer. Always be sure to mention the model, year of manufacture and identification number provided on the identification plate of the wheelchair when contacting your dealer. CAUTION! The wheelchair should be serviced by your authorized Sunrise dealer once a year or, in the case of intensive use, every six months.
ENGLISH Checking controller: • Check the thin rubber gaiter or boot around the base of the joystick shaft for damage or splitting. Check visually only, do not handle the gaiter. • Make sure that all components of the control system are securely mounted. Do not over-tighten any securing screws. Checking controls: • Switch on the hand control – Do the lights flash? This signifies that there is a fault in the electronic system.
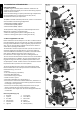
To remove the wheel/tyre: Please see below and next page for photographs. • Remove the colour ring. • Use a 16 mm AF lug nut to loosen the 3-Socket studs, (Fig. 8.2). • Jack the base/battery box up and support it using blocks, • (Fig. 8.3). • Remove the 3 studs and pull the wheel away from the hub. • Remove the valve cap and let the air out of the tyre by gently pressing the valve stem with a small screw driver, (Fig. 8.4).
Fig. 8.8 Fig. 8.9 Fig. 8.10 ENGLISH Fig. 8.7 8.2.4 Removing the castor wheels (M base) (Fig.8.11). • Use a 17.0 mm spanner/socket to undo the axle bolt. • Remove the nyloc nut. Fig. 8.11 Removing the castor wheels (F/R base) (Fig.8.12) • Use a 13.0 mm wrench and 5 mm Allen key to undo loosen the screws. • Remove both screws Refitting: When refitting do not try to force the bolt through. Gently move the wheel back and forth until the bolt slips through then tighten to a torque of 14Nm.
ENGLISH Annually Monthly Daily check routine as described in chapter 5.1 Weekly Daily* Maintenance & Inspection Schedule * Weekly check routine as described in chapter 8.1 * Clean wheelchair upholstery & Seating system * Complete inspection, safety check and service should be made by a Sunrise Medical authorised dealer. * 8.3 Wheels & tyres maintenance To ensure that your wheelchair functions properly, it is essential that the tires are kept at the correct pressure.
ENGLISH 8.4 Lighting maintenance: DANGER! Maintaining lights and indicators is a safety critical task. If your lights and indicator system shows a defect, please contact your Sunrise Medical Approved Dealer. All lights and indicators are state of the art LED low energy, no maintenance units. There are no light bulbs used. The high intrinsic reliability of these units means that they are extremely unlikely to fail under normal usage.
The symbols below mean that in accordance with local laws and regulations your product should be disposed of separately from household waste. When this product reaches the end of its life, take it to the local collection point designated by local authorities. The separate collection and recycling of your product at the time of disposal will help conserve natural resources and ensure that it is recycled in a manner that protects the environment.
ENGLISH 10.0 Trouble shooting If the wheelchair is not working as it should, check the following points. • Check whether the batteries are charged. • Turn the wheelchair off and then back on again. • Check whether the battery plugs are all securely in place. • Check whether the freewheel lever is in the DRIVE position • Check the position of the speed regulator. • Make sure that the controller isn’t locked & Controller If the problem has not been resolved: • & Controller 11.
Model Q400 series Type / configuration Maximum user weight In combination with Sedeo Lite In combination with Sedeo Pro EN12184 class: 136 kg 136 kg ENGLISH Q400 M Mid wheel drive 300 lbs. 300 lbs.
Model Q400 series ENGLISH Type / configuration Q400 F Front wheel drive Maximum user weight In combination with Sedeo Lite In combination with Sedeo Pro EN12184 class: 136 kg 136 kg 300 lbs. 300 lbs.
Model Q400 series Q400 R Rear wheel drive Maximum user weight In combination with Sedeo Lite In combination with Sedeo Pro EN12184 class: 136 kg 136 kg ENGLISH Type / configuration 300 lbs. 300 lbs.
ENGLISH Technical specifications: SEDEO Lite seating system Metric system values Minimum Seat angle adjustment Powered tilt with COG adjustment Powered tilt with COG adjustment Powered tilt with COG adjustment Effective seat depth Effective seat width optional optional optional Maximum 0° - 30° -5° - 25° 0° - 50° 410 mm 560 mm 385 mm 510 mm Imperial system values & alternative Minimum Maximum -5° - 25° 0° - 30° 0° - 50° 16.1" 15.2" 22.0" 20.
Minimum Swing away SEDEO LITE legrests, manual elevating / power elevating Lower leg length (from seatplate) Knee angle Ankle angle Swing away UNI legrests Lower leg length (from seatplate) Knee angle Ankle angle Swing away SEDEO PRO legrests Lower leg length (from seatplate) Knee angle Ankle angle Swing away SEDEO PRO legrests, manual elevating / power elevating Lower leg length (from seatplate) Knee angle Ankle angle SEDEO Multi-Position headrest mount Headrest height adjustment range Headrest depth adjus
ENGLISH Technical specifications: SEDEO Pro seating system Seat angle adjustment Powered tilt with COG adjustment Powered tilt with COG adjustment Powered tilt with COG adjustment Powered tilt with COG adjustment Effective seat depth Effective seat width Seat to floor height Filler Module (No powered tilt in space, no seat elevator) pos. 1 60 or 80 Ah batteries pos. 2 60 or 80 Ah batteries pos. 3 60 or 80 Ah batteries pos. 4 60 or 80 Ah batteries Powered tilt & seat elevator (300 mm) pos.
12.0 Warranty ENGLISH THIS GUARANTEE DOES NOT AFFECT YOUR LEGAL RIGHTS IN ANY WAY. Sunrise Medical* provides a guarantee, as set out in the warranty conditions, for products to its customers covering the following. Warranty conditions: 1. Should a part or parts of the product require repair or replacement as a result of a manufacturing and/or material fault within 24 months, then the affected part or parts will be repaired or replaced free of charge. The warranty will only cover manufacturing defects 2.
FRANÇAIS Pour toute question relative à l’utilisation, à l’entretien ou à la sécurité de votre fauteuil roulant, contactez votre revendeur agréé Sunrise Medical. Si vous ne connaissez aucun revendeur dans votre région ou si vous avez des questions supplémentaires, vous pouvez écrire ou téléphoner à : Sunrise Medical S.A.S ZAC de la Vrillonnerie 17 Rue Mickaël Faraday 37170 Chambray-Lès-Tours Tel : +33 (0) 247554400 Fax : +30 (0) 247554403 www.sunrisemedical.fr Sommaire 1.
Nous vous remercions d’avoir choisi un fauteuil roulant Sunrise Medical. Sunrise Medical proposent des produits de mobilité de qualité conçus pour renforcer votre indépendance et faciliter la réalisation de vos activités quotidiennes. Dans le cadre d'une initiative d'amélioration continue de produit, Sunrise Medical se réserve le droit de modifier les spécifications et le modèle sans préavis.
FRANÇAIS 2.0 Sécurité Respectez toujours scrupuleusement les consignes apparaissant en regard des symboles d'avertissement. Le non-respect des instructions peut causer des blessures physiques, l'endommagement du fauteuil roulant ou la dégradation de l'environnement. Dans la mesure du possible, les informations relatives à la sécurité sont fournies dans le chapitre consacré à ce sujet. Fig. 2.1 2.
2.3 Sécurité : Organes mobiles (Fig. 2.10) Fig. 2.9.1 RMC Fig. 2.9.2 RMT Fig. 2.9.3 RMP FRANÇAIS DANGER ! Le fauteuil roulant possède des pièces mobiles et rotatives. Tout contact avec les organes mobiles peut entraîner de graves blessures ou endommager le fauteuil. Il convient d'éviter tout contact avec les organes mobiles du fauteuil.
FRANÇAIS 2.5 Sécurité : Risque d'étouffement 2.7 Sécurité : Tablettes DANGER ! Ce fauteuil est composé de petites pièces qui, dans certaines conditions, peuvent présenter un risque d'étouffement pour les jeunes enfants. Sécurité : Tablette escamotable : 2.6 Sécurité : Utilisation d'un élévateur fixé à un véhicule On trouve les élévateurs de fauteuils roulants dans certains vans, bus et immeubles pour vous permettre de passer d’un niveau/étage à l’autre.
Fig. 3.1 1 Description générale Le fauteuil Q400 est un modèle électrique modulaire. Il se distingue par son système de suspension qui permet des conditions de déplacement idéales à l’intérieur comme à l’extérieur. De conception modulaire, simple et bénéficiant d'une variété de réglages, le Quickie Q400 est un excellent fauteuil qui permet un entretien, un recyclage et une remise en état simplifiés. La série Q400 satisfera les besoins, circonstances ou préférences personnelles.
FRANÇAIS • • • • AVERTISSEMENT ! Si vous êtes sous l'influence de médicaments susceptibles d'entraver votre capacité de conduite, vous n'êtes pas autorisé à utiliser le fauteuil roulant. Une vision adéquate est exigée pour opérer le fauteuil en toute sécurité dans l'environnement de l'utilisateur. Le fauteuil n'est pas prévu pour être occupé par plus d'une personne à la fois. Ne laissez pas les enfants utiliser le fauteuil roulant sans surveillance.
Les fauteuils Sunrise Medical peuvent être ajustés en fonction des besoins des utilisateurs. À cet égard, nous faisons la distinction entre les paramètres de configuration du fauteuil et les options de réglage d'assise. Les réglages sont effectués une seule fois, lorsque le fauteuil est sur le point d'être utilisé. Les réglages doivent être réalisés par un spécialiste, sauf indication contraire. Les réglages d'assise peuvent être effectués par l'utilisateur.
5.0 Utilisation du fauteuil roulant FRANÇAIS DANGER ! • Les paramètres du boîtier de commande devront éventuellement être ajustés. • Contactez immédiatement votre revendeur agréé afin de faire contrôler la configuration de vos paramètres si vous remarquez un changement dans votre capacité à : 1. Contrôler le joystick 2. Maintenir votre torse droit 3. Eviter les obstacles. 5.
5.3 Conduite du fauteuil roulant Sunrise Medical vous recommande de consulter un spécialiste qui vous aidera à développer une technique personnelle pour monter et descendre d’un fauteuil roulant, frontalement ou latéralement. Vous éviterez ainsi tout risque d’accident et d'éventuelles blessures. AVERTISSEMENT • Il incombe à l'utilisateur du fauteuil roulant de respecter les réglementations locales en vigueur relatives à la sécurité.
FRANÇAIS Utilisation sur la route Soyez très attentif à la circulation sur la route. • • • • • • DANGER ! N’oubliez pas que les chauffeurs de voitures ou de camions ne s’attendent certainement pas à voir un fauteuil roulant descendre d’un trottoir en marche arrière. S’il y a le moindre danger, ne prenez pas le risque de traverser la route. Traversez toujours les routes le plus rapidement possible. Ne conduisez pas sur des objets qui pourraient crever les pneus.
Votre fauteuil roulant a été conçu et testé pour être utilisé sur une pente maximale de : Q400 M : 8° (14%) en configuration standard. Q400 F : 8° (14%) en configuration standard. Q400 R : 10° (17,6%) en configuration standard. Vous pouvez cependant ajuster votre position avec le lift, le mécanisme de bascule d’assise, le mécanisme électrique d’inclinaison du dossier ou le repose-jambes central électrique ou ces options combinées.
5.7 Obstacles et trottoirs : FRANÇAIS DANGER ! • Ne descendez jamais d'un trottoir en marche arrière. • N’essayez pas de monter ou de descendre des marches, ni d'emprunter les escalators. Cela est très dangereux et vous pourriez vous blesser et endommager votre fauteuil roulant. Ce fauteuil a été conçu pour monter un trottoir ou une marche à la fois.
5.8 Pousser le fauteuil roulant FRANÇAIS Le fauteuil roulant peut également être poussé. Pour ce faire, les moteurs doivent être débrayés à l'aide du levier de débrayage. Cette caractéristique, pensée pour les accompagnateurs, sert également de levier de débrayage d'urgence. Le levier de débrayage possède 2 positions 1. Pour la conduite du fauteuil : (Fig. 5.6). Position ‘Conduite’ : Tournez le levier de sorte que le levier situé du côté de la roue motrice soit orienté vers le haut. 2.
FRANÇAIS 5.9 Options d'assise (électriques) Le fauteuil peut être équipé des options mécaniques et/ou électriques suivantes pour ajuster votre position d'assise. Ces options peuvent être actionnées sans utiliser d'outils. Options d'assise électriques (Fig. 5.9 - Fig. 5.11). Vous trouverez les consignes relatives aux options d’assise électriques dans le & Boîtier de commande + & : 1. Option de bascule d’assise électrique 2. Option du lift électrique 3. Option d'inclinaison de dossier électrique 4.
6.0 Batteries, recharge et autonomie Les batteries sont la source d’énergie de pratiquement tous les véhicules modernes de mobilité fabriqués aujourd’hui. La conception des batteries utilisées pour les véhicules de mobilité est radicalement différente de celles utilisées pour démarrer les voitures.
FRANÇAIS 6.2 Recharger les batteries : & Chargeur de batteries : Lisez attentivement le manuel d’utilisation fourni avec le chargeur. Les procédures générales et les effets d’interférence avec le fauteuil et les batteries restent valides. Consignes relatives à l’entretien des batteries Connexion du chargeur de batterie Procédure de connexion du chargeur et recharge • Mettez le boîtier de commande hors tension.
Le chargeur externe a été conçu pour recharger deux batteries gel de 12 volts connectées en série (= 24 V). Les chargeurs sont dotés de caractéristiques prévenant tout risque d’accident susceptible de survenir à la suite d’un mauvais branchement des batteries, d’une surchauffe résultant d’un emplacement du chargeur dans un endroit contre-indiqué ou d’une recharge des batteries à une tension autre que celle indiquée.
FRANÇAIS 6.4 Garantie des batteries : Fig. 6.2 Les garanties couvrant les batteries sont soumises à des périodes définies par les fabricants. Cependant, la plupart des garanties sont sujettes à une disposition spécifique relative à l’usure. Par conséquent, si l’une de vos batteries venait à être complètement usée au bout de 6 mois, il vous sera impossible d’en obtenir une en faisant jouer la garantie. 6.
Fig. 6.6.1 RMT FRANÇAIS Pour débrancher les batteries des modèles roue motrice traction/propulsion : • Dévissez les deux molettes filetées situées sous le châssis du siège qui relient le châssis du siège à l’interface du module du siège (étape 1), et relâchez le levier (étape 2) (Fig. 6.6.1 - 6.6.2). • Rabattez le châssis du siège vers l’arrière (Fig. 6.3). • Vérifiez d’avoir bien placé la béquille du siège pour éviter qu’il ne se referme accidentellement (Fig. 6.7 avant - Fig. 6.8 arrière).
7.0 Transport FRANÇAIS 7.1 Transport du fauteuil à bord d'un véhicule motorisé Monter et descendre du véhicule DANGER ! • Faites vous confirmer que le véhicule est correctement équipé pour transporter un passager dans un fauteuil roulant, et assurez-vous que la méthode d'accès/de sortie est convenable pour votre type de fauteuil roulant. Le sol du véhicule doit être suffisamment résistant pour supporter le poids combiné de l'utilisateur, du fauteuil roulant et des accessoires.
• • • Fig. 7.2 FRANÇAIS • DANGER ! Le fauteuil doit impérativement être arrimé à l'aide des points de retenue prévus sur le châssis du fauteuil (Fig. 7.3). Les points d'arrimage (2 à l'avant et 2 à l'arrière) sont indiqués par les symboles d'ancrage (Fig. 7.2). Commencez par attacher les sangles à l'avant du fauteuil, puis les sangles à l'arrière. Tendez les sangles pour immobiliser le fauteuil. Le fauteuil ne peut pas être arrimé à des accessoires (accoudoirs, support anti-bascule, etc.).
FRANÇAIS 7.2 Utilisation du fauteuil comme siège passager Un fauteuil roulant arrimé dans un véhicule n'assurera pas le même niveau de sécurité que les sièges du véhicule. Sunrise Medical recommande d'utiliser, dans la mesure du possible, les sièges du véhicule et leur système de retenue.
Utilisation du fauteuil à bord d'un train. Avant d'entreprendre votre voyage, contactez la compagnie de chemin de fer. pour obtenir toutes les informations relatives aux conditions/instructions particulières.
FRANÇAIS 8.0 Entretien et nettoyage La durée de vie du fauteuil dépend directement de la qualité de son entretien. Pour toute information concernant les paramètres spécifiques, la maintenance ou les réparations, contactez votre revendeur agréé Sunrise Medical. Lorsque vous contactez votre revendeur, munissez-vous toujours des informations suivantes : modèle, année de fabrication et numéro d'identification. Ces informations sont indiquées sur la plaque signalétique du fauteuil.
Vérification des commandes : • Allumez le manipulateur de commande – Les voyants clignotent-ils ? Cela signifie qu'il y a une anomalie dans le système électronique. Reportez-vous au chapitre 9 pour obtenir des informations sur le dépannage. • Activez toutes les options électriques, y compris les feux et les clignotants (le cas échéant) pour vérifier qu'ils fonctionnent bien. • Après avoir élevé le siège, démarrez le fauteuil pour voir si le mode Réducteur s'active afin de ralentir le fauteuil.
Pour déposer la roue/le pneu : Veuillez vous référer aux photos ci-dessous et de la page suivante. • Retirez l’anneau coloré. • À l’aide d’un écrou de roue AF de 16 mm, dévissez les 3 boulons (Fig. 8.2). • Surélevez le compartiment à batteries / la base à l’aide d’un cric et faites-le reposer sur une cale, • (Fig. 8.3). • Retirez les 3 boulons et tirez la roue pour la sortir du moyeu.
Fig. 8.8 Fig. 8.9 Fig. 8.10 FRANÇAIS Fig. 8.7 8.2.4 Retrait des roues directrices (base M) (Fig. 8.11). • À l'aide d'une clé/douille de 17 mm, dévissez le boulon d'essieu. • Retirez l'écrou Nyloc. Fig. 8.11 Retrait des roues directrices (base F/R) (Fig. 8.12) • Utilisez une clé de 13,0 mm et une clé hexagonale de 5 mm pour desserrer les vis. • Retirer les deux vis. Remontage : Lorsque vous remontez la roue, ne forcez pas pour faire passer le boulon.
FRANÇAIS Annuel Mensuel Contrôles de routine quotidiens énoncés au chapitre 5.1 Hebdomadaire Quotidien* Programme d'entretien et d'inspection * Contrôles de routine hebdomadaires énoncés au chapitre 8.1 * Nettoyage de la toile du fauteuil & Système d'assise * Inspection complète, contrôle de sécurité et révision effectués par un revendeur agréé Sunrise Medical. * 8.
DANGER ! L'entretien des feux et des clignotants est une opération cruciale pour la sécurité. Si vous remarquez une anomalie avec les feux ou les clignotants, contactez votre revendeur agréé Sunrise Medical. Les feux et les clignotants sont des unités à LED dernier cri sans maintenance et à faible consommation. Ils n'intègrent aucune ampoule. De par leur haute fiabilité intrinsèque, le risque de voir ces unités tomber en panne est extrêmement faible en condition d'utilisation normale.
FRANÇAIS 9.0 Enlèvement Le symbole ci-dessous signifie que votre produit doit être mis au rebut séparément de vos autres déchets ménagers, conformément aux réglementations et lois locales. Lorsque le produit atteint la fin de son cycle de vie, veuillez l'emmener aux points de ramassage conçus à cet effet par les autorités locales.
10.0 Dépannage FRANÇAIS Si le fauteuil ne fonctionne pas normalement, vérifiez ce qui suit. • Vérifiez que les batteries sont chargées. • Éteignez, puis rallumez le fauteuil. • Vérifiez que les fiches des batteries sont bien connectées. • Vérifiez que le levier de débrayage est en position CONDUITE • Vérifier la position du régulateur de vitesse. • Vérifiez que le boîtier de commande n'est pas verrouillé & Boîtier de commande Si le problème persiste : • & Boîtier de commande 11.
Modèle Série Q400 Type / configuration Q400 M FRANÇAIS Roue motrice centrale Charge maximale Avec le Sedeo Lite Avec le Sedeo Pro EN12184 classe : 136 kg 136 kg 300 lbs. 300 lbs.
Modèle Série Q400 Type / configuration Charge maximale Avec le Sedeo Lite Avec le Sedeo Pro EN12184 classe : 136 kg 136 kg 300 lbs. 300 lbs.
Type / configuration Modèle Série Q400 Q400 R FRANÇAIS Roue motrice propulsion Charge maximale Avec le Sedeo Lite Avec le Sedeo Pro EN12184 classe : 136 kg 136 kg 300 lbs. 300 lbs.
Caractéristiques techniques : Système d’assise SEDEO Lite >>> Minimum Réglage de l’angle d’inclinaison du siège Bascule d’assise électrique avec compensation (en option) Bascule d’assise électrique avec compensation (en option) Bascule d’assise électrique avec compensation (en option) Profondeur utile du siège Largeur utile du siège Hauteur sol-siège Module d’assise manuel (sans mécanisme électrique de bascule d’assise, sans lift) Pos. 1 Batteries 60 A Angle d’assise de 0° Pos.
Caractéristiques techniques : Système d’assise SEDEO Lite FRANÇAIS Valeurs du système métrique Minimum Potences SEDEO LITE Longueur du segment jambier (à partir de la plaque d'assise) Angle genou Angle d'inclinaison au niveau des chevilles Repose-jambes SEDEO LITE manuels/électriques Longueur du segment jambier (à partir de la plaque d'assise) Angle genou Angle d'inclinaison au niveau des chevilles Repose-jambes escamotables UNI Longueur du segment jambier (à partir de la plaque d'assise) Angle genou Angl
Réglage de l’angle d’inclinaison du siège Bascule d’assise électrique avec ajustement du centre de gravité en option Bascule d’assise électrique avec ajustement du centre de gravité en option Bascule d’assise électrique avec ajustement du centre de gravité en option Bascule d’assise électrique avec ajustement du centre de gravité en option Profondeur utile du siège Largeur utile du siège Hauteur sol-siège Module d’assise manuel (sans mécanisme électrique de bascule d’assise, sans lift) Angle d’inclinaison d
12.0 Garantie FRANÇAIS CELA N'AFFECTE EN AUCUN CAS VOS DROITS LEGAUX. La garantie de Sunrise Medical* est détaillée dans les conditions de garantie suivantes. Conditions de garantie : 1. Si une ou plusieurs pièces devaient être remplacées ou réparées suite à un vice de fabrication et/ou de matériel dans les 24 mois, la ou les pièces seront remplacées ou réparées gratuitement. La garantie ne couvre que les vices de fabrication. 2.
Sunrise Medical B.V. Groningenhaven 18-20 3433 PE Nieuwegein The Netherlands Phone: 31 (0)30 - 60 82 100 www.SunriseMedical.co.uk Inhoudsopgave 1.0 Gebruikersinformatie �������������������������������������������82 1.1 Deze gebruikershandleiding �������������������������������������������82 1.2 Voor meer informatie �����������������������������������������������������82 1.
NEDERLANDS 1.0 Gebruikersinformatie Wij danken u dat u hebt gekozen voor een Sunrise Medical rolstoel. De hoogwaardige mobiliteitsproducten van Sunrise Medical zijn ontworpen om de onafhankelijkheid te vergroten en uw dagelijkse leven gemakkelijker te maken. Wij streven naar voortdurende verbetering van onze producten. Daarom houdt Sunrise Medical zich het recht voor specificaties en ontwerp zonder kennisgeving te wijzigen.
Volg de aanwijzingen naast deze waarschuwingssymbolen nauwgezet op! Wanneer deze instructies niet nauwkeuring in acht worden genomen, kan dit leiden tot fysiek letsel, schade aan de rolstoel of schade aan de omgeving. Waar mogelijk wordt in het betreffende hoofdstuk veiligheidsinformatie verschaft. Fig. 2.1 2.1 De symbolen en labels op het product De tekens, symbolen en instructies die op de rolstoel zijn bevestigd, maken deel uit van de veiligheidsvoorzieningen. Ze mogen nooit worden bedekt of verwijderd.
NEDERLANDS 2.3 Veiligheid: Bewegende delen (Fig. 2.10) Fig. 2.9.1 MWD GEVAAR! Een rolstoel heeft bewegende en roterende delen. Contact met bewegende delen kan leiden tot ernstig lichamelijk letsel of schade aan de rolstoel. Contact met de bewegende delen van de rolstoel moet worden vermeden. • Wielen (aandrijfwiel en zwenkwiel) • Elektrische kantelverstelling • Elektrische hoog/laagverstelling • Elektrische rughoekverstelling • Wegzwenkbare stuurkasthouder 2.
GEVAAR! In dit mobiliteitshulpmiddel zijn kleine onderdelen verwerkt die onder bepaalde omstandigheden een verstikkingsgevaar voor kleine kinderen kunnen vormen. 2.6 Veiligheid: Gebruik van een (op een voertuig bevestigde) rolstoellift In bussen, minibussen en gebouwen worden rolstoelliften gebruikt om u te helpen van een bepaald niveau naar een ander niveau te komen.
3.0 Bedoelde gebruik van de rolstoel Fig. 3.1 1 NEDERLANDS Algemene beschrijving De Q400-serie is een volledig modulaire elektrische rolstoel. Dankzij het veersysteem is het rijgedrag van de rolstoel zowel binnen als buiten ideaal. Het modulaire ontwerp, de eenvoud en de vele in- en verstelmogelijkheden zorgen ervoor dat de Quickie Q400 serie makkelijk is in onderhoud en zeer geschikt om te herverstrekken.
• • • OPGELET! • De gebruiker van de rolstoel is altijd volledig verantwoordelijk voor de naleving van de toepasselijke, lokale veiligheidsvoorschriften en -richtlijnen. Begeleiders Wanneer de stoel is uitgerust met een begeleidingsbesturing, kan de elektrische stoel namens de gebruiker worden bestuurd door een begeleider. Wanneer de elektrische rolstoel is uitgerust met een begeleidersbesturing, kan de rolstoel worden bediend door de gebruiker of kan de besturing worden overgezet naar de begeleider.
NEDERLANDS 4.0 Instellen van de rolstoel De rolstoelen van Sunrise Medical kunnen worden aangepast aan de specifieke behoeften van de gebruiker. Daarbij maken we een onderscheid tussen rolstoelinstellingen en opties om de zitting van de rolstoel aan te passen. De rolstoel wordt éénmalig ingesteld bij de eerste keer dat de rolstoel wordt gebruikt. Dit moet door een gekwalificeerde specialist worden gedaan, tenzij nadrukkelijk anders wordt aangegeven.
GEVAAR! • Wees erop bedacht dat u mogelijk de instellingen van de bediening van uw systeem moet aanpassen. • Overleg direct met uw erkende dealer om de instellingen van de bediening aan te passen als u veranderingen opmerkt in uw vermogen om: 1. De joystick te bedienen 2. Houd uw bovenlijf rechtop 3. Vermijd botsingen met voorwerpen. 5.
5.2 Overplaatsen NEDERLANDS Sunrise Medical adviseert dat u samen met uw arts of therapeut de voor u meest geschikte in- en uitstaptechniek (voorwaarts of zijwaarts) ontwikkelt om persoonlijk letsel te vermijden. Voorbereiding voor een voorwaartse overplaatsing: GEVAAR! Het kan gevaarlijk zijn om zelf in- en uit de rolstoel te stappen. Hiervoor is een goede balans en handigheid vereist. Wees erop bedacht dat er tijdens iedere overplaatsing een moment komt dat u het zitsysteem niet onder u hebt.
• • • • • • GEVAAR! Het laatste dat een bestuurder van een auto of vrachtwagen verwacht, is een rolstoel die achterwaarts van de stoep de weg op rijdt. Als u twijfelt, steek dan niet de weg over, maar wacht tot u er zeker van bent dat het wel veilig is om over te steken. Steek de weg altijd zo snel mogelijk over om ander verkeer te vermijden. Rij niet over voorwerpen die gaatjes in de banden kunnen veroorzaken.
NEDERLANDS 5.6 Rijden op een helling Uw rolstoel is ontworpen en getest op gebruik op hellingen van maximaal: Q400 M: 8° (14%) in standaard configuratie. Q400 F: 8° (14%) in standaard configuratie. Q400 R: 10° (17,6%) in standaard configuratie. U hebt echter de mogelijkheid om uw zitpositie aan te passen via de zitlift, de kantelverstelling, de rughoekverstelling, de beensteunen of via een combinatie van deze mogelijkheden.
GEVAAR! • Rijd nooit achterwaarts van een stoep af. • Rijd nooit een (rol)trap op- of. Dit is niet veilig en kan leiden tot persoonlijk letsel en beschadiging van de rolstoel. Deze rolstoel is ontworpen om slechts één enkele tree of stoeprand op-of af te rijden. • We adviseren dat gebruikers met een verminderde rompbalans veiligheidsgordels dragen om het lichaam rechtop te houden bij het op- of afgaan van hellingen, stoepranden of andere obstakels.
NEDERLANDS 5.8 Duwen van de rolstoel De rolstoel kan verplaatst worden door deze te duwen. Hiertoe moeten de motoren via een vrijloophendel ontkoppeld zijn. Deze functie is ontwikkeld voor begeleiders van rolstoelgebruikers en functioneert tevens als vrijloop in geval van nood. De vrijloophendel kent 2 posities 1. Om met de rolstoel te rijden. (Fig. 5.6). Positie 'Rijden': Draai de hendel zodanig dat deze aan de kant van het aandrijfwiel naar boven wijst. 2. Om de motoren te ontkoppelen: (Fig. 5.7 - Fig.
(Elektrisch aangedreven) zitopties De rolstoel kan met de volgende mechanische en/of elektrische verstellingen worden voorzien om de zitpositie aan te passen. Deze verstellingen kunnen door de gebruiker zonder gereedschap gebruikt worden. Elektrische zitverstellingen (Fig. 5.9 - Fig. 5.11). Hoe deze elektrisch aangedreven zitopties worden bediend, staat in & Bediening + & Zitsysteem: 1. Elektrische kantelverstelling 2. Elektrische hoog/laagverstelling 3. Elektrische rughoekverstelling 4.
6.0 Accu's, opladen en bereik NEDERLANDS 6.1 Accu's Accu’s vormen de krachtbron voor bijna alle moderne mobiliteitsproducten die tegenwoordig verkrijgbaar zijn. Het ontwerp van accu's die in mobiliteitsproducten worden gebruikt is wezenlijk anders dan bijvoorbeeld een accu van een auto. Auto-accu's zijn ontworpen om een grote hoeveelheid stroom te leveren in een korte periode, terwijl mobiliteitsaccu's (doorgaans "deep cycle" accu genoemd), hun vermogen gelijkmatig gedurende een lange tijdsduur afgeven.
Aansluiten van de accu-oplader & Acculader: Lees de gebruiksaanwijzing die met de oplader is meegeleverd, zorgvuldig door. De algemene procedures en effecten betreffende interferentie van de rolstoel en de accu's blijven van kracht. Aansluiten van oplader en opladen • Schakel de bediening van de rolstoel uit. & Bediening: • Steek de ronde stekker van de acculader in het contact van de lader aan de voorzijde van de joystickmodule.
NEDERLANDS Acculader 6.3 Het bereik van uw voertuig: De externe oplader is ontworpen om twee in serie geplaatste 12 V gelaccu's (= 24V) op te laden. Kijk voor energieverbruik (maximale actieradius) in de tabellen met specificatie achterin deze handleiding. De opladers zijn voorzien van veiligheidsfuncties om gevaar of ongelukken te voorkomen. Hierbij kunt u denken aan het verkeerd om plaatsen van de accu's, oververhitting door storingen, of het opladen van accu's met een ander voltage.
6.4 Garantie op de accu's: Fig. 6.2 NEDERLANDS De garantie op de accu's is afhankelijk van de termijn zoals bepaald door de fabrikant. Voor de meeste garantievoorwaarden geldt echter een gebruik- en slijtageclausule. Als uw accu na 6 maanden versleten is, is het niet mogelijk onder de garantiebepalingen een nieuwe accu te verkrijgen. 6.5 Vervangen van accu's De rolstoel gebruikt twee in serie geplaatste 12V gesloten 'droge' gelaccu's. Deze accu's zijn volledig verzegeld en vereisen geen onderhoud.
NEDERLANDS Om de accu's op de voorwiel- en achterwielaandrijver af te koppelen: • Stap 1: maak de twee schroeven van de hendel onder het midden van het zittingframe los (deze verbinden het zittingframe met de interface van de zitmodule); stap 2: ontkoppel de hendel (Fig. 6.6.1 - 6.6.2). • Duw het frame van de zitting achterwaarts (Fig. 6.3). • Controleer, voordat u het frame loslaat, of de zitting via de vergrendeling is vergrendeld (fig. 6.7 voorzijde - fig. 6.
7.0 Transport 7.1 Vervoer van de rolstoel in een auto GEVAAR! • Controleer of het voertuig over de juiste hulpmiddelen beschikt om een passagier in een rolstoel te vervoeren. Controleer tevens of de methode om in en uit het voertuig te komen, geschikt zijn voor uw type rolstoel. De vloer van het voertuig moet sterk genoeg zijn om het gecombineerde gewicht van de rolstoel, de persoon die in de stoel zit en de accessoires te dragen.
• NEDERLANDS • • • GEVAAR! De rolstoel kan uitsluitend worden vastgezet via de verankeringspunten op het rolstoelframe (Fig. 7.3). De verankeringspunten (2 aan de voorzijde, 2 aan de achterzijde), worden aangegeven met het verankeringssymbool (Fig. 7.2). Bevestig eerst de voorste banden, daarna de achterste. Trek de banden aan om de rolstoel vast te zetten. De rolstoel mag niet worden vastgezet aan de accessoires (draagarmen, armsteunen, antitipbeugels, etc.).
Een in een voertuig vastgezette rolstoel biedt niet dezelfde veiligheid als een normale stoel en veiligheidssysteem in dat voertuig. Sunrise Medical adviseert dat de rolstoelgebruiker, waar mogelijk, gebruik maakt van de stoelen en de daarbij behorende veiligheidsgordels van het voertuig. Sunrise Medical erkent dat het niet altijd praktisch is om een rolstoelgebruiker over te brengen naar een gewone stoel in het voertuig.
NEDERLANDS 7.3 Speciale vereisten ten aanzien van transport Gebruik van uw rolstoel in de trein. Neem voordat u op reis gaat, contact op met de treinmaatschappij. Zij kunnen u informatie verschaffen over speciale eisen/aanwijzingen.
De levensduur van de rolstoel is afhankelijk van goed onderhoud. Voor informatie over specifieke instellingen, onderhoud en reparaties kunt u contact opnemen met uw erkende Sunrise dealer. Zorg ervoor dat u altijd het model, het productiejaar en het identificatienummer noemt wanneer u contact opneemt met uw dealer. (Deze informatie staat vermeld op het identificatieplaatje op de rolstoel.
NEDERLANDS Controleer de bediening: • Controleer het dunne rubberen omhulsel aan de onderkant van de joystickhendel op schade en scheuren. Controleer dit alleen visueel, kom er niet aan. • Controleer of alle onderdelen van het bedieningssysteem goed vastgemaakt zijn. Draai veiligheidsschroeven niet overmatig vast aan. Controleer de bediening: • Schakel de handbediening in - Gaan de lampjes knipperen? Dit duidt op een storing in het elektrische circuit. Zie hoofdstuk 9 voor eenvoudige probleemoplossing.
Terugplaatsen • Plaats de binnenband in de band en laat de band op de buitenring rusten. • Leg daarbij het ventiel op de daarvoor bestemde uitsparing in de rand. • Daarbij moet het ventiel naar buiten wijzen. • Plaats de binnenring over de band, binnenband en buitenring. • Plaats daarbij de uitsparing voor het ventiel over het ventiel. De uitsparingen in de binnen- en buitenring en het ventiel moeten overeenkomen, (Fig. 8.10). • Controleer of de moeren in lijn zijn op beide ringen.
Fig. 8.8 Fig. 8.9 Fig. 8.10 NEDERLANDS Fig. 8.7 8.2.4 Verwijderen van de zwenkwielen (M-basis) (Fig. 8.11). • Gebruik een moer- of dopsleutel 17,0 mm om de asbout los te maken. • Verwijder de nyloc moer. Fig. 8.11 Verwijderen van de zwenkwielen (V/A-basis) (Fig. 8.12). • Gebruik een 13 mm moersleutel en een 5 mm inbussleutel om de schroeven los te maken. • Verwijder beide schroeven Opnieuw plaatsen: Duw de bout nooit met grote kracht door de ring bij het monteren.
NEDERLANDS Jaarlijks Maandelijks Dagelijkse controle zoals beschreven in hoofdstuk 5.1 Wekelijks Dagelijks* Onderhouds- en inspectieschema * Wekelijkse controle zoals beschreven in hoofdstuk 8.1 * Reinig bekleding van rolstoel & Zitsysteem * Een volledige controle, veiligheidscontrole en servicebeurt dient uitgevoerd te worden door een erkende Sunrise Medical dealer. * 8.
NEDERLANDS 8.4 Onderhoud van verlichting: GEVAAR! Het onderhoud van verlichting en knipperlichten is een taak waarbij de veiligheid in geding kan komen. Als er sprake is van een storing in de verlichting en/of richtingaanwijzers van uw rolstoel, neem dan contact op met uw erkende Sunrise Medical dealer. Alle verlichting en richtingaanwijzers bestaan uit de modernste LED-verlichting met laag energieverbruik; het zijn units die geen onderhoud vereisen. Er worden geen gloeilampen gebruikt.
Het hieronder vermelde symbool betekent dat uw product aan het einde van zijn levensduur in overeenstemming met lokale wet- en regelgeving afgevoerd dient te worden, gescheiden van huishoudelijk afval. Wanneer dit product niet langer gebruikt kan worden, breng het dan naar het door de plaatselijke overheid aangewezen plaatselijke afvalverzamelpunt.
NEDERLANDS 10.0 Mogelijke problemen Als de rolstoel niet naar behoren functioneert, controleer dan de volgende punten: • Controleer of de accu's opgeladen zijn. • Zet de rolstoel uit en dan weer aan. • Controleer of alle accustekkers goed op de juiste plaats vastzitten. • Controleer of de vrijloophendel in de positie RIJDEN staat. • Controleer de positie van de snelheidsregelaar.
Model Q400 serie Type/configuratie Max. gebruikersgewicht In combinatie met Sedeo Lite In combinatie met Sedeo Pro EN12184 klasse: 136 kg 136 kg 300 lbs. 300 lbs.
Model Q400 serie Type/configuratie Q400 F NEDERLANDS Voorwielaandrijving Max. gebruikersgewicht In combinatie met Sedeo Lite In combinatie met Sedeo Pro EN12184 klasse: 136 kg 136 kg 300 lbs. 300 lbs.
Model Q400 serie Q400 R Achterwielaandrijving Max. gebruikersgewicht In combinatie met Sedeo Lite In combinatie met Sedeo Pro EN12184 klasse: 136 kg 136 kg 300 lbs. 300 lbs.
Technische specificaties: Zitsysteem SEDEO Lite NEDERLANDS Waarden metrieke stelsel Minimum Aanpassing zithoek Elektrische kantelverstelling met zwaartepuntverplaatsing - optioneel Elektrische kantelverstelling met zwaartepuntverplaatsing - optioneel Elektrische kantelverstelling met zwaartepuntverplaatsing - optioneel Effectieve diepte zitsysteem Effectieve breedte zitsysteem Hoogte zitting tot bodem Vulmodule (geen elektrische kantelverstelling, geen zitlift) pos. 1 60 Ah Accu's 0° zithoek pos.
Wegzwenkbare SEDEO LITE beensteunen Onderbeenlengte (vanaf zitplaat) Kniehoek Enkelhoek Wegzwenkbare SEDEO LITE beensteunen, lengte compenserend/ elektrisch Onderbeenlengte (vanaf zitplaat) Kniehoek Enkelhoek Wegzwenkbare UNI beensteunen Onderbeenlengte (vanaf zitplaat) Kniehoek Enkelhoek Wegzwenkbare SEDEO PRO beensteunen Onderbeenlengte (vanaf zitplaat) Kniehoek Enkelhoek Wegzwenkbare SEDEO PRO beensteunen, lengte compenserend/ elektrisch Onderbeenlengte (vanaf zitplaat) Kniehoek Enkelhoek SEDEO hoofdsteu
NEDERLANDS Technische specificaties: Zitsysteem SEDEO Pro Aanpassing zithoek Elektrische kantelverstelling met aanpassing zwaartekrachtpunt optioneel Elektrische kantelverstelling met aanpassing zwaartekrachtpunt optioneel Elektrische kantelverstelling met aanpassing zwaartekrachtpunt optioneel Elektrische kantelverstelling met aanpassing zwaartekrachtpunt optioneel Effectieve zitdiepte Effectieve zitbreedte Hoogte zitting tot bodem Vulmodule (geen elektrische kantelverstelling, geen zitlift) pos.
12.0 Garantie DEZE GARANTIE DOET OP GEEN ENKELE WIJZE AFBREUK AAN UW RECHTEN. Garantievoorwaarden: 1. Indien een onderdeel of onderdelen van het product binnen 24 maanden gerepareerd of vervangen moet(en) worden als gevolg van een fabricagefout en/of gebrek in het materiaal, wordt het betreffende onderdeel of de betreffende onderdelen kosteloos gerepareerd of vervangen. De garantie geldt slechts voor fabricagefouten. 2.
UK = www.SunriseMedical.co.uk FOR Q400M DE = www.SunriseMedical.de FR = www.sunrisemedical.fr IT = www.SunriseMedical.it NL = www.SunriseMedical.nl ES = www.SunriseMedical.es PT = www.SunriseMedical.pt SE = www.SunriseMedical.se NO = www.SunriseMedical.no DK = www.SunriseMedical.dk CH = www.SunriseMedical.ch FOR Q400F/R CZ = www.medicco.cz PL = www.Sunrise-Medical.pl EU = www.SunriseMedical.eu AU = www.sunrisemedical.com.au US = www.SunriseMedical.com OM_Q400 M-F-R_EU_EN_FR_NL_Rev.