3 Burner Gas Grill - LP USE AND CARE MANUAL SF278LP Stop! Missing a part? DO NOT RETURN PRODUCT TO STORE The store where you made the purchase does not stock parts for this item. If you need parts, whether they are missing or damaged, please call Customer Service at 1-800-229-5647 Call us between 8:00 AM and 5:00 PM Eastern time, Monday through Friday or email us at saleshelp@sureheat.com FOR YOUR SAFETY: 1. Read this Manual before attempting to assemble or operate your grill. 2.
General Safety Instructions IMPORTANT SAFETY INFORMATION - Read this manual carefully before using your grill to reduce the risk of fire, burn hazard or other injury. - Extreme care should be used because of the high temperatures produced by this appliance. CHILDREN SHOULD NOT BE LEFT UNATTENDED IN AN AREA WHERE THE GRILL IS BEING OPERATED. - This appliance must be kept clear from combustible materials, gasoline or other flammable vapors and liquids.
General Safety Instructions ! ▲ WARNING ! ▲ Keep any electrical supply cords and the fuel supply hose away from any heated surfaces. ! ▲ DO NOT use the grill in garages, breezeways, sheds or any enclosed area. Never operate the grill in enclosed areas as this could lead to a carbon monoxide buildup, which could result in injury or death. Place the grill on a level surface. Avoid moving the grill while it is in operation.
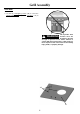
Grill Features 1 6 2 7 8 3 4 9 10 5 11 1. Roll top grill hood 7. Bread warming rack 2. Grilling/cooking surface 8. Side burner 3. Side shelf 9. Control Knob: Side burner 4. Towel bar 10. Electronic igniter: main burners and side burner 5. Control knobs: Main burners 11. Cart with doors 6.
Getting Started Self-tapping screw x 8 pcs Phillips Pan Head M6 x 40 screw x 8 pcs Phillips Pan Head M5 x 12 screw x 14 pcs Phillips Pan Head M6 x 10 Screw x 2 pcs Getting Started 1. Please follow the steps in the order that they are presented. 2. Assemble the grill where you plan to use it. 3. You may want to place an old towel or cloth at the assembly site to prevent nuts and bolts from becoming lost. 4. Have a friend help.
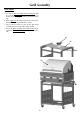
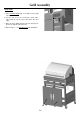
Grill Assembly STEP ONE a. Use two (2) self-tapping screws (1B) to secure the cylinder limit handle (1A) on the cart base (1C) as shown. The Cylinder limit handle must be installed to prevent storage of spare L.P. Gas Tanks. Failure to comply with these instructions could result in a fire or explosion that could cause serious bodily injury, death, or property damage.
Grill Assembly STEP TWO a.Use four (4) phillips pan head M6 x 40 scews (2A) to secure the cart side left (2B) to the cart base (2C). Note: Add flat washer and lock washer then installing the screws in position. b.Use four (4) phillips pan head M6 x 40 scews (2A) to secure the cart side right (2D) to the cart base (2C). Note: Add flat washer and lock washer then install the screws in position. Note: The sides of the cart sides without holes facing to the front.
Grill Assembly STEP THREE a. Use four (4) self-tapping screws (3A) to secure the front top cross bar (3B) onto the cart sides. b. Use four (4) Phillips pan head screws (3C) to secure the grill cart back (3D) to the rear of the cart sides as shown.
Grill Assembly STEP FOUR a. Use four (4) M5 x 12 Phillips Pan Head Screws (4A) to secure the Heat Shield (4B) on the Cart Sides as shown. the cutout flange should be toward back of the cart. b. Put the Drip Pan (4C) into the hole at the center of the Heat Shield. Place the handle in the cutout. c. Have someone help you pick up the grill head assembly and set it on top of the cart as shown. d. Use six (6) M5 x 12 Phillips Pan Head Screws (4A) to secure the grill head assembly (4D) on the top of the cart.
Grill Assembly STEP FIVE a. Place Cart Door Right (5A) on an angle over the right side door pivot. b. Tilt the top of the door toward the grill, while depressing the top door pivot pin above the door edge. c. Move the door slightly until the pin locks into place in the hole on bottom of the front face. d. Repeat steps a - c for Cart Door Left (5B) installation.
Grill Assembly 6B STEP SIX a. Lay the Side Shelf Left Assembly (6A) on its side. Use one (1) M6 x 10 phillips pan head screw to attach one of the Handle Ends (6B) to the front of the shelf. 6A Note: Be careful not to scratch the side of the shelf. b. Slide one end of the Handle Bar (6C) into the installed handle end. Attach the second handle end using the M6 x 10 phillips head screw while holding the assembly in place. 6C c.
Grill Assembly STEP SEVEN a. On the inside bottom of the side burner assembly you will find the brass burner cap attached with tape. Remove and set aside. b. Feed the side burner gas supply hose assembly through the side of the cart. c. Loosen the four (4) 5/16-24 Hex Head Screws on the right side of the grill. d. Attach the Right Side Burner Shelf (7A) by inserting the four (4) screws on the side of the grill head into the holes on the right shelf. Close view for Step 7f e.
Grill Assembly STEP EIGHT 8C 8B a. Remove two phillips pan head screws (8A) from the side burner valve assembly (8B). b. Carefully insert the valve assembly into the cast side burner. You will need to angle the tube into the side burner casting assembly (8C). Make certain that the elbow is pointing down when the valve is put in place.
Grill Assembly STEP NINE a. Insert the Flavor Grids (9A) into the cut outs with triangle ridges facing up. b. Install Main Cooking Grates (9B) on the ledges provided on the grill to create your cooking surface. c. Slide the Bread Warming Grate (9C) through the cutouts on the hood support sides and rest it on the brackets. The finished grill should look like the figure on the cover of this Use and Care Manual.
Gas Requirements GENERAL INFORMATION ! WARNING ▲ Never attach an unregulated gas line to the appliance. Connection to an unregulated gas line can cause excessive heat or fire. Verify the type of gas supply to be used, either Natural Gas (N.G.) or Liquid Propane (L.P.), and make sure the serial plate agrees with that of the supply. ! WARNING ▲ Always have a qualified service technician perform difficult conversions or modifications.
Gas Requirements L.P. GAS INSTALLATION Surefire™ Gas Grills that are set to operate with L.P. gas come with a high capacity hose and regulator assembly. (Note: Only use the pressure regulator and hose assembly supplied with the grill or a replacement pressure regulator and hose assemblies specified by Surefire™). This assembly is designed to connect directly to a standard 20 lb. L.P. cylinder. L.P. Cylinders are not included with the grill. L.P.
Pre Operation Leak Testing GENERAL INFORMATION Although all gas connections on the grill are leak tested prior to shipment, a complete gas tightness check must be performed at the installation site due to possible shifting during shipment, installation or excessive pressure unknowingly being applied to the unit. Periodically check the whole system for leaks and immediately check the system if the smell of gas is detected. BEFORE TESTING 1. Do not smoke while leak testing. 2. Extinguish all open flames. 3.
Lighting the Grill Do not attempt to "Light" the grill if the odor of gas present!! BEFORE LIGHTING ! WARNING ▲ Fig. 1 Important! Before Lighting: • Check the gas supply line for cuts, wear or abrasion. • Always keep your face and body as far away from the grill as possible when lighting. GRILL BURNER LIGHTING Lighting the Grill with electronic igniter 1. Make sure all control knobs are in the “OFF” position. 2. Open the gas supply valve located on top of your L.P. tank. Fig.
Using the Grill and Side Burner GRILL LOCATION ! WARNING ▲ Do not use the grill in garages, breezeways, sheds or any enclosed area. Never operate the grill in enclosed areas as this could lead to a carbon monoxide buildup, which could result in injury or death. Place the grill on a level surface. Avoid moving the grill while it is in operation. NOTE: The grill will operate best if it is not facing directly into the wind.
Care and Maintenance GENERAL MAINTENANCE - Keep outdoor cooking gas appliance area clear and free from combustible materials, gasoline and other flammable vapors and liquids. - Do not obstruct the flow of combustion and ventilation air. - Keep the ventilation openings of the cylinder enclosure free and clear from debris.
Care and Maintenance DRIP TRAY The drip tray should be cleaned periodically to prevent heavy buildup of debris. NOTE: Allow the drip tray to cool before attempting to clean. Important: Do not leave the grill outside during inclement weather unless it is covered. Rain water can collect inside of the grill, the grill cart or the drip tray if left uncovered.
Troubleshooting Your Grill GENERAL TROUBLE SHOOTING You should inspect the burners at least once a year or immediately if any of the following conditions occur: • The smell of gas. • Flames appearing mostly yellow. (some yellow at the tips is OK) • The grill will not get hot enough. • Burners make a snapping noise. • The grill heats unevenly. SPIDER AND INSECT WARNING Spider and insects can nest in the burners of this or any other grill and cause the gas to flow from the front of the burner.
Troubleshooting Your Grill Problem SOLUTION Grill will not light with a match or low heat with dial set to "High" position. • Is your gas supply fully turned on? • Is there gas in your L.P. tank? Check your gas level. • Shut off gas supply, disconnect gas line at tank, reconnect the line to the tank. • Make sure all the knobs are in the “OFF” position, then open the gas supply valve on the L.P. tank very slowly 1/4 turn, then open fully (at least two full turns). Check Flame.
Replacement Part List Hood Assembly Manifold & Valve Assy. FCMD2908001 FCMD2908007 1 set 1 set Hood Handle Assy. Large Bezel FCMD2908002 FCCS0007033 1 set 1 pcs Temp.
Replacement Part List Side Burner Valve Cart Side Right FCTG3007024 FCMD2908015 1 pcs 1 pcs Towel Bar Cart Base FCTG3007020 FCMD2908016 1 set 1 set Left Side Shelf Cylinder limit handle FCMD2908009 FCMD2908017 1 set 1 pcs Cart Door Left Side Burner Igniter w/ Wire FCMD2908010 FCTG2608030 1 set 1 pcs Cart Door Right Drip Pan FCMD2908011 FCMD2908018 1 set 1 pcs Cart Door Handle Assy. Wheel Channel Left Assy.
LIMITED WARRANTY Sure Heat Mfg warrants that for 2 years from the date of purchase, the stainless steel panels will not break due to defects in material or workmanship. All other components of this grill are warranted free from defects in material and workmanship for one year from the date of purchase. Sure Heat Mfg. at its option, will repair or replace this product or any component of the product found to be defective during the warranty period.