
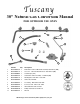
Instruction Manual
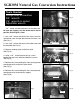

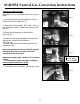


15. Remove all the knobs, set the knobs aside.
(See Fig. 14)
16. Remove the screws holding the main burner
knob bezels to the front face and remove the bezels.
(See Fig. 15)
17. Hold the manifold, slightly move it to the right
and lift the left end out. (See Fig. 16)
18. Lift the left end of the manifold up, carefully
remove the manifold out of the grill. (See Fig. 17)
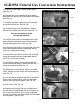
You are now ready to install
the new NG manifold.
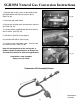
19. Start by placing the new manifold into the grill
body with the control knob stems facing outward
through control panel front. (See Fig. 16)
20. Reattach the flex line on the right side of the grill
to the new manifold using the adjustable wrench.
(See Fig. 12 on previous page)
21. Reattach the flex line on the left side of the grill
to the new manifold using the adjustable wrench.
(See Fig. 13 on previous page)
22. Reattach the bezels to the manifold with the
screws removed in Step 13. Make sure that “off” is
facing up on the bezel.(See Fig. 15)
23. Reattach the control knobs onto the manifold
stems, making sure the arrows are facing upwards.
(See Fig. 14)
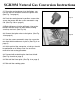
24. Use the wrench supplied with this kit to hold the
orifice in the searing burner, then use adjustable
wrench to disconnect the elbow. (See Fig. 18)
25. NG Orifice. (See Fig. 19)
26. Replace the NG orifice on the searing burner.
Use the wrench supplied with this kit to hold the ori-
fice in the searing burner, then use the adjustible
wrench to reconnect the elbow. Make sure the elbow
is facing down.. (See Fig. 18)
4
Fig 14
Fig 15
Fig 16
Fig 17
SGR30M Natural Gas Conversion Instructions
Control Knob
Stems
Fig 18