
Instruction Manual
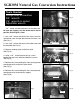

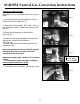


holding the side burner orifice holder. (See Fig.25)
2. Remove the side burner orifice. (See Fig. 26)
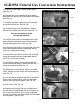
3. Remove the side burner knob. (See Fig. 27)
4. Remove the (2) screws holding the side burner
bezel and valve. (See Fig. 28)
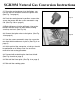
5. Remove the side burner valve assembly and
replace it with NG valve assembly.
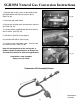
6. Slide the valve assembly through the center hole
in the front of the shelf. (See Fig. 29)
7. Insert the orifice holder into the side burner
bracket. Use a Philips Screwdriver to fasten the
screw on the orifice holder to secure the orifice in
place. (See Fig.25-26)
8. Reattach the bezel to the front of the side burner
and the NG valve assembly with the screws previ-
ously removed. (See Fig. 28).
Note: Make sure the bezel is installed in the correct position. The
“ H” will be facing the igniter.
9. Reattach the control knob.
10. Move to hear and make new step carefully run
the supplied hose from the inside of the cart through
the grommeted hole in the cart side to the side burn-
er assembly. Connect the end of the hose to the
NG valve assembly.
(See Fig. 1 on page 2).
This completes the side burner conversion.
Converting the Rear Infrared Burner to NG
7
Fig 26
Fig 25
SGR30M Natural Gas Conversion Instructions
Fig 27
Fig 28
Bracket
Orifice holder
Fig 29