
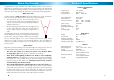
Specifications


666
Troubleshooting
Problem: At night, all I see is white.
Solution: The camera is most likely looking through a window. At night, the
infrared light the camera uses to see in the dark can ‘bounce back’ off a refl ective
surface (such as glass, water, spider webs, some ceramics and so on) and effectively
blind the camera. If you want to see outside, mount the camera outside - we made
it weather resistant for a reason!
Problem: I see only a blank screen where my image should be.
Solution: Check the wiring to the camera, and ensure the camera is being
supplied power from the included power adapter. Try using a different video lead,
or connecting the camera to a different television or monitor. Be sure there are no
devices interrupting your signal, such as a DVR or VCR that isn’t outputting the
signal correctly.
Problem: I can’t see anything at night.
Solution: The maximum range of the night vision is just that, the maximum range.
If there’s nothing in this range, you won’t see anything. Also, some dark objects
(like the proverbial black cat) may not refl ect enough light to be seen except as a
silhouette if the background is brighter. Some objects which can easily be seen in
visible light don’t refl ect much infrared light.
3
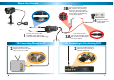
Choosing a Location
The ADS-180 can be mounted just about anywhere, provided there is some
protection against direct sunlight and rain/moisture (it’s weather resistant, but
long-term exposure will eventually interfere with the operation of the camera).
Some of the things you’ll have to consider when choosing a location are:
• What you want to monitor, and where you’ll get the best view of it.
• How you’re going to connect the camera to your monitoring system.
• How to keep the camera out of harm’s way. Up high in protected corners is a
good option.
Mounting
The camera mounts onto a fl at surface using screws. The surface must have
suffi cient strength to hold the camera. Materials such as hardwood, brick or
masonry are good options, and we’ve included all the gear you’ll need to mount
it there (except the tools - sorry, you’ll still need your own drill). You can mount
the camera onto a metal surface, but you’ll need to supply your own mounting
hardware.
To mount the camera:
• Using the holes on the camera stand as a guide, mark the locations on your
wall/ceiling to drill. Make sure the wall/ceiling is thick and strong enough that
you won’t drill through it.
• If the wall is masonry, brickwork or similar, use the provided wall plugs. If the
wall is made of wood, then the camera can be screwed directly onto the wall.
• Ensure that the cable is protected from the weather. The camera is weather
resistant, but the cable (particularly the power and video-out plugs) is not.
• Once the camera has been mounted, ensure that it is securely fi xed in place.
The camera is vandal resistant, but that won’t help if an intruder can remove
the whole camera!