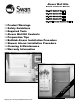
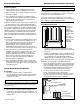
Alcove Wall Kits Bathtub and Shower Wall Kits BA-3060 Bathtub Wall Kit SA-3232 Shower Wall Kit SA-3636 Shower Wall Kit SA-3448 Shower Wall Kit SA-38NEO Corner Shower Wall Kit Product Warnings Safety Guidelines Required Tools Alcove Wall Kit Contents Preparation Tips Bathtub Alcove Installation Procedure Shower Alcove Installation Procedure Cleaning & Maintenance Warranty Information R ea B da ef n or d e Un In d st er al s lin ta g nd Register your warranty at www.theswancorp.
Safety Guidelines The Swan Assurance — if our product is properly installed and maintained, as stated in these instructions, it will not leak. Remember – Safety First IMPORTANT NOTICE The Swan Corporation, the makers of the Swan products, cannot anticipate every possible circumstance that might involve a potential hazard during the installation of our product(s). The warnings and instructions in this installation guide are, therefore, not all-inclusive.
Safety Guidelines Slipping Hazard Do not install this product in the presence of water. Installing this product without drying all surfaces, or in the presence of water, could cause you to slip and fall due to wet floors or spilled fluids. Personal injury can result from slips or falls. Before installation, dry all surfaces, including the floor, with a cloth or paper towel. Clean up all water or spilled fluids immediately.
Safety Guidelines General Information General Information SA-3232 Alcove Shower Wall Kit For shower floors 32 inches wide and 32 inches deep. Designed for use with Swan Corporation SS-3232 Single Threshold Shower Floor or other manufacturer’s shower floor of the same dimensions.
General Information SA-38NEO Alcove Corner Shower Wall Kit If the shower or bathtub is placed over a garage or on an outside wall, care must be taken to ensure that the shower or bathtub is properly insulated from cold temperatures. For corner shower floors 38 inches wide and 38 inches deep. Designed for use with Swan Corporation SS-38NEO Neo-Angle Shower Floor or other manufacturer’s shower floor of the same dimensions.
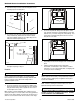
General Information Bathtub Alcove Installation Procedure Product Features IMPORTANT NOTICE Swan Corporation alcove wall panels easily fit through existing doorways and can be installed by one person. For remodeling, upon removal of the old bathtub, measure the alcove pocket to be sure that the new bathtub and alcove wall panel kit will fit in the available space. It may be necessary to reconstruct one or more walls of the alcove.
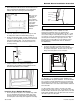
Bathtub Alcove Installation Procedure 1. Build a stud pocket wall structure to the dimensions for The Swan Corporation BA-3060 Bathtub or other appropriate bathtub. Make sure all framing is plumb and square. Back Panel Note: For more information on building the alcove bathtub wall pocket, refer to The Swan Corporation BT-3060 Bathtub Installation Manual. 2. Trial fit the bathtub in the stud pocket, making sure that the stud pocket walls fit the bathtub flange properly. 3.
Bathtub Alcove Installation Procedure 3. Install the vertical filler boards next to the front flange of BOTH side panels to provide a solid mounting surface for the shower doors. Measure the inside depth and height of the side panel and attach appropriate size filler boards to the wall studs near the front edge of the tub. Receiving Channel 2” Receiving Channel Side Panel Side Panel Filler Boards ABS-014 6. Push down firmly to lock the panel mounting tabs into the mounting clips on the back panel.
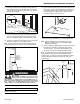
Bathtub Alcove Installation Procedure 8. 11. Cut the clearance holes using a router, saber saw, or hole saw. Drill or cut holes 1/2 inch larger than the diameter of the plumbing outlets, from the finished side of the panel. For best results, when drilling, place a scrap of wood beneath the hole to ensure a clean cut. Measure the location of the plumbing outlets (valves, tub spout, and/or shower head).
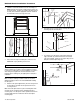
Bathtub Alcove Installation Procedure 14. Push down firmly to lock the wall mounting tabs into the mounting clips on the back panel. Mounting Tab Mounting Clip Side l ne k ac Pa B Pane l ABS-021 2. ABS-015 15. The bottom of the side panel must fit flush against the ledge of bathtub (A) and should extend to the outside edge of the bathtub. Make sure the upper flange on the side panel and back panel align (B). Anchor the top and side flanges of a side panel.
Shower Alcove Installation Procedure Install Shower Alcove Wall Kit Note: The bottom of the alcove wall panels are designed to fit INSIDE the attachment flange on the shower floor threshold. Preparation 1. Remove the shower floor and alcove wall kit from the protective shipping cartons and inspect them for damage. Check and make sure all the required components are included in the cartons. IMPORTANT NOTICE A. Alcove side wall attachment flanges extend out past the front edge of the shower floor.
Shower Alcove Installation Procedure 4. Install the shower floor in the stud pocket following all instructions in the appropriate shower floor installation manual. IMPORTANT NOTICE If shower doors will be installed filler boards, such as 3/4” plywood or 1” x 4” strapping, must be installed on the stud wall BEFORE side panel installation. These filler boards are necessary to provide solid backing to prevent deforming and damage to the side panels.
Shower Alcove Installation Procedure 7. IMPORTANT NOTICE The Shower Alcove System is designed so that the use of silicone caulk is not necessary. As a precautionary measure, to help prevent leaking due to unlevel installation or excessive water being forced against the front threshold area of the shower floor, silicone caulking may be applied prior to side panel installation.
Shower Alcove Installation Procedure IMPORTANT NOTICE Any cutout should have rounded corners (sharp corners can promote stress cracks). Mounting Tab Mounting Clip 11. Cut clearance holes using a router, saber saw, or hole saw. Drill or cut holes 1/2 inch larger than the diameter of the plumbing outlets from the finished side of the panel. For best results, when drilling, place a scrap of wood beneath the hole to ensure a clean cut. Side l ne k ac Pa B Pane l ABS-015 15.
Shower Alcove Installation Procedure Optional Caulking Note: Moisture resistant wallboard will be installed over the alcove panel flanges. For best results, when using galvanized drywall screws, drill a shallow countersink at each pilot hole to allow the screw head to fit flush with the surface of the flange. IMPORTANT NOTICE The Alcove Shower Wall Kit installation is now complete. DO NOT discard these installation instructions. PLEASE LEAVE THEM WITH THE HOMEOWNER.
Optional Caulking 4. Once the side panel is seated on the threshold, color coordinated caulk must be forced out beyond the finished sides of the end panel, as shown. Care and Cleaning IMPORTANT NOTICE Because cleaning products change over time, always check the manufacturer’s instructions to make sure it is compatible with fiberglass reinforced polyester. DO NOT use a cleaner if the label indicates it should not be used on fiberglass reinforced polyester.