
Installation Guide


Product Features
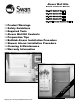
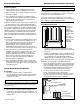
Swan Corporation alcove wall panels easily fit through
existing doorways and can be installed by one person.
Made of Veritek™ with no surface coating to chip or crack -
color runs throughout.
Alcove wall panels are designed to be snapped together
using the sturdy interlocking tabs included on the wall panels.
All back and side wall panels feature a nailing flange for
attaching directly to the stud wall.
Moisture resistant sheetrock or greenboard is installed over
the nailing flanges to give a custom finished appearance.
Followed carefully, these installation instructions will result in an
easy, trouble-free installation of your Swan Corporation product.
Any deviations, additions, and/or deletions from the prescribed
installation, without prior written approval, will void the warranty
covering this product. Not following the directions could also
result in personal injuries, water damage, and other damage to
floors, pipes, walls, and other portions of your building or home.
Disclaimer
The information contained in this Installation Manual is given
free of charge. It is based upon technical data, which we
believe to be reliable and is intended for use by persons
having knowledge of this technical area at their own
discretion and risk. Swan Corporation assumes no
responsibility for results obtained or damage incurred from
the use of this material either in whole or in part by the buyer.
This manual will give you basic instructions for the
installation of the product in a step-by-step sequence that
will work in most types of installations. If you have an
installation application that is not covered in this manual,
please call your local Swan Corporation distributor or
contact The Swan Corporation directly for additional
information about your application.
Follow all installation instructions. Failure to follow these
instructions could result in personal injuries, water damage,
or other damage to floors, pipes, walls, or other portions of
your building or home.
Install Bathtub Alcove Wall Kit
Preparation
1. Remove the bathtub and alcove wall kit from the
protective shipping cartons and inspect them for damage.
Check and make sure all the required components are
included in the cartons.
To prevent unnecessary delays, before starting the installation,
refer to the Kit Contents section to verify the contents of the
carton are correct.
2. Allow the Swan Corporation products to adjust to room
temperature for at least six hours before installation. The
alcove wall panels should be installed at temperatures not
less than 65°F.
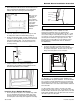
For remodeling, upon removal of the old bathtub, measure the
alcove pocket to be sure that the new bathtub and alcove wall
panel kit will fit in the available space. It may be necessary to
reconstruct one or more walls of the alcove.
If the alcove wall kit is to be installed over new or existing
drywall (not recommended), allow for thickness of the drywall
when building or modifying stud pocket walls.
Stud Wall Construction
The key to a
good Alcove
Wall Kit
installation is
proper fit within
the stud pocket
walls.
Remember
these important
points to ensure
a smooth
installation.
• Completely read and understand this manual and the
appropriate bathtub installation manual prior to beginning
the project.
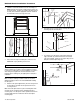
• Measure the actual bathtub and alcove wall panels and use
these dimensions to build the stud pocket walls to fit. Up to
a 3/16” gap between the stud wall and the Swanstone
bathtub and/or alcove wall attachment flange is acceptable.
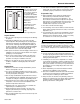
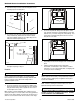
Note: The bottom of the alcove wall panels are designed to fit
INSIDE the attachment flange on the bathtub threshold.
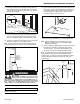
A. Alcove side wall attachment flanges extend out past the front
edge of the bathtub. Make sure to construct the stud pocket
walls so that multiple studs (A) are installed (ganged) at the
front threshold to provide backing for filler boards and the
vertical attachment flange on each alcove side panel.
B. The alcove wall panels feature a three-dimensional
design. If shower doors will be installed, solid
3/4” thick filler boards (B) MUST be attached to the studs
to fill in the space between the alcove side panels and
front threshold studs prior to panel installation.
ABS-018c
Side
Panel
Multiple Studs
Bathtub
Ledge
A
B
Top View
Looking Down
3/4” Filler Board for
Shower Door Installation
ABS-007
IMPORTANT NOTICE
IMPORTANT NOTICE
The Swan Corporation 6 800-325-7008
General Information Bathtub Alcove Installation Procedure