
Installation Instructions

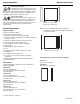
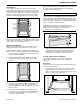
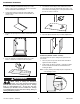

2. If the shower base is not perpendicular to the wall, use a
level and draw a line around the alcove on all three walls.
Measure the distance from the line to the top of the
shower base.
3. Transfer these measurements to both side panels and the
back panel. Cut the bottoms of the panels.
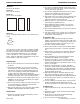
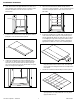
4. If using an overlap panel, the back overlap panel may
need to be cut (side-to-side) to fit the opening, find and
mark the center of the back wall in the alcove opening.
Use a level to draw a line from the shower base to a point
above the height of the wall panel.
5. Take several measurements, bottom-to-top, from the
center line to each wall surface. These measurements will
ensure the back panel fits the exact contour of the two
side walls.
6 If using the CCSO-1272 or CCSO-1296 overlap panel to
create a 60" wide wall kit, place the two panels together
with the finished side facing up. Make sure the 12" panel
is overlapping the edge of the larger panel and the seam
is tightly held together, as shown. Measure and mark a
light pencil line down the center of the combined panels.
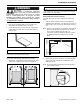
Note: The overlap panel should be located on the side of the
large panel closest to the shower head. This will help
prevent water from being forced into the overlap section
of the panel.
7. Transfer the measurements from Step 5 onto the panels.
Note: The back panel can be cut slightly smaller than the
opening because the side panels will cover any small
gap (less than 1/4 inch).
C
L
C
L
Level line
Level line
The Swan Corporation – Swanstone 8 800-325-7008
Installation Procedure