
Installation Guide


Note: For more information on installing apron strips, refer
to the Apron Strips (optional) instructions in the Installation
Procedure section of this manual.
IMPORTANT NOTICE
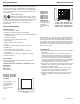
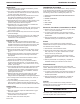
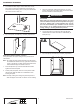
For a finished appearance, install greenboard up to the front
edge of the shower base UNLESS optional apron strips will be
cut from Swanstone material and installed next to the front edge
of the shower base. In that case, leave a 1/2” gap between the
shower base and the greenboard. The Swanstone apron strips
will cover this gap (see illustration below).
In addition, if baseboard trim (not included) will later be
installed along the floor next to the shower base, a 1/2” gap
between the floor and bottom of the greenboard is
recommended (see illustration below).
1/2"
1/2"
1/2"
4. Apply a coat of water or oil-based primer/sealer to all
the surfaces of the cementboard or greenboard (follow
the manufacturer’s instructions). Allow the primer to dry
thoroughly before installing the Swanstone panels.
Flat, Subway Tile, or Square Tile
Panel Installation
The installation process is the same for either flat or tile
panels. Follow the steps in this section for installation
instructions.
Back Panel
If the back wall measures less than the width of the panel, cut
the panel to fit the opening.
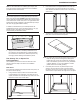
1. Using a builder’s square, make sure the shower base
is perpendicular to the side walls. If the walls are out of
square, the bottom of all the panels may need to be cut to
follow the contour of the shower base.
2. If the shower base is not perpendicular to the wall, use
a level and draw a line around the alcove on all three
walls. Measure the distance from the line to the top of the
shower base.
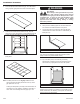
3. Transfer these measurements to both side panels and the
back panel. Cut the bottoms of the panels.
Note: On subway tile and square tile panels, this process will
keep the faux grout lines running level, although the
bottom tiles may not be evenly sized from the shower
base to the first faux grout line. Since every installation
is slightly different, it is up to the installer to create a
pattern match that is visually pleasing.
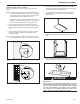
4. If the back panel must be cut (side-to-side) to fit the
opening, find and mark the center of the back wall in
the alcove opening. Use a level to draw a line from the
shower base to a point above the height of the wall panel.
C
L
C
L
Installation Procedure
800-325-7008 7 Swan