
Installation Guide


Side Panel (with shower controls)
If the side panels do not require cutting to size, proceed to
Step 5.
Note: On subway tile and square tile panels, the side panels
are marked with labels in the top, right-hand or left-hand
corner of the panel. The edge closest to the label is the
outside finished edge and should not be cut.
Cutting the side panel to precisely fit the back wall is not
necessary if a corner molding, supplied in some kits, is
used. This corner molding will cover gaps up to 1/2”.
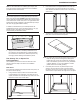
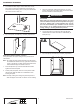
1. Place the panel on top of the shower base and slide it
against the back wall panel. If the side panel has only one
finished edge, make sure that the finished edge is facing
out.
2. Scribe (mark) the panel, as shown. If the panel is wider
than the wall, take this width into consideration when
scribing the panel.
Note: Precisely scribing and cutting the panel will provide a
clean 90 degree corner with no need for corner molding.
Flat Panel
Square Tile or Subway Tile Panel
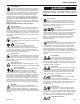
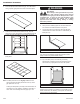
3. Place the wall panel, finished side facing up, on a flat
surface. Place pieces of masking tape over the area where
the saw contacts the Swanstone panel.
4. Cut the panel using a circular saw with a 60-80 tooth
carbide blade or a saber saw with a bi-metal blade (14
teeth per inch).
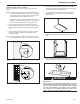
5. Measure the openings for the shower controls and shower
head.
6. Place the wall panel, finished side facing up, on a flat
surface. Transfer the measurements to the panel.
WARNING
Dust Hazard
When cutting or drilling the Swanstone product, use a dust
collection method which prevents dust particles from going
into the air. Always work in a well-ventilated area. To keep
the area well-ventilated, open windows and use exhaust
fans. Always use an OSHA approved dust mask when
cutting, drilling, or sanding Swanstone products.
Installation Procedure
800-325-7008 9 Swan