
Installation Guide


Ensure all plumbing or electrical work inside the walls is
finished prior to installation of the wall panels.
Prepare the area with 1/2 inch (13 mm) moisture-resistant
drywall, marine grade plywood, or concrete board. Never
install our products directly on any structure that is, or may
become, wet or damp.
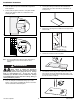
All Swanstone panels have a finished and unfinished side.
The finished side should always be installed facing outward.
Regardless of the appearance (shiny or dull), the finished
side is very smooth. The unfinished side will many times
have very slight grooves in it from the thickness sanding
process. If you cannot identify the finished side, do not
install the panel until you have contacted your local Swan
Corporation distributor or contact the Swan Corporation
directly for additional information about your application.
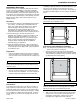
Walls must be solid, plumb, and square within 1/8 inch of
true. Shim or trim the opening, as required. This kit has
been designed with some adjustability for minor alignment
problems.
The mounting surface must be free of dirt, film, waxes, or
any other residues.
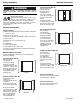
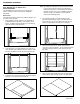
If you are installing a recessed accessory, cut the hole after
the panel is installed and fully supported by the wall.
Remember to position the accessory between the wall
studs.
Caulking Tips
Follow the instructions on the caulking tube.
When job is complete, inspect all caulked areas for gaps
and fill as needed.
Clean up any excess silicone using denatured alcohol and a
clean cloth.
Be very careful not to disturb caulk joints before they dry.
Wall Surface Preparation
Swan Corporation panels can be installed over a variety of
products. If you intend to apply the panels to any surface
other than those described, consult with a professional
contractor. Use the following sections when installing this
product over:
SHEETROCK/GREENBOARD/CEMENT BOARD/WOOD
PLASTER
CEMENT/CONCRETE
OLD TILE
WALLPAPER
MASONITE
Sheetrock, Greenboard, Cement Board, or Wood
Surface must be dry, smooth, and free of any dust, soap
scum, or any other contaminants.
To ensure proper adhesion of the panels, the wall surface
must be sealed with a water or oil-based primer/sealer.
After the primer/sealer is completely dry, complete the
installation following the instructions in this manual.
Plaster
Depending on the condition of the existing wall surface,
additional silicone may be required to ensure contact between
the substrate and the wall panel.
Sand textured or swirled finishes smooth.
Clean the wall surface with a damp cloth to remove any
dust, soap scum, or any other contaminants. The wall
surface must be dry and smooth.
To ensure proper adhesion of the panels, the wall surface
must be sealed with a water or oil-based primer/sealer.
After the primer/sealer is completely dry, complete the
installation following the instructions in this manual.
Cement/Concrete
Depending on the condition (flatness) of the existing wall
surface, additional silicone may be required to ensure contact
between the substrate and the wall panel.
To ensure proper adhesion of the panels, the complete area
must be sealed with two coats of water or oil-based
primer/sealer.
After the primer/sealer is completely dry, complete the
installation following the instructions in this manual.
Old Tile
Depending on the condition of the existing wall surface,
additional silicone may be required to ensure contact between
the substrate and the wall panel.
Old ceramic tiles, if solidly adhered, do not need to be
removed. All plastic tiles must be removed.
Remove or reattach any loose ceramic tiles. Old tiles and
front edge ceramic tiles should be reset for appearance only.
Remove any tile accessories attached to the walls.
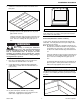
Remove the bottom row of tile and cut a ventilation gap in
the substrate.
The tile surface must be dry, smooth, and free of any dust,
soap scum, or any other contaminants.
Complete the installation following the instructions in this
manual.
Note: If using a trim kit, old tiles may need to be removed to
allow a proper fit.
Wallpaper
All wallpaper must be removed from the area being covered.
Clean the wall surface to remove any dust, soap scum, or any
other contaminants. The wall surface must be dry and smooth.
To ensure proper adhesion of the panels, the complete wall
surface must be sealed with two coats of water or oil-based
primer/sealer.
After the primer/sealer is completely dry, complete the
installation following the instructions in this manual.
Masonite
Clean the wall surface to remove any dust, soap scum, or
any other contaminants. The wall surface must be dry and
smooth.
To ensure proper adhesion of the panels, the wall surface
must be sealed with a water or oil-based primer/sealer.
After the primer/sealer is completely dry, complete the
installation following the instructions in this manual.
IMPORTANT NOTICE
The Swan Corporation 6 800-325-7008
General Information