
Installation Guide

Installation Procedure
Followed carefully, these installation instructions will result in
an easy, trouble-free installation of your Swan Corporation
product. Any deviations, additions, and/or deletions from the
prescribed installation, without prior written approval, will void
the warranty covering this product. Not following the directions
could also result in personal injuries, water damage, and other
damage to floors, pipes, walls, and other portions of your
building or home.
Disclaimer
The information contained in this Installation Manual is given
free of charge. It is based upon technical data which we
believe to be reliable and is intended for use, by persons
having knowledge of this technical area, at their own
discretion and risk. Swan Corporation assumes no
responsibility for results obtained or damage incurred from
the use of this material either in whole or in part by the buyer.
This manual will give you basic instructions for the
installation of the product in a step-by-step sequence that
will work in most types of installations. If you have an
installation application that is not covered in this manual,
please call your local Swan Corporation distributor or
contact the Swan Corporation directly for additional
information about your application.
Follow all installation instructions. Failure to follow these
instructions could result in personal injuries, water damage,
or other damage to floors, pipes, walls, or other portions of
your building or home.
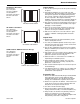
Preparation
1. Remove the bathtub wall kit from the protective shipping
carton and inspect the contents for damage. Check and
make sure all the required components are included in the
cartons.
To prevent unnecessary delays, before starting the installation,
refer to the Kit Contents section to verify the contents of the
carton are correct.
2. Allow the contents to adjust to room temperature for at
least six hours before installation. The alcove wall panels
should be installed at temperatures not less than 65°F.
Measure the bathtub to be sure the new wall panel kit will fit.
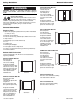
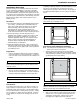
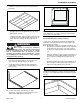
Filler Boards
If an existing wall covering (B) (i.e. tile) does not extend to a
height equal to the height of the panel, it will be necessary to
install a filler board (A) to that height. The filler board must be
the same thickness as the existing wall covering (tile). Usually
1/4 inch masonite, or similar material, is adequate. If desired,
the filler board can extend from the top edge of the tile to the
ceiling.
If installing an optional wall panel extension kit above the wall
panel kit, the filler board must extend from the top of the
existing wall covering (tile) to 24 inches above the top edge of
the installed tub wall kit panels, or to the ceiling if less than 24
inches.
Failure to use a filler board to properly install the panels could
result in water damage or other damage to floors, walls, or
other portions of your building or home.
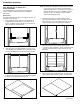
New Construction Wallboard Installation
Note: If the wall panel kit is installed over an existing wall
surface, proceed to the next section.
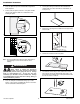
1. Measure and cut out openings for the faucet(s), bathtub
spout, and/or shower head. Install 1/2 inch moisture-resistant
cement board or greenboard over back (1), front (2), and rear
(3) wall surfaces of the rough opening.
To prevent possible water damage (wicking affect) to the wall,
install the wall board with a 1/2 inch gap above the bathtub
side lip, the front edge of the bathtub, and the floor.
2. Apply a coat of water or oil-based primer/sealer to all the
surfaces of the cement board or greenboard (follow the
manufacturer’s instructions). Allow the primer to dry
thoroughly before applying any silicone adhesive.
IMPORTANT NOTICE
1
2 3
A
B
IMPORTANT NOTICE
IMPORTANT NOTICE
IMPORTANT NOTICE
Installation Procedure
800-325-7008 7 The Swan Corporation