
Installation Guide
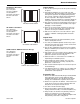

Flat, Subway Tile, or Square Tile
Panel Installation
The installation process is the same for either flat or tile
panels. Follow the steps in this section for installation
instructions.
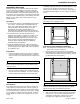
Back Panel
If the back wall measures less than the width of the panel, cut
the panel to fit the opening.
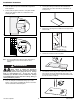
1. Using a builder’s square, make sure the tub surface is
perpendicular to the side walls. If the walls are out of
square, the bottom of all the panels may need cutting to
follow the contour of the tub surface.
2. If the tub surface is not perpendicular to the wall, use a
level and draw a line around the alcove on all three walls.
Measure the distance from the line to the top of the tub.
3. Transfer these measurements to both side panels and the
back panel. Cut the bottoms of the panels.
Note: On subway tile and square tile panels, this process will
keep the faux grout lines running level, although the
bottom tiles may not be evenly sized from the tub to the
first faux grout line. Since every installation is slightly
different, it is up to the installer to create a pattern
match that is visually pleasing.
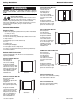
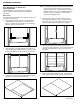
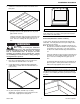
4. If the back panel must be cut (side-to-side) to fit the
opening, find and mark the center of the back wall in the
alcove opening. Use a level to draw a line from the tub
surface to a point above the height of the wall panel.
6. Take several measurements, bottom to top, from the
center line to each wall surface. These measurements will
ensure the back panel fits the exact contour of the two
side walls.
6. Place the panel, finished side facing up, on a flat surface.
Using a pencil, lightly mark the center of the back panel.
C
L
C
L
The Swan Corporation 8 800-325-7008
Installation Procedure