
Owners manual

(If you purchased a 4” diameter tube kit, go to 4” diameter tube kit instructions below.)
Attach tube assembly to base unit. a.
The aluminum tube insert must be inserted into the end of the tube. (Image 11) Be sure to b.
align axle hole in the aluminum tube insert with the pre-drilled axle hole on the tube.
Insert Crank handle through the base unit and into the aluminum tube insert. Be sure to align c.
axle hole. (Image 12)
Fasten tube to base unit using the 2.83” axle bolt that is packaged with your base kit. (Image d.
13, Image 14, Image 15)
Align and tighten locking collar with allen wrench. (Image 16)e.
Repeat same procedure on opposite end using insert with axle.f.
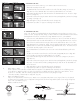
Note: The 4” tube kit is packaged with two large aluminum inserts and two resin inserts. See
pictures of each. (Image 17)
Note: Image 17 also includes the smaller aluminum inserts that were
packaged with the base kit.
You will use the large aluminum inserts for your installation.
Remove the two small aluminum inserts from your base kit. One insert will have an axle pre-a.
attached that will need removed and installed on one of the large aluminum inserts. Remove
the bolt from the small metal insert using the allen wrench and install the axle on one of the
large aluminum inserts. (Image 18, Image 19) The small bolt that holds the axle to the small
aluminum tube insert will not be used with the large aluminum tube insert. The axle bolt itself
will hold the assembly together on the axle end.
The small aluminum inserts and the resin inserts can now be discarded as they will not be b.
used.
The tube insert must be inserted into the end of the tube. (Image 20) Be sure to align axle c.
hole in the tube insert with the pre-drilled axle hole on the tube.
Insert Crank handle through the base unit and into the tube insert. (Image 21) Be sure to d.
align axle hole.
Fasten tube to base unit using the 3.75” axle bolt that is packaged with your tube kit. (Image e.
22) Note: the 2.83” axle bolt that is packaged with your base kit can be discarded as it
will not be used.
Align and tighten locking collar with allen wrench. (Image 23)f.
Repeat same procedure on opposite end using insert with axle.g.
Image 11
Image 12
Image 13
Image 14
Image 15
Image 16
Image 17
Image 18
Image 19
Image 20
Image 21
Image 22
Image 23
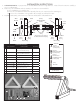
8. Attach Straps to Tubes:
Come in 6 inches from each tube end and attach a strap plate to the aluminum tube assembly. Use the self drilling screws
on the drill line to attach the plate. Look at the holes that were pre-drilled at the factory and use the same drill line. There
are 6 lines on each tube. Take the remaining strap plates and connect them evenly along the length
of the tube assembly. Attach Straps to strap plate. (Fig. D)
9. Attach Solar Blanket to Straps:
If Reel is to be placed at the end of the pool, attach cover to strap plate with plastic screw. (Fig. E) If Reel is to be placed
in offset position, then attach cover to strap plate forming a fold to act like a hinge and the plastic screw will go through two
layers of the solar blanket. (Fig. F)
Bubbles should face down.
Twist
Tubing To
Remove Excess
Play Prior
To Screwing
Together.
Fig. C
Thread
Strap
as Shown
Fig. D
Solar Blanket
Strap & Bracket
Plastic Screw
Fig. E
Fig. F
Solar Blanket Folded
Plastic Screw
Strap & Bracket
DISCARD
DISCARD