
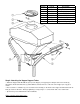
Replacement Part List


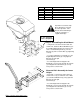


4
When ordering replacement parts
*USE PAINT CODE: TK=BLACK
Item # Part # Description
1 10192 Washer - Nylon Retainer 5/16
2 10111* Bracket - Motor Support, Upper
3 10112* Gate - Hopper
4 NB555 Washer - USS Flat, 1/2
5 7825Z Bushing
6 10051 Spring - Gate
7 NB579 Washer - 5/16 X 1 1/4 OD
8 10113 Deflector
9 NB556 Washer - USS Flat, 5/16
10 NB505 Bolt - 5/16-18 X 1 1/2 HCC
11 NB181 Nut - Nyloc 5/16-18
12 10975 Hopper
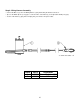
Step 1: Hopper Gate Assembly
• Assemble the Deflector (8), Hopper Gate (3) and Upper
Motor Support Bracket (2) together using four 5/16-18 X 1 ½”
Bolts (10), four 5/16” Washers (9), four 5/16” X 1 ¼” Washers
(7), four Springs (6), four Bushings (5), four ½” Washers (4)
and four 5/16” Nylon Retainer Washers (1) in the order shown.
• Tip: Use the 5/16” Nylon Retainer Washers (1) to hold the
assembly together for the next step. The four slots of the
Hopper Gate (3) need to be aligned with the Bushings (5) so it
can freely slide.
Step 2: Attaching the Hopper Gate
Assembly
• Using a ½” socket wrench and a ½” box end
wrench, attach the assembly made in Step 1 to the
Hopper (12) by sliding the four 5/16-18 X 1 ½” Bolts
(10) through the holes in the bottom of the Hopper
(12). Place a 5/16” X 1 ¼” Washer (7) over each
5/16-18 X 1 ½” Bolt (10) and securely fasten the
assembly with the 5/16-18 Nuts (11).
• Tip: Make sure the Hopper Gate (3) is able to slide
smoothly. If it doesn’t slide smoothly, the Bushings
(5) installed in Step 1 may not be correctly aligned.
Check to make sure the Bushings (5) are correctly
aligned with the four slots of the Hopper Gate (3) by
pressing down on the sides of the Hopper Gate (3).
You should feel resistance from the Springs (6),
indicating proper alignment.