
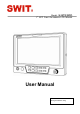
Owner's manual
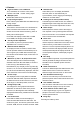


4. DB-9 Terminal Description
The Multi-functional DB-9 port centralized DC power input, CVBS input, picture-in-picture switch on/off and
TALLY light controlling. In your build-up EFP system, you can use only one DB-9 cable to input everything,
instead of the complex cable work.
The terminal description is as follows:
Terminal 1: Factory firmware burning
Terminal 2: Connect “PIP” with “VGND” to switch on the PIP window, and disconnect to switch off
Terminal 3: Connect “R” with “VGND” to switch on the Red TALLY light, and disconnect to switch off
Terminal 4: Connect “G” with “VGND” to switch on the Green TALLY light, and disconnect to switch off
Terminal 5: Factory firmware burning
Terminal 6: DC input, support 6.5V-17V wide range voltage
(Lower voltage will generate high current, and please use the high quality of DB-9 connector.)
Terminal 7: Ground port for DC power and controlling signal
Terminal 8: Composite video input
(The screen will not display if both BNC CVBS-IN and DB-9 CVBS-IN are connected)
Terminal 9: Ground port for CVBS signal
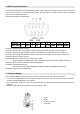
5. Cold Shoe Bracket
The provided monitor bracket supports both cold shoe and screw mount for camera connection.
1. For cold shoe: anticlockwise screw the knob to draw the bolt back, slide the cold shoe mount into camera,
and then clockwise adjust the knob to fasten.
2. For screw mount: clockwise screw the knob to draw the bolt directly into the screw thread of camera till
fastened.
3. Screw the ball head knob into monitors, and lock the ball head.
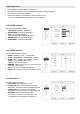
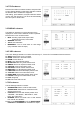
Terminal 1 2 3 4 5 6 7 8 9
Description
PIP G R DC_IN
VGND
CVBS_IN
SGND
Lock
Knob
Cold shoe mount
Screw bolt