Under Cabinet CD Clock Radio with Remote MODEL SCR2608 INSERUCTION MANUAL Operating Instructions BEFORE OPERATION THIS PRODUCT, READ, UNDERSTAND, AND FOLLOW THESE INSTRUCTIONS. Be sure to save this booklet for future reference.
IMPORTANT SAFETY INSTRUCTIONS The Lightning flash with arrowhead symbol, with an equilateral triangle is intended to alert the user of the presence of uninsulated dangerous voltage within the product’s enclosure that may be of sufficient magnitude to constitute a risk of electric shock to persons. CAUTION: TO REDUCE THE RISK OF ELECTRIC SHOCK, DO NOT REMOVE COVER (OR BACK). NO USER SERVICEABLE PARTS INSIDE. REFER SERVICING TO QUALIFIED WARNING: TO PREVENT FIRE SERVICE PERSONNEL.
Object and Liquid entry-Care should be taken so that objects do not fall and liquids are not spilled into the housing.
IMPORTANT INFORMATION REQUIRED BY THE FCC Since the Compact Disc (CD) circuitry may cause interference to other radios nearby, switch this set off when not in use or move it away from the affected radios. This device complies with Part 15 of the FCC Rules. Operation is subject to the following two conditions: (1) this device may not cause harmful interference; and (2) this device must accept any interference received , including interference that may cause undesirable operation.
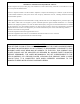
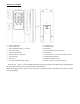
LOCATION OF CONTROLS 1. 2. 3. 4. 5. 6. 7. 8. 9. 10. 11. 12. LCD DISPLAY- A (for CD, CLOCK AND RADIO) VOLUME DOWN VOLUME UP CD DRAWER REMOTE SENSOR POWER ON INDICATOR POWER/ ALARM OFF BUTTON CD DRAWER OPEN/CLOSE BUTTON LCD DISPLAY B (FOR TIMER) MINTUE SET BUTTON (FOR TIMER) HOUR SET BUTTON (FOR TIMER) STEREO/MONO BUTTON (FOR FM RADIO ONLY) 13. 14. 15. 16. 17. 18. 19. 20. 21. 22. 23. 24. 25.
REMOTE CONTROL 1. 2. 3. 4. 5. 6. 7. 8. 9. OPEN /CLOSE KEY PLAY/PAUSE KEY FAST FORWARD (SKIP >>|) BUTTON VOLUME UP KEY VOLUME DOWN KEY REWIND (SKIP |<<) BUTTON RANDOM KEY MUTE KEY CD/ RADIO MEMORY KEY (MEM) 10. 11. 12. 13. 14. 15. 16. 17. 18. SNOOZE KEY ALARM SET KEY SLEEP KEY EQUALIZATION PRESET KEY (EQ) REPEAT KEY FUNCTION KEY ( to select the CD, Radio function) STOP/RADIO BAND KEY POWER/ ALARM OFF KEY Battery compartment (for Remote control) Insert two(2) “AAA”/1.
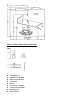
Under Cabinet Mounting Instructions z z z z z z z z z Tools Required Drill and 1/4” Drill Bit Ruler or Tape Measure Nail or Awl Scissors Screwdriver – Phillips Countersink (Optional) Masking Tape Safety Glasses
1 – Mounting template Parts Packed with your unit 1. 2. Spacers (3pcs of 1/4” , 3pcs of 1/2”, 3pcs of 1”) Washers (3pcs) 3. Phillips head screws (3pcs of 2 3/4”, 3pcs of 1 5/8”) 4. Mounting Template Before Mounting Empty contest of the selected cabinet under which the unit will be mounted and thoroughly clean the underside of the cabinet to remove any grease residue which might be present. We recommend the unit be mounted at the front edge of the cabinet.
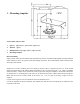
Mounting Procedure Step 1. If your cabinet does not have a overhang: a) Position template in desired location on underside of cabinet, flush with front edge. b) Then tape template in pace and go to step 2. If your cabinet have overhang: a) Measure the thickness of the overhang. b) Fold front of the template downward along the printed guideline that is closet to the thickness of your cabinet. c) Tape fold-down portion to backside of overhand, tape template to cabinet underside.
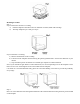
Helpful Hints: On wooden cabinets you may want to mark and start the drill holes with a nail or an awl. Be sure to hold the drill very firmly against the cabinet to reduce “walking” of the drill bit from the markings. Using masking tape above the hole locations on inside of wooden cabinet shelf to help reduce splintering. If installing the unit under a wood cabinet, you may wish to countersink the drilled hold for the INSIDE of the cabinet if a countersink the holes use the supplied washers.
FULL LCD DISPLAY UNIT POWER SUPPLY ( Mains 120V/60Hz) Connect the power cable plug to the (120V) wall outlet. Warning: Before using the unit. Check that the local mains supply is compatible with the HI-FI System (120V 60Hz) Do not plug or unplug the power cable when your hands wet. When planning not to use this unit for long periods of time (i.e Vacation etc.) disconnect the plug from the wall outlet.
CLOCK SETTING 1. 2. While in the CD or Radio mode, Press “Display/AL.Set” two time to enter the time mode. Press and hold MEMORY/C- ADJ button for 2 seconds, enter to hour adjustment mode( Hour will begin to flash) 3. Press SKIP >>| or SKIP |<< button to desired time. (e.g. 10:27pm -> 9:27am) 4. Press MEMORY/C-ADJ button, enter to minute adjustment mode.( Minute will begin to flash) d . Press SKIP >>| or SKIP |<< button to desired time. (e.g.
ALARM TIME SETTING 1. While in the CD or Radio mode, Press “Display/AL.Set” one time to enter the alarm time set mode. (The bell icon “ ” will appear and begin to flash) 2. Press and hold MEMORY/C- ADJ button for 2 seconds, enter to alarm hour adjustment mode (Alarm hour will begin to flash) 3. Press SKIP >>| or SKIP |<< button to desired time. (e.g. 10:27pm -> 9:27am) Press MEMORY/C-ADJ button, enter to alarm minute adjustment mode.
TO WAKE UP TO CD: a. b. c. d. e. Power on the unit by pressing the Power/AL. off button. Open the CD DRAWER and insert a CD (with the label side facing up) into the CD compartment. Close the CD DRAWER. Power off the unit by pressing the Power/AL. off button. Press AL.SET KEY (on the remote controller) repeatedly to select CD mode. (“CD” indicator will appear and cd indicator will begin to flash) f.
TIMER FUNCTION (0:01 --------19:59) 1. Continue press the HOUR SET button (T/HOUR) adjust the hour of the time. (from 19: --to 0: --) 2. Continue press the MINUTE SET button (T/MIN) adjust the minute of the time. (from --:59 to -- : 00) 3. When the count-down time reach to zero, the system will alarm for 3 minutes 4. To tune off the timer alarm. Simply PRESS and HOLD the Hour set button (T/HOUR) and Minute set button (T/Minute) for 3-5 seconds the timer will be turn off.
RADIO SECTION RADIO RECEPTION NOTE: In Radio operation mode, press Display/AL.Set button to display the clock time. 1. Press Power/AL. off button to turn on the unit. 2. Press RADIO button to select radio. 3. Select AM/FM band by pressing the STOP/BAND button. AM and FM are alternately selected each time when the STOP/BAND button is pressed. 4. How to use the buttons for radio a.
OPERATION OF CD PLAYER Power ON in CD mode and indicate the total tracks which contain in the disc If open the CD DRAWER or there is no disc inside the unit, “00” display will be indicated on the display. PLAYING A CD 1. Turn on the unit by pressing the POWER/ AL. OFF button 2. Press CD button to select CD function. 3. Press Open/Close button to open the CD drawer. 4. Insert a CD with the label facing up. 5. Close the CD Door by pressing Open/Close button.
SKIPPING TRACKS Press during play. Backward------------SKIP |<< button Fast Forward------------SKIP >>| button Press SKIP |<< button twice to skip to the beginning of the previous track. Press SKIP >>| button once to skip to the beginning of the next track. SEARCHING TRACKS Press and hold during play Backward------------SKIP |<< button Fast Forward------------SKIP >>| button PROGRAMMED PLAYBACK Up to 20 tracks can be programmed in to play in any desired sequence. 1.
TROUBLESHOOTING GUIDE You experience a problem with this unit check the chart below before calling of service.