
Installation Guide
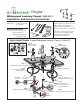


Caution: If replacing an older faucet ensure water supply is turned OFF
before removing, then open faucet valves to relieve water pressure.
Step 1 Attach hot & cold control valves
Step 2 Attach handles
Step 3 Install lift rod and attach spout
Step 4 Connect hoses between valves & spout
Step 5 Attach drain body to flange
Tee and hose assembly required
rotational swing clearance at base
of spout is 4 inches (102 mm)
minimum from hitting back wall
Pipe
Sealant
nished deck
front view
rotate until
threads stop
nished deck front view
HOT valve: red label
COLD valve: blue label
5
4
3
2
1
HOT
(red label)
COLD
(blue label)
nished deck
front view
CCW=OFF
CW=OFF
OFF
OFF
ange nut
ange
beveled
washer
friction
washer
back
of sink
PLUMBERS
PUTTY
*
use included ange
washer only when
plumbers putty is
not available
*
ange washer
(optional)
1
2
Thread Locker
1 drop
nished deck
front view
1
2
Installation Instructions
Page 2