
User's Manual
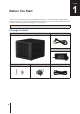
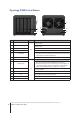
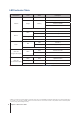
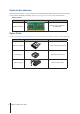
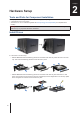
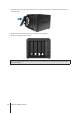
Table Of Contents

4
Chapter 1: Before You Start
Synology DS920+ at a Glance
No. Article Name Location Description
1
Status Indicator
Front
Displays the status of the system. For more information, see "LED
Indicator Table".
2
Drive Status Indicator
Displays the status of each drive. For more information, see "LED
Indicator Table".
3
Drive Tray Lock Lock or unlock drive trays.
4
USB 3.0 Port Connect external drives or other USB devices to the Synology NAS here.
5
Power Button
1. Press to power on your Synology NAS.
2. To power o your Synology NAS, press and hold until you hear a beep
sound and the Power LED starts blinking.
6
Drive Tray Install drives (hard disk drives or solid state drives) here.
7
LAN Port
Rear
Connect network cable here.
8
RESET Button
1. Press and hold until you hear a beep sound to restore the IP address,
DNS server, and password for the
admin
account to default.
2. Press and hold until you hear a beep, then press and hold again until
you hear three beeps to return the Synology NAS to "Not Installed"
status so that DiskStation Manager (DSM) can be reinstalled.
9
eSATA Port
Connect external SATA drives or Synology Expansion Unit
1
to the
Synology NAS here.
10
Power Port Connect power cord here.
11
Fan
Disposes of excess heat and cools the system. If the fan malfunctions,
the Synology NAS will emit a beeping sound.
12
Kensington Security Slot Attach a Kensington security lock here.
13
USB 3.0 Port Connect external drives or other USB devices to the Synology NAS here.
1
13
2
4
5
3
9
8
7
10
11
6
12
1
For more information about Synology Expansion Unit supported by your Synology NAS, please visit
www.synology.com
.