
User`s guide


5
Chapter 2: Getting Started with Synology VisualStation
Editing Device and System Settings
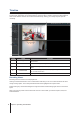
Device information and system settings of VisualStation can be viewed and edited from Surveillance Station. To
see device information and system settings, please do the following:
1
Open Surveillance Station.
2
Go to VisualStation.
3
Click Edit.
4
Select Edit Settings.
Getting to Know VisualStation
This section explains the basics of navigating and operating Synology VisualStation.
Using a Mouse or Joystick
Once VisualStation is powered on and booted up, the VisualStation user interface appears on the HDMI or VGA
display connected to it. In order to navigate and operate this user interface, you can plug a mouse or joystick into
one of the USB ports located on the back panel of VisualStation.
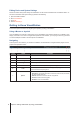
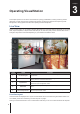
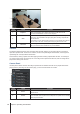
Navigating
At the top of the user interface, you should see a taskbar. Use this taskbar to navigate between pages. See the
graphic and explanation below:
Item Name Function
1. Live View Go to the Live View tab.
2. Timeline Go to the Timeline tab.
3. Recording List Go to the Recording List tab.
4. Log Go to the Log tab.
5. Notications View notications, such as system messages, warnings, etc.
6. Lock
Click to lock your VisualStation to the currently paired Synology NAS in order to
prevent other NAS from pairing with it.
7. Options
This menu includes the following:
1.
Information: View system information: model name, serial number, IP address,
fan status, paired server info.
2.
Network: Edit device name and network congurations.
3.
Firmware: Perform rmware upgrade.
4.
Shutdown: Power off VisualStation.