TF_EXPERT-PRO_INSFTW1_USA 04/12/13 11:48 PageC1 EN p. 1 ES p. 15 EN Descriptive diagram - Esquema descriptivo ES A B C D E F G H I K J Pressure Cooker User’s Guide Guía del usuario Réf INSFTW1 • 12/2013 • Subject to modifications ESPACE GRAPHIQUE www.t-falusa.
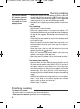
TF_EXPERT-PRO_INSFTW1_USA 04/12/13 11:48 PageC4 Table of contents Fig 1 Fig 2 Fig 3 CLICK Important safeguards p 1 Descriptive diagram p 2 Characteristics p 2 Compatible heat sources p 2 T-fal accessories p 3 Operating instructions p 3 Opening p 3 Closing p 3 Minimum filling p 4 2/3 1/2 1/3 Fig 4 Fig 7 Fig 10 Fig 13 Fig 5 Fig 8 Fig 11 Fig 14 Fig 6 Fig 9 Fig 12 Maximum filling p 4 Food preparation instructions p 4 Using the operating valve p 4 Using for the first tim
TF_EXPERT-PRO_INSFTW1_USA 04/12/13 11:48 Page1 IMPORTANT SAFEGUARDS When using pressure cookers, basic safety precautions should always be followed : 1. Read all instructions. 2. Do not touch hot surfaces. Use handles or knobs. 3. Close supervision is necessary when the pressure cooker is used near children. 4. Do not place the pressure cooker in a heated oven. 5. Extreme caution must be used when moving a pressure cooker containing hot liquids. 6.
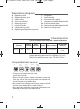
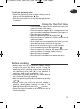
TF_EXPERT-PRO_INSFTW1_USA 04/12/13 11:48 Page2 Descriptive diagram A B C D E F G H - Operating valve Operating valve seat Safety valve Pressure indicator Opening button Long lid handle Lid positioning mark Operating valve positioning mark I J K L MNO- Lid gasket Steam basket Steam basket support Long pressure cooker body handle Pressure cooker body Short pressure cooker body handle Maximum filling mark Characteristics Pressure cooker base diameter - model references Capacity 6.
TF_EXPERT-PRO_INSFTW1_USA 04/12/13 11:48 Page3 T-fal accessories • The following pressure cooker accessories are available : EN ES Accessory Reference number Gasket X9010103 ES • To replace other parts or have repairs performed, please call on your local T-fal Approved Service Center. • Only use T-fal genuine parts designed for your product model. PT EL Operating Instructions This appliance cooks under pressure. Improper use may result in scalding injury.
TF_EXPERT-PRO_INSFTW1_USA 04/12/13 11:48 Page4 Minimum filling • Always pour a minimum amount of liquid of at least 8.5 oz (about 1 cup) into the pressure cooker. For Steaming: • At least 25 oz (about 3 cups) of water must be poured in. • Place the basket (J) onto the steaming support piece (K) provided for this purpose - Fig 5 Food placed in the steam basket must not touch the pressure cooker lid.
TF_EXPERT-PRO_INSFTW1_USA 04/12/13 11:48 Page5 EN To refit the operating valve: • Place the operating valve in place making sure to align it with the dot position (H). • Press the valve then turn it until the desired position is reached. ES Using for the first time • Fill the pressure cooker to the two-thirds mark (the maximum mark) with water. • Place the basket support (K) in the bottom of the pressure cooker and place the basket (J) on top of it. • Close the pressure cooker.
TF_EXPERT-PRO_INSFTW1_USA 04/12/13 11:48 Page6 During cooking The pressure indicator (D) prevents pressure from rising in the pressure cooker if it is not properly closed. • Select your recipe. Set the operating valve to if the recipe calls for low pressure or if it calls for high pressure. Refer to the table on page 12 for suggested cooking times if you are not following a recipe. • Decide if you are going to steam cook or immersion cook. For steaming: - Add at least 3 cups of water.
TF_EXPERT-PRO_INSFTW1_USA 04/12/13 11:48 Page7 EN valve (A) to the position. Once the pressure indicator (D) drops down: your pressure cooker is no longer under pressure. • Fast pressure release: place your pressure cooker under a stream of cold water. Once the pressure indicator (D) drops down: your pressure cooker is no longer under pressure. Turn the operating valve (A) to the position. • Now you can open it.
TF_EXPERT-PRO_INSFTW1_USA 04/12/13 11:48 Page8 Never use a sharp or pointed object to do this. Always have your pressure cooker checked by a T-fal Approved Service Center after 10 years of use. To clean the operating valve (A): • Remove the operating valve (A): Refer to the “Using the operating valve” heading. • Clean the operating valve (A) under running tap water - Fig 11 To clean the operating valve seat located in the lid: • Remove the valve (A).
TF_EXPERT-PRO_INSFTW1_USA 04/12/13 11:48 Page9 EN opening knob cannot be activated. Never force the pressure cooker open. Never tamper with the pressure indicator. Always make sure that the pressure inside the pressure cooker has been released.
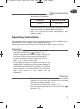
TF_EXPERT-PRO_INSFTW1_USA 04/12/13 11:48 Page10 Regulation Markings Marking Location Manufacturer's identification or trademark Lid handle Year and batch of manufacture Inside the lid Model reference Operating pressure (PF) Max.
TF_EXPERT-PRO_INSFTW1_USA 04/12/13 11:48 Page11 EN T-fal and Your Frequently Asked Questions Problems Recommendations If the pressure cooker has • Have your pressure cooker inspected by a T-fal heated up under pressure Approved Service Center. with no liquid inside: If the pressure indicator • This is normal for the first few minutes. did not rise and nothing • If the problem persists, check that: escapes from the valve - There is enough heat, if not, turn up the heat.
TF_EXPERT-PRO_INSFTW1_USA 04/12/13 11:48 Page12 Table of Cooking Times Vegetables Cooking Artichoke Asparagus Beets Broccoli Brussels sprouts Cabbage, green Carrots Cauliflower Celery Endives Green beans Leek Mushrooms Peas Potatoes Pumpkin (mashed) Rice Spinach Turnips White beans semi-dry Zucchini FRESH PRODUCE Valve position 1 - steam - immersion - immersion - steam - steam - steam sliced - steam leaves - steam sliced - steam - immersion - steam - immersion - steam - steam sliced - steam sliced - stea
TF_EXPERT-PRO_INSFTW1_USA 04/12/13 11:48 Page13 EN Limited Warranty ES •The body of your new T-fal pressure cooker comes with a ten year limited warranty for use under the conditions outlined in these instructions. This warranty covers: - Any defects relating to the metal structure of the pressure cooker body. - Any premature deterioration of the metal base. •For other parts, a one year parts and labor warranty is provided. This warranty covers any defects or manufacturing faults.
TF_EXPERT-PRO_INSFTW1_USA 04/12/13 11:48 Page14
TF_EXPERT-PRO_INSFTW1_USA 04/12/13 11:48 Page15 EN Indice de contenido Instrucciones importantes de seguridad p 16 Esquema descriptivo p 17 Características p 17 Fuentes de calor compatibles p 17 Accesorios T-fal p 18 Instrucciones de uso p 18 Apertura p 18 Cierre p 18 Llenado mínimo p 19 Llenado máximo p 19 Instrucciones de preparación de los alimentos p 19 Utilización de la válvula de funcionamiento p 19 Primera utilización p 20 Antes de la cocción p 20 Durante la cocción p 2
TF_EXPERT-PRO_INSFTW1_USA 04/12/13 11:48 Page16 INSTRUCCIONES IMPORTANTES DE SEGURIDAD Siempre que se utilizan ollas a presión, deben seguirse unas instrucciones básicas de seguridad: 1. Leer todas las instrucciones. 2. No tocar las superficies calientes. Utilizar las asas o las sujeciones. 3. Es necesario no descuidar la vigilancia de la olla a presión cuando se utiliza en presencia de niños. 4. No meter la olla a presión en un horno caliente. 5.
TF_EXPERT-PRO_INSFTW1_USA 04/12/13 11:48 Page17 EN Esquema descriptivo A - Válvula de funcionamiento B - Conducto de válvula de funcionamiento C - Válvula de seguridad D - Indicador de presencia de presión E - Botón de apertura F - Asa larga de la tapa G - Señal de posición de la tapa H - Señal de posición de la válvula de funcionamiento I J K L M N O - Junta de la tapa - Cestillo - Soporte del cestillo - Asa largo de la cuba - Cuba - Asa corta de la cuba - Señal de llenado máximo ES ES PT EL Caracter
TF_EXPERT-PRO_INSFTW1_USA 04/12/13 11:48 Page18 Accesorios T-fal • Los accesorios de la olla que podrá encontrar en las tiendas, son: Accesorio Referencia Junta X9010103 • Para el cambio de otras piezas o reparaciones, llame al Servicio Técnico Autorizado T-fal. • Sólo utilice piezas originales T-fal adecuadas a su modelo. Instrucciones de uso Esta olla cocina a presión. El uso inadecuado podría provocar lesiones por escaldaduras.
TF_EXPERT-PRO_INSFTW1_USA 04/12/13 11:48 Page19 EN Llenado mínimo • Introduzca siempre una cantidad mínima de líquido, al menos igual a 8.5 oz (2 vasos). Para una cocción vapor: • El llenado debe ser al menos igual a 25 oz (6 vasos). • Coloque el cestillo (J) sobre la pieza de soporte de cocción al vapor (K) suministrada para este fin. Fig 5. Los alimentos que están en el cestillo no deben estar en contacto con la tapa de la olla.
TF_EXPERT-PRO_INSFTW1_USA 04/12/13 11:48 Page20 Para colocar de nuevo la válvula de funcionamiento: • Coloque la válvula de funcionamiento en su lugar, asegurándose de que se alinee con la posición del punto (H). • Presione sobre la válvula y gire hasta la posición deseada. Primera utilización • Llene de agua 2/3 de la cuba. (señal de llenado máximo). • Coloque el soporte del cestillo (K) en el fondo de la cuba y deposite el cestillo (J) encima. • Cierre la olla.
TF_EXPERT-PRO_INSFTW1_USA 04/12/13 11:48 Page21 Durante la cocción El indicador de presencia de presión (D) le impide a la olla aumentar la presión si esta no está cerrada correctamente. • Seleccione su receta. Ajuste la válvula de funcionamiento en si la receta requiere baja presión o si requiere alta presión. Consulte la tabla en la página 27 para obtener los tiempos de cocción sugeridos si no sigue una receta. • Decida si va a cocinar al vapor o por inmersión.
TF_EXPERT-PRO_INSFTW1_USA 04/12/13 11:48 Page22 Fin de la cocción Para liberar el vapor: • Una vez que la fuente de calor esté apagada, tiene dos posibilidades: • Descompresión lenta: gire la válvula de funcionamiento (A) hasta la posición . Cuando el indicador de presencia de presión (D) baje: su olla ya no tiene presión. • Descompresión rápida: coloque la olla debajo de un grifo de agua fría. Cuando el indicador de presencia de presión (D) baje: la olla ya no tiene presión.
TF_EXPERT-PRO_INSFTW1_USA 04/12/13 11:48 Page23 Para conservar por más tiempo las cualidades de la olla: no ponga a calentar la cuba cuando está vacía. Nunca utilice objetos cortantes o puntiagudos para realizar esta operación. Es necesario revisar la olla en un Servicio Técnico Autorizado T-fal después de 10 años de utilización.
TF_EXPERT-PRO_INSFTW1_USA 04/12/13 11:48 Page24 puede accionarse. Nunca abra la olla a la fuerza. Sobre todo, no fuerce el indicador de presencia de presión. Asegúrese que la presión interior ha disminuido.
TF_EXPERT-PRO_INSFTW1_USA 04/12/13 11:48 Page25 EN Marcados o etiquetajes reglamentarios Marcado ES Localización Identificación del fabricante o marca comercial Asa de la tapa Año y lote de fabricación Dentro de la tapa Referencia modelo Presión de funcionamiento (PF) Presión máxima de seguridad (PS) Capacidad En el fondo externo de la cuba ES PT EL AR FA 25
TF_EXPERT-PRO_INSFTW1_USA 04/12/13 11:48 Page26 T-fal responde a sus preguntas Problemas Recomendaciones Si la olla se ha calen- • Lleve la olla a revisar a un Servicio Técnico tado a presión sin Autorizado T-fal. líquido dentro: Si el indicador de pre- • Esto en normal durante los primeros minutos. sencia de presión no ha • Si el fenómeno continua, compruebe que: subido y no sale nada - La fuente de calor es bastante fuerte, si no auméntela.
TF_EXPERT-PRO_INSFTW1_USA 04/12/13 11:48 Page27 EN Tabla de los tiempos de cocción Verduras ES FRESCOS CONGELADOS Cocción Posición de la válvula Posición de la válvula 1 2 Alcachofas Apio Arroz (legumbre) Brócoli Calabacines Calabaza (puré) Champiñones Coles de Bruselas Coliflor Endivias Espárragos Espinacas Guisantes Judías semi secas Judías verdes Nabos Patatas en cuartos Puerros rodajas Remolacha Repollo Zanahorias - Vapor - inmersión - Vapor - inmersión - inmersión - Vapor - Vapor - inmersión - inm
TF_EXPERT-PRO_INSFTW1_USA 04/12/13 11:48 Page28 Garantía limitada •Su nueva olla a presión T-fal incluye una garantía limitada de 10 años que cubre el aparato en las condiciones de uso que se especifican en estas instrucciones. Dicha garantía cubre: - los defectos relacionados con la estructura metálica del cuerpo de la olla a presión. - cualquier deterioro prematuro de la base metálica. •Las otras piezas están cubiertas por una garantía de un año que incluye piezas de repuesto y mano de obra.