TRANSMISSION SERVICE TECHNOLOGY TT100 USER’S GUIDE
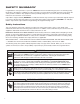
SAFETY SUMMARY Congratulations on the purchase of your new T-TECH Transmission Fluid Exchange System. The following safety information is provided as a guideline to help you operate your new transmission fluid exchange system under the safest possible conditions. Any equipment can be potentially dangerous to use when safety or safe handling instructions are not known or not followed.
WARNING – FLUIDS UNDER PRESSURE Hot transmission fluid, under pressure, can injure the eyes. Always wear eye protection (safety glasses) when opening transmission lines to protect the eyes against hot fluids being forcefully sprayed into them. Ordinary glasses do not have impact resistant lenses, they are NOT safety glasses. Always clean up transmission fluid spills immediately. Transmission fluid is very slippery when spilled.
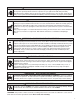
TABLE OF CONTENTS SAFETY SUMMARY Safety Instructions . . . . . . . . . . . . . . . . . . . . . . . . . . . . . . . . . . . . . . . . . . . . . . . . . . . . . . . . .2 Additional Safety Information . . . . . . . . . . . . . . . . . . . . . . . . . . . . . . . . . . . . . . . . . . . . . . . . . . . . . . . . . . . . . . . . . .2 Fluids Under Pressure . . . . . . . . . . . . . . . . . . . . . . . . . . . . . . . . . . . . . . . . . . . . . . . . . . . . . . . . . . . . . . . . . . . . . . . .
T-TECH APPLICATION NOTES General . . . . . . . . . . . . . . . . . . . . . . . . . . . . . . . . . . . . . . . . . . . . . . . . . . . . . . . . . . . . . . . . .21 BMW . . . . . . . . . . . . . . . . . . . . . . . . . . . . . . . . . . . . . . . . . . . . . . . . . . . . . . . . . . . . . . . . . . .21 BMW General . . . . . . . . . . . . . . . . . . . . . . . . . . . . . . . . . . . . . . . . . . . . . . . . . . . . . . . . . . . . . . . . . . . . . . . . . . . . .21 BMW 500 Series . . . . . . . . . . . .
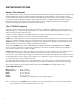
INTRODUCTION About This Manual This manual includes a Safety Summary, Operating Procedures, Machine Preparation, Maintenance Instructions and Troubleshooting Procedures for transmission fluid exchanging. Anyone intending to use this machine should become familiar with all the information included in this manual (especially the Safety Summary) before attempting to use the Transmission Fluid Exchanger.
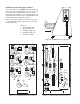
PREPARATION FOR USE Although minimal, T-TECH requires some preparation before use. The following instructions describe the necessary steps to prepare your new transmission fluid exchanger for use. Fitting Organization Locate the standard fittings assortment and set each fitting in the T-TECH cabinet storage position identified by the picture mounted on the backside of the cabinet cover. The standard fittings have a specific storage location inside the T-TECH cabinet.
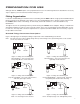
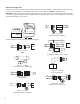
YELLOW Blue Band FIT315 FIT316 Figure 7. Fitting 314 Ford/Lincoln/Mercury – Fits earlier Ford, Lincoln, and Mercury small and large passenger vehicles Figure 8. Fitting 315 and Fitting 316 Any vehicle with 1/4 inch hose connections BLACK FIT317 FIT318 Figure 10. Fitting 319 Any vehicle with 3/8 inch hose connections Figure 9. Fitting 317 and Fitting 318 Any vehicle with 5/16 inch hose connections FIT320 FIT323 FIT324 FIT321 BLACK Figure 12.
Cabinet Drawer Storage Layouts The storage trays in the T-TECH cabinet are defined in Figure 15. Figure 16 and Figure 17 show the tray layout for storage of the standard fittings in trays 3 and 4 respectively. The numbers shown in the illustration are the specific fitting number for the standard fittings and will be referred to throughout this manual. Note: The numbers in Figures 16 and 17 correspond to standard fittings FIT301-FIT324. (There is no fitting numbered FIT313.) Figure 15. 1.
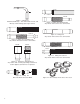
Special Fittings Kits Optional accessories on TT100 must be ordered separately. The special fittings shown in Figure 18 through Figure 34 are stored in small plastic cases (Figure 18) in trays 1 and 2, inside the T-TECH cabinet (Figure 15). CAUTION: Each of the special fittings kits displayed here is a unique matched set of fittings intended for special use. Always keep the fittings in each kit together. When the fittings in these kits become mismatched, it is possible to damage the fittings or the vehicle.
Figure 28. FIT410 Saab Figure 27. FIT409 Volvo Figure 30. FIT412 Pre-2005 Dodge Durango/Dakota Figure 29. FIT411 Mazda/Ford Banjo Fittings Figure 32. FIT414 3/8" Quick Connect, Ford Figure 31. FIT413 Allison 1000 Series Figure 34. FIT416 90º 3/8" Quick Connect, GM/Chrysler Figure 33.
Removing Air From the Cylinder When using the T-TECH for the first time, there may be space at the top of the cylinder (air in the cylinder). If not corrected, this condition may short future exchanges. If for some reason the piston is at the bottom of the cylinder, or there is large air pocket above the piston, the piston can be moved to the top of the cylinder by the following method. Service Hose Adapters 1. Set CONTROL VALVE to SERVICE VEHICLE. 2.
OPERATION INSTRUCTIONS For first time use, do not perform any of the following procedures until you have completed the procedures in Preparation For Use. All procedures must be performed in the order presented. CONTROL VALVE Figure 36. Control Valve Positions For each service being performed, always make certain to fill the cylinder with the specific type of ATF required by the vehicle to be serviced.
Fill Cylinder Function The Fill Cylinder function is used to fill the T-TECH cylinder with new ATF and empty the cylinder of old ATF. CAUTION: Fill cylinder completely. Air below the piston will result in an incomplete exchange as this air will compress and not move the piston at beginning of the exchange process. (This condition usually occurs only during the initial fill.) Using a Bulk Dispenser Gun To use this method, a bulk dispenser gun (see Figure 38) accessory kit must be used.
Connecting to the Vehicle Connecting to the vehicle for service requires identifying the automatic transmission cooling lines and making the necessary connections to exchange ATF. Identifying Cooling Lines Figure 40 is a diagram of a typical automobile transmission cooling system. Transmission cooling systems are essentially the same from one vehicle to another though they may be routed differently or the fittings might be in slightly different locations.
Hose Clamp Flare RED FIT304 FIT303 RED BAND Figure 45. Insert Fittings Figure 46. Attach Service Adapter Hoses 8. Make certain the hose clamp is tightened on the inside of the hose clamp flare on each fitting (see Figure 45) to keep the hose from coming off. CAUTION: Over tightening the adapter hose clamps will destroy the hose ends over a period of time. Clamp the hoses down with a snug fit only. If they still leak, see Troubleshooting. 9.
Fluid Exchange Function Use this function to exchange old automatic transmission fluid (ATF) with new ATF. Bulk Fill Service Check Valve Port 1. With the T-TECH auto align feature, you need not Valve be concerned about which service transfer hose in SERVICE Position is connected to the transmission cooling line or to the radiator because flow direction is controlled Three Way Valve through the T-TECH unit. New 2.
Bypass Feature The T-TECH bypass feature allows new ATF to loop within the vehicle when the exchange is complete and the piston is at the top of the cylinder. This feature allows the operator to walk away (work on something else, etc.) when the machine is running, without being concerned about service completion. When the piston reaches the top of the cylinder (old ATF has displaced all of the new ATF), the bypass feature is automatically engaged.
MAINTENANCE General There is no periodic maintenance necessary on the T-TECH unit. Troubleshooting The following troubleshooting flow charts are provided for solutions to problems that may occur during various operating processes. Vehicle Service The machine is not filled with new fluid Is the piston at the top of the cylinder? Yes No Orient CONTROL VALVE to SERVICE VEHICLE and retest.
Fill Cylinder Using Bulk Dispenser Is the piston at the top of the cylinder? No Is there a strong, steady flow? Yes No Yes See REMOVING AIR FROM THE CYLINDER for removal instructions. Verify CONTROL VALVE is set to FILL CYLINDER and retry fill process. No Is the bulk dispenser gun connected to the SERVICE PORT? Turn bulk dispenser gun off. Disconnect one hose adapter from transfer hose. Turn gun on, wait 4-5 sec. Turn gun off. Reconnect hose adapter (over used ATF container).
T-TECH APPLICATION NOTES General The information in the following pages provides information for specific T-TECH applications. The information provided here is listed alphabetically by vehicle manufacturer and vehicle type. CAUTION: Some automobile manufacturers use snap type connectors on transmission cooling lines. To avoid damaging the radiator, never remove the fitting from the radiator but rather use the proper disconnect tool to remove line from fitting.
Radiator Dodge Dakota (to 1997) and some Ram FIT403 Note: Whenever using special fittings from FIT403, start them by hand and slowly tighten enough to prevent leaks. Vehicle Transmission Cooling Line Line Removal Tool Use FIT403 on the 1995 to 1997 Dakota (see FIT412 for post 1997) and some Ram models. The quick connect fitting in the Dodge Dakota transmission cooling line (at the radiator) requires a removal tool that is not supplied. FIT403 is installed on the Dakota as illustrated in Figure 54.
Dodge Ram [Pre-2001 Turbo Diesel] Instructions 1. The Dodge Turbo Diesel uses the large quick connect fitting in FIT403, but it is easier to locate the 1/2 inch hose connection near the bottom of the radiator and use 1/2 inch fittings FIT321 and FIT324 with hose clamps. Some Dodge Durango and Dakota 1997-2004 FIT412 FIT412 is a three part fitting (see Figure 56). Connect to Service Hose Adapter Instructions Connect to Service Hose Adapter Radiator Vehicle In-Line Transmission From FIT412 1.
Ford Contour FIT408 O-Ring FIT408 is a two part fitting that requires an O-ring seal to the transmission line. To Service Adapter Hose To Radiator CAUTION: These fittings are a matched set and must be kept together in the small plastic box marked FIT408. Instructions 1. Remove the transmission cooling line from the radiator. 2. Attach the female portion of FIT408 to the transmission cooling line. 3. Attach the male portion of FIT408 to the radiator (see Figure 58).
Many 2002 to 2006 Ford Explorers and Mercury Mountaineer models feature a sealed transmission system with no automatic transmission dipstick. The instructions below outline the proper service techniques for fluid level check on such models using the T-TECH FIT516 Ford Fill Adapter Kit. Suggested Service Tools: Oil suction gun, 3/16" Allen or T-30 Torx wrench and a T-TECH FIT516 Ford Fill Adapter Kit. 1. Ensure the vehicle is sitting level.
Ford Taurus and Windstar FIT403 FIT403 must be installed at the transmission in Ford Taurus and Windstar and in the Mercury Sable. For some 1993 and newer vehicles, use the larger diameter fitting in FIT403 (see Figure 60) with FIT321 used as the female side. For some 1993 and older use the smaller diameter fitting in FIT403. CAUTION: These fittings are a matched set and must be kept together in the small plastic box marked FIT403.
Mercury Mountaineer See Ford Explorer Instructions. Mercury Mystique FIT401 CAUTION: These fittings are a matched set and must be kept together in the small plastic box marked FIT401. Instructions 1. 2. 3. 4. Remove the stock bolt, the fitting and the crush washers from the radiator. Install the T-TECH female half to the stock bolt and washers. Install the T-TECH male half into the radiator using the white nylon gasket (supplied).
Allison Series 1000 Special Fitting Kit FIT413 (Optional) CAUTION: T-TECH Automatic Transmission Fluid Exchange Machines are designed to bleed Automatic Transmission Fluid (ATF) into the overflow container if system pressures exceed 85 PSI. Please note that the FIT413 Kit cannot be used in conjunction with T-TECH Model No. JB100 because of the pressure limitations of that early model.
3. 4. 5. 6. 7. Install the male half of the special fitting FIT411 into the radiator with a supplied nylon gasket. When service is completed, return the fittings to special fittings case. Reinstall factory parts. Start the engine. Check for leaks and fluid quantity. Mercedes-Benz Standard Fitting FIT322 The Mercedes-Benz standard fitting FIT322 looks similar to the BMW special fittings FIT402 but is somewhat smaller. Instructions Use the instructions and picture for BMW FIT402.
Toyota Toyota Camry Note: When servicing Toyota Camry’s with 4 cylinder engine, a low line pressure condition may be encountered. This is normal and requires the following steps to perform the service. 1. With the T-TECH connected to the vehicle through a cooler line, start the vehicle. 2. Set the parking brake, with one foot on brake, place the transmission in neutral and increase the engine speed to 1900 RPM. Monitor the exchange process until completed. 3.
REPLACEMENT PARTS LIST External Parts List 5 ® T-TECH 6 CAUTION Do not exceed 75 PSI input pressure when filling the T-TECH. WARNING Failure to follow instructions may cause damage or explosion; always shield eyes. Read entire instruction manual before use.
Item 32 Description Part Number Transmission Fluid Exchanger, TT100 Model 150-012-000 2 Caster Kit (2 Standard, 2 with Brake) 413-079-666 3 Fitting, Elbow, 45 degree 253-377-666 4 Fitting, Brass 253-376-666 5 Valve Knob 246-433-000 6 Pressure Gauge 251-003-000 7 Quick Connect, Male COU120 8 Quick Connect, Female COU110 † Service Hose Assembly 870-675-000 † Tubing, Nylon 1/2" outside diameter, 44" length 059-212-044 † Tubing, Nylon 1/2" outside diameter, 30" length 059-212-
REPLACEMENT PARTS LIST CONTINUED Internal Parts List 9 6 7 4 5 13 10 3 11 8 16 12 15 1 14 2 33
Item Part Number 1 Shuttle Valve Assembly with fittings 870-868-000 2 Fitting – Tee 1/2 tube 253-304-002 3 Control Panel – TT100 440-665-100 4 Fitting – Elbow 90 Degree 3/8 MPT x 1/2 Tube 253-307-002 5 Panel – Back 440-660-100 6 Valve 4-Way 252-069-000 7 Fitting – 3/8 MPT x 1/2 Tube 253-412-002 8 T-TECH Cabinet Assembly 134-316-000 9 Fitting – Reducer 1/2 stem x 1/4 Tube 253-301-002 10 Fitting – Tee 1/2 MPT x 1/2 Tube 253-415-002 11 Check Valve 1/2 MPT 253-095-666 12 Fitt
T-TECH Fittings and Tools Description Part Number Standard Fittings Assortment FIT300 Includes: Description Special Fittings Assortment Part Number FIT110 Includes: GM Large Female FIT301 Ford Escort/Nissan/Mazda FIT401 GM Large Male FIT302 BMW FIT402 GM Small Female FIT303 Ford Taurus/Full Size Dodge Trucks FIT403 GM Small Male FIT304 3/8 Quick Connect, GM/Chrysler FIT404 Chrysler Large Male FIT305 Jeep/Chrysler FIT405 Chrysler Large Female FIT306 Ford/Dodge FIT406 Chrysler
PLUMBING DIAGRAM 36
LIMITED WARRANTY Clore Automotive, LLC warrants your T-TECH to be free from defects in material and workmanship for a period of one year from the date of sale to the original user or consumer purchaser. If your T-TECH malfunctions or fails within the 12 month warranty period because of a defect in material or workmanship, we will repair it without charge. This warranty is in lieu of all other express warranties.
TT100 USER’S GUIDE READ CAREFULLY BEFORE OPERATING UNIT! WARNING: This product contains chemicals, including lead, known to the State of California to cause cancer, birth defects and other reproductive harm. Wash hands after handling. Clore Automotive • Kansas City, MO 64161 • www.t-techonline.com • 913.310.