
User manual

HH905RH2L Replacement Cable (2,300mm / 7.5ft)
HH905RH2S Replacement Cable (1,200mm / 4ft)
<Attachments>
Hex wrench (2.5mm & 3mm)
*
When detaching the cable, be sure to remove the cable from the
footboard first, according to the instructions outlined in this manual.
It is not possible to remove the cable from the upper section without
removing it from the footboard first.
*
While replacing the cable, please handle with care so as not to bend
the cable wires.
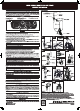
1.
Loosen the T-bolt and extend the two legs outward. Stand the
footboard upright and straighten out the cable.
2.
Loosen and remove the plastic nut (A). Then, remove the cover
plate (B) as shown as Fig.1.
3.
Insert a 2” (5cm) tall support wedge (box, book, etc) under the
footboard (Fig.2).
4.
Hold the upper section upside down as shown in Fig. 3. Then, press
down on the pull rod about 2” (5cm) as shown in (Fig.4), freeing the
cable from the footboard section.
5.
At the top of the footboard section, loosen the screw (C) with the
included 2.5mm hex wrench (Fig.5).
6.
Hold the red bushing (D) and pull up the cable, completely removing
it from the footboard section (Fig.6).
7.
Remove the cable through the slit in the red bushing. Be careful not
to lose the bushing, nut (A), or cover (B).
8.
Loosen the three screws (E-G) using the included 2.5mm hex
wrench (Fig.7).
9.
Remove the lower pipe section, revealing the cable holder (Fig.8).
10.
Loosen and remove the screw (H) with the included 3mm hex
wrench (Fig.9). Then, remove the cable from the cable holder.
11.
Remove the cable through slit in the red bushing (D‘) as shown in
Fig.10.
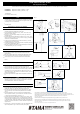
1.
Pass the new cable through the slit in the red bushing (D'). Please
note that the larger hole of the bush is seen outside (Fig.10).
2.
Place the ball-end of the cable into the cable holder (Fig.11). Tighten
the screw (H) with the included 3mm hex wrench (Fig.8). Insert the
red bushing (D’) into the lower end of the pipe section. Then, re-
tighten the screw (G). Be careful as to not allow the screw (G) to hit
the slit of the bushing (D’).
3.
Insert the pipe section into upper section. Re-tighten the screws (E,
F).
*
Even when the pipe section is fixed to the upper section, the tension
adjuster can move freely up and down until the cable is attached to
the footboard section. This is not a malfunction.
4.
As you did when detaching the cable, insert a 2”(5cm) tall support
wedge (box, book, etc) under the footboard to support that.
5.
Pass the new cable through the slit in the red bushing (D). Please
note that the larger hole of the bushing should be on the outside
(Fig.6).
6.
Insert the bushing (D) into the top end of the footboard section.
Then re-tighten the screw (C). Be careful as to not allow the screw
to hit the slit of the bushing (D) (see Fig.6 - 5).
7.
Hold the upper section upside down as shown in Fig.3. Then, press
down on the pull rod about 2” (5cm). The ball-end of the cable will
come down close to footboard (Fig.4). Align the ball-end of the cable
to the cable holder, release the tension on the pull rod and allow the
ball-end to settle into the holder. It will then be fixed into position by
spring tension.
8.
As seen in Fig.1, place the cover plate (B) over the cable holder and
tighten the plastic nut (A) to secure the cover plate in place.
Cable Replacement Manual
TAMA REMOTE HI-HAT STAND
Attach the new cable to the footboard section
Please read this manual in its entirety before you begin to replace the cable. Store this manual in a convenient place for future reference.
Detach the cable from the upper section
Attach the new cable to the upper section
NOTE
NOTE
Detaching the cable from the footboard
(A)
Plastic nut (A)
Cover plate (B)
Fig.1
Fig.2
Fig.3
5cm
(2")
Press down
Cable
Fig.4
(C)
(D)
Slit
Larger hole
Fig.5
Fig.6
(E)
(F)
(G)
(D')
(D')
(H)
Fig.7
Fig.8
Fig.9
Fig.10
Fig.11
Ball end of the cable
cable holder
Slit
Larger hole
Fig.12
Ball end of the cable
Lower pipe section
Tension adjuster
■ Sie können ein PDF dieser Sicherheitsanweisung auf Deutsch unter http://www.tama.com finden.
■ Vous pouvez trouver un PDF de ce manuel d'instructions de sécurité en français sur le site http://www.tama.com.
■ È possibile trovare un PDF di questo Manuale di istruzioni per la sicurezza in italiano all’indirizzo http://www.tama.com.
■ Encontrará disponible este Manual de instrucciones de seguridad en formato PDF y en español en
http://www.tama.com.
■ Można znaleźć PDF niniejszej instrukcji bezpieczeństwa w języku polskim na http://www.tama.com.
■ Pode encontrar um PDF deste Manual de Instruções de Segurança em português em http://www.tama.com.
■ Вы можете найти это руководство по технике безопасности в формате PDF на русском языке по адресу
http://www.tama.com.
■ 点击此处查看 PDF版的中文安全使用说明 : http://www.tama.com