
Manual

This instruction manual was issued in June 2011. Specifi cations and design are subject to change without notice.
この取扱説明書は2011年6月現在の物です。製品改良のために予告なく仕様を変更する事がありますので、あらかじめご了承ください。
スプリングシートの調整(写真8)
スプリングシートは従来のボトム
シンバルの角度調整部にスプリン
グを入れる事で、オープン時はボ
トムシンバルが傾き、クローズ
するにつれてシンバルが水平にな
る事によって、シンバルを閉じる
時の二枚のシンバル間の空気をス
ムーズに抜き、より明確にフット
クローズ音を引き出す機構です。
調整ボルトを左向きに回すと、よ
りボトムシンバルを傾ける事がで
きます。好みの傾き具合が決まっ
たらロックナットを左向きに回し
てロックして下さい。
ティルトシステム(写真9)
スタンド自体を傾けて、ハイハッ
トシンバルの角度を調整する事が
出来ます。Tボルト②を緩め、よ
り脚を開くようにスライダを押し
下げるにつれてスタンドが前傾し
ます。好みの位置で再び②を締め
て固定します。
より長く滑らかなアクションをお楽しみ頂く為に。時々乾いた布でほこ
りや汚れを拭き取って下さい。チェーン部には錆を防ぐために時々オイ
ル(TAMAチューンナップ・オイルTOL2)を差して下さい。ベアリングや
ヒンジ部は給油の必要が無い設計ですので、オイルを差す必要はありま
せん。
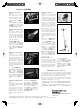
スタビライザーの調整(写真7)
スタビライザーの位置を調整する
事で、演奏中のスタンド自体の安
定感を高める事が出来ます。ま
ず、フットボードを折りたたみ、
二本の角頭ボルト (c) を緩め、ラ
バー部を引いて伸ばして下さい。
適当な位置で角頭ボルト (c) を再
び締めて固定します。
〒461-8717愛知県名古屋市東区橦木町3-22
www.tama.com
Adjustment /
各部の調整
Adjusting the spring tension
(Photo 4)
The spring tension can be
adjusted to any of 6 levels.
Turning the adjuster clockwise
increases the spring tension.
スプリングテンションの調整
(写真4)
テンション調整ダイアルを回す事
で、6段階にスプリングテンション
を調整出来ます。ダイアルを右に
回すと踏み心地が重くなります。
Adjusting the duo spike length
(Photo 5)
Each leg has a rubber tip and
spike. When using a spike to
keep the stand from walking,
loosen the square-headed bolt
(a), slide the spike to the desired
length, and then retighten the
square-headed bolt (a).
Duospikeの調整(写真5)
二本の脚の先端は、床の状況に合
わせてラバーとスパイクを選択で
きます。スパイクを出して使う場
合は、角頭ボルト(a)を緩めて剣先
を出し、好みの長さで再度締めつ
け固定します。
Adjusting the footboard angle
(Photo 6)
The angle of the footboard
can be adjusted. Loosen the
two square-headed bolts (b),
slide the backside cover of the
base frame up or down until
the footboard is at the desired
angle, and then retighten the
bolts (b). Make sure the two
bolts are parallel when they are
tightened.
フットボード角度調整(写真6)
二本の角頭ボルト(b) を緩め、背
面カバーを上下にスライドさせる
事でフットボードの角度を調整す
る事が出来ます。好みの角度が決
まったら再びボルト(b)を締めて固
定します。この時、二本のボルト
が平行になっているか確認して下
さい。
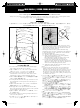
Adjusting the Spring seat
(Photo 8)
Using the small spring, the
Spring seat causes the bottom
cymbal of the hi-hat to tilt
slightly when the hi-hat cymbals
are opened. When they are
closed, both the top and bottom
cymbals are flattened by the
compression of the spring.
This works as an air deflector
between the two cymbals. As
a result, this will give you a
tighter “foot close” sound.
To tilt the bottom cymbal
more, turn the adjusting bolt
counterclockwise. When you
reach the desired angle for the
desired sound, turn the locknut
counterclockwise to lock the
angle.
Adjusting the tilt (Photo 9)
The angle of the hi-hat cymbal
can also be adjusted by tilting
the stand itself. First, loosen
the T-bolt
2
, and then slide
the slider to the desired angle.
Retighten the T-bolt
2
when the
stand is at the desired angle.
To ensure parts continue to move smoothly over time, periodically
wipe off dust with a dry cloth and lubricate the chain with TAMA
TOL2 tune-up oil. Please note that bearings and hinges do not
require lubrication due to their lubrication-free design.
The fixing screws may become loose due to vibrations during
playing or transport. Use the included wrench or a Phillips
screwdriver to tighten them as necessary.
Adjusting the stabilizer length
(Photo 7)
The stability of the stand can be
adjusted by changing the length
of the stabilizer.
First, fold up the footboard.
Next, loosen the two square-
headed bolts (c), pull the
stabilizer rubber to the desired
length, and then retighten the
bolts (c).
Maintenance/
メインテナンス
Photo 4
写真
4
Photo 8
写真
8
Photo 9
写真
9
Photo 5
写真
5
Photo 6
写真
6
Photo 7
写真
7
Tension
adjuster
テンション
調整ダイアル
(a)
(b)
(c)
backside
cover
背面カバー
2
Lock nut
ロックナット
Adjust bolt
調整ボルト
Tilt more
傾ける
Lock
固定する
TAMA HI-HAT STAND.indd 2TAMA HI-HAT STAND.indd 2 2011-4-27 15:02:072011-4-27 15:02:07