2FT TRAMPOLINE WITH BASKETBALL HOOP Assembly, Installation, Care, Maintenance, and User Instructions USER MANUAL
PLEASE DO NOT RETURN TO STORE STOP Please do not return this product to the retailer!! We are able to assist you in ANY way If you find that you have any trouble with assembly or missing or damaged parts please contact the seller.
AwARNING YOU MUST CAREFULLY READ AND UNDERSTAND THESE OPERATING INSTRUCTIONS BEFORE PUTTING TOGETHER AND USING THIS TRAMPOLINE. KEEP THESE OPERATING INSTRUCTIONS SO THAT YOU CAN REFER BACK TO THEM LATER OR PASS THEM ON IF YOU SELL THIS TRAMPOLINE. THIS TRAMPOLINE MAY ONLY BE USED TOGETHERWITH THE NET THAT COMESWITH IT. AT庄NTION! - Only for domestic use. - This product is designed for outdoors use. - Only one user at a time. Risk of collision.
INTRODUCTION 。 。 Before using this trampoline, please read all instructions carefully and make sure you follow it. Just like any other leisure activity, there is a risk of injury. To avoid injuries, ensure that you observe the corresponding safety regulations and tips. Misuse of this trampoline is dangerous and can lead to serious injuries! •Trampolines are bouncy equipment that transport the user into unusual heights and different postures.
• Do not jump if you are tired. Keep the exercise times short. • Properly secure the trampoline when It is not in use. Secure it against unauthorized usage. If a ladder is being used, the spotter should remove this from the trampoline if they leave the area in order to prevent unauthorized access by children under the age of six. • Keep objects faraway that could get in the way of the trampolinist. Keep the space around the trampoline free.
·The user should wear a T-shirt, shorts or a pullover, as well as proper gym shoes, heavy socks or go barefoot. If you are a beginner, to protect yourself from scratches and grazes you should wear a long-sleeve T-shirt and long pants until you have mastered the correct landing positions and forms. When on the trampoline, do not wear shoes with hard soles, such as tennis shoes, as these excessively wear down the material of the mat. ·Always climb properly on and off the trampoline to avoid injury.
TIPS TO REDUCE THE RISK OF ACCIDENTS • The role of the user in the prevention of accidents It is vital to keep control while jumping. Do NOT move on to more complicated, more difficult exercises before mastering the basic jumps. Read, understand and practice all safety precautions and warnings before the use of the trampoline. A controlled jump is a jump in which your starting and landing point on the mat are ide ntical.
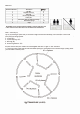
LESSON PLAN The following lessons are suggested for learning of the basic steps and jumps before passing to more difficult and more com plicated丿umps. Read and understand all safety information before actually getting on the trampoline and using it. In addition, the supervisor and pupil should fully discuss body movements and trampoline safety information and the supervisor should perform a demonstration. Lesson 1 A. Performing the right techniques for getting on and off the trampoline B.
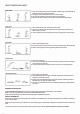
三 一 BASIC TRAMPOLINE JUMPS f ) )) - 停厂鸟 因/- 1. Land in a flat seated position. 2. Place your hands on the mat next to your hips and keep your elbows relaxed. 3. Return to the upright position by pushing off with your hands. 三 r FRONT DROP = 1. Start with the basic jump and perform a low jump. 2. Land on your knees with a straight back and upright body and keep your balance with your arms. 3. Jump back into the basic jumping position by swinging your arms upwards. `_ [勹二勹三 三 1.
PARTS LIST Reference Number 1 2 3 4 5 6 7 8 Descriotion Top Rail Top Rail with Leqs Base Leg Vertical Leq Extension Frame pad Trampoline Mat, stitched with V-Rinqs Galvanized Sorinqs Rope QTY(PCS) 4 4 4 8 1 1 72 8 REMEMBER TO USE GLOVES DURING ASSEMBLY TO AVOID PINCHING and IT WILL TAKE AT LEAST TWO PEOPLE TO ASSEMBLE THE TRAMPOLINE STEP 1 - Frame Layout Lay out the following 20 pieces that you will need to begin with the frame assembly, ensure the holes on the curved poles (#1,#2) are facing upwar
STEP2 - Support Leg Assembly Slide all Vertical Leg Extensions(#4) into Base Legs(#3) as shown. Twist the poles until the push buttons click in, locking the poles together. STEP3 - Top Rail Assembly .... , I #1 I #2 11+- l Two people will be necessary at this point to assemble the trampoline. l Take two Top Rail with Legs (#2) and one Top Rail (#1), and join them together. #4 Then connect it with the "Leg Section" assembled in Step 2 to form a curved frame section.
IMPORTANT NOTICE Make sure the holes on the Top Rail with Legs (#2) and the Vertical Leg Extension(#4) are aligned. If the holes are not aligned, please rotate the Vertical Leg Extension(#4) so that the 2 holes match each other. • These holes needs to be aligned so that you can assemble the safety net. STEP 4 -Trampoline Mat Assembly CAREFUL-When attaching the springs, the Connector Points can become pinch points since the trampoline is tightening up. Two people are recommended to assemble this step. A.
C. How to use the Spring Loading Tool. STEP I: Hook the springs into the v-rings of the jumping mat, and attach one end of the spring loading tool to the v-ring. STEP II: Extend spring loading tool and hook the other end of the spring onto the trampoline frame. Please be careful where you place your hands and other parts of your body during spring assembly as connector points become pinch points! v maintain the count of springs.
STEP 5 - Frame Pad Assembly A. Place the Frame Pads (#5) over the trampoline so that the springs and the steel frame is covered. Tie the elastic strap underneath the cover to the legs of Top Rails (#2). Make sure the pad is securely attached to the frame and in the proper position prior to use the trampoline. B. To make sure there's no gap between the Jumping Mat (#6) and the Frame Pad (#5) so as to prevent foot getting caught during use, "sew" these two pieces together with Rope (#8).
。 。 Enclosure Part List < po I •"h• ,.,.--.
Lower Pole Assembly • Place the Lower Net Pole (#D) next to the Vertical Leg Extension (#8), slide the Eye Bolt(#G) from the bottom of the Lower Net Pole (#C), insert it through the Bar Spacer (#E) and the top hole on frame, secure it with Washer (#F) and Nut (#I) with Wrench (#M). • Secure the bottom hole with Screw(#H), Bar Spacer (#E), Washer (#F) and Nut (#I) with Wrench (#M). • Repeat the above steps to assemble the Lower Board Pole (#B).
STEP 3: Spread the Safety Net (#L) out on the trampoline mat, align the door to where you would like to get in and out of the trampoline. The edge with the pre-sewn hanging loop on the upper part of the net will be hooked to the top of the poles (See B). _ B2 STEP4: To secure the bottom of the Safety Net (#L), attach the buckles to the V-rings of the jumping mat as shown below.
STEP 6: After you have set up the trampoline the same as shown in figure 7, check all the fastenings on your trampoline (maybe need two adults help), so the net will be tight enough for the trampoline. ®-��� IX ,心砌》 FIGURE7 IMPORTANT WARNING!! YOU SHOULD GO BACK NOW AND STRETCH ALL ATTACHMENT HOOKS TIGHT AND DOUBLE CHECK TO S庄WHETHER YOU HAVE FASTENED THE SCREW AND BOLT OR NOT, SO THE SAFETY NET STANDS STIFF. OTHERWISE, THE SAFETY NET WILL NOT FUNCTION PROPERLY.
Basketball System Assembly Connect the Fix Plate (#2), Plastic Board (#1), Hoop (#4 #5) and U-Shape Connecting Tube (#6) together with M8 Screw, washer and Nut (#3). Connect the complete basketball system with the Board Poles (marked with A&B) as the digram shown.
2-Step Ladder Assembly Hang the ladder on the ring element that is closest to the net entrance.