D00942621A X- 01 D2 Super Audio CD/CD Player Owner’s Manual . . . . . . . . . . . . . . . . . . . . 2 Manuel du Propriétaire . . . . . . . . . . . 27 Bedienungsanleitung . . . . . . . . . . . . . .
CAUTION: TO REDUCE THE RISK OF ELECTRIC SHOCK, DO NOT REMOVE COVER (OR BACK). NO USERSERVICEABLE PARTS INSIDE. REFER SERVICING TO QUALIFIED SERVICE PERSONNEL. The lightning flash with arrowhead symbol, within an equilateral triangle, is intended to alert the user to the presence of uninsulated “dangerous voltage” within the product’s enclosure that may be of sufficient magnitude to constitute a risk of electric shock to persons.
This product has been designed and manufactured according to FDA regulations “title 21, CFR, chapter 1, subchapter J, based on the Radiation Control for Health and Safety Act of 1968”, and is classified as class 1 laser product. There is not hazardous invisible laser radiation during operation because invisible laser radiation emitted inside of this product is completely confined in the protective housings. The label required in this regulation is shown ①. ① For U.S.A.
Features The latest VRDS mechanism for Super Audio CD (Specially developed ball bearings for the optimum VRDS mechanism.) The VRDS mechanism securely clamps the disc to the turntable whose diameter is exactly the same as that of the disc. This system completely eliminates vibration inherent to removable media and unwanted vibrations generated by the mechanical systems.
Before Use What’s in the box Please confirm that the following accessories are in the box when you open it. Remote control unit x 1 Batteries (AA, R6, SUM-3) x 2 Felt sheet x 3 Power cord x 1 Owner’s manual x 1 Warranty card x 1 Conventions about This Manual Read this before operation < As the unit may become warm during operation, always leave sufficient space around the unit for ventilation. < The voltage supplied to the unit should match the voltage as printed on the rear panel.
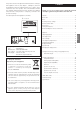
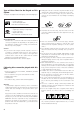
Discs Type of Discs That Can be Played on This System This player can playback discs bearing any of the following logos: < Always place the disc on the disc tray with the label side up. (Compact discs can be played or recorded only on one side.) < To remove a disc from its storage case, press down on the center of the case and lift the disc out, holding it carefully by the edges. Audio CD: • 12cm or 8cm discs • Linear PCM digital audio Audio CDs are divided into tracks.
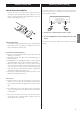
Remote Control Unit How to insert the batteries Remove the end cover of the remote control unit with a screwdriver. After checking the polarity (+/_) of two AA batteries, insert the batteries observing polarity, replace the end cover and replace the screws. Restoring factory settings If you have made a lot of changes to the setup, and want to restart from a known set of options, restore the unit to the factory settings as follows: 1. Turn the unit off and wait 30 seconds or longer.
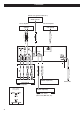
Connection Master clock generator (G-0s etc.) WORD SYNC OUT Surround amplifier Stereo amplifier AUDIO IN L i.LINK (AUDIO) R i.LINK cable BNC coaxial cable XLR cable A D C F B E DIGITAL IN (COAXIAL) Wall socket 5.1CH AUDIO IN Surround amplifier Balanced XLR pin assignment D/A Converter DIGITAL IN (OPTICAL) Digital audio device (CD recorder, MD deck, etc.
CAUTION: < Switch off the power to all equipment before making connection. < Read the instructions of each component you intend to use with this unit. < Be sure to insert each plug securely. To prevent hum and noise, avoid bundling the signal interconnection cables together with the AC power cord or speaker cables. A Analog audio output terminals 5.1 channel For surround (5.
Front panel features A B C D E Front Panel A POWER Use this button to turn the unit on and off. When the unit is on, the ring surrounding the button lights up. F GH I J K c d Display a b e f The equipment draws nominal non-operating power from the AC outlet with its POWER switch in the off position. k j i h g B MODE Use this button to change settings of Word sync, DAC, priority playback area, and i.LINK output. C DAC indicator Shows the type of DAC currently selected.
Understanding the remote control unit A Number buttons Use these buttons for selecting tracks by number, etc. B 2CH/MULTI Use this button to switch between two-channel (stereo) and multi-channel surround audio output. C PLAY AREA Use this button to select the playback area of Super Audio CDs. D SCAN (m/,) Use these buttons for fast scanning during playback. E STOP ENGLISH I Use this button to stop playback. F PLAY A Use this button to start playback.
Playback 3 2 4 1 5 Press the PLAY button to start playback. 5 1 Turn the unit on. Pausing playback Each press of the POWER button turns the unit on and off. The ring surrounding the POWER button and the display light up when the unit is turned on. 2 Press the OPEN/CLOSE button. The shutter opens and the disc tray slides out. Press the PAUSE button to pause playback (the ring surrounding the PAUSE button on the main unit lights). Press PLAY or PAUSE to restart playback.
Skipping playback Press the MUSIC SKIP button (. or /) repeatedly until the desired track is found. The selected track will be played from the beginning. < If tracks are skipped while playback is paused or stopped, playback is paused or stopped at the start of the selected track. Selecting a track Use the number button to select tracks for playback. Use the +10 button to enter the first digit of numbers greater than 9 (repeated presses show 1-, 2-, 3- etc.
Programmed playback Programmed playback allows up to 30 tracks to be played back in the order you decide. Clearing the last track from the list Press the CLEAR button to clear the last track from the list. 1 Press the PROGRAM button (either when playing back or stopped). If a track is currently playing back, this track is added as the first item in the programmed playback list. Adding tracks to the list Use the number buttons to add tracks to the list.
Repeat mode Use the REPEAT button to select the repeat mode for playback. Repeated presses of the REPEAT button cycle between the following options: REPEAT DSC (whole disc repeat) REPEAT OFF (no repeat) The display on the main unit can be dimmed to suit the environment in which you listen to music. There are three levels and an “off” setting. Use the FL DIMMER button to cycle between these settings. Note that the OFF setting is not memorized when the power is turned off.
Changing the display mode MODE During playback, it is possible to change the display as shown here. 1 Repeatedly press the MODE button to select the menu item to be changed. < The DISPLAY button doesn’t work during programmed playback. WORD DAC LAYER (normal display) Currently playing track Elapsed time of current track < If you leave the unit idle for 10 seconds, the setting mode will be cancelled. Time remaining for current track 2 Use the SKIP buttons (.
Setting the Word sync, DAC, priority playback area, and i.LINK output (1) Available menu item and options DAC (D/A converter) This unit is equipped with the following DA converters: WORD (Word sync) Use this feature to lock your entire system to a single sync signal (clock) by connecting this unit to the Esoteric G-0s or similar device that outputs a sync signal. “ON” or “OFF” are available. < This unit is ready for the clocks up to 176.4 kHz and switches itself depending on an incoming signal.
Setting the Word sync, DAC, priority playback area, and i.LINK output (2) LAYER (priority playback area) i.LINK There are two types of Super Audio CDs, regular ones that contain 2-channel stereo and multi-channel stereo, and hybrid discs (two-layer discs) that contain Super Audio CD and regular CD data. Used to select an i.LINK output setting. When using the i.LINK terminal, select “60958” or “PCM”, and set the Digital Out to “ON”.
Settings (introduction) 1 Turn on the main unit. 4 When a option marked with “>” is displayed, use the up or down cursor buttons to change the setting, and press the ENTER button to confirm the entry. 2 Press the SETUP button to enter the setup menu. < Individual menu functions are described on pages 21-23. < Repeat steps 3 and 4 as required. “AudioSetup” appears on the front panel display. 5 Exit the setup menu by pressing SETUP once more.
Settings (Setup Menu Chart ) AudioSetup GeneralSet Analog Out options DigitalOut CD Direct SP Setup SP Size L/R Size options options C Size options options SR/SL Size options SW ON/OFF options L/R *.*m options C *.*m options SR/SL *.*m options LR ***.*dB options C ***.*dB options SR ***.*-dB options SL ***.*dB options SW ***.
Settings (Audio Setup) Analog output (Analog Out) Digital output (DigitalOut) When a option marked with “>” is displayed, use the up or down cursor buttons to change the setting, and press the ENTER button to confirm the entry. When a option marked with “>” is displayed, use the up or down cursor buttons to change the setting, and press the ENTER button to confirm the entry. 2ch Outputs 2-channel audio from the the i.LINK (AUDIO) and the 2ch analog audio output terminals (FRONT L and R).
Settings (Speaker Setup for the i.LINK and the 5.1ch analog audio output terminal) Use these speaker setup menus when the i.LINK (AUDIO) terminal or the 5.1ch analog audio output terminals are connected to a surround sound amplifier, and when you don’t use the speaker menus of the amplifier. There is no need for this setup when not using the i.LINK (AUDIO) terminal or the 5.1ch analog audio output terminals, or when you use the speaker menus of the amplifier.
Speaker distance (Distance) This setup is effective in the following case only: Set the DAC mode to “M.bit” or “1bit”, play Super Audio CDs, and output sound from the 5.1ch analog output terminals. Speaker levels (SP Level) Use this to set the relative levels of the speakers. You can set the L/R pair together, and the center, and surround rear pair independently, as well as the subwoofer. The maximum value you can set here is 0dB and the minimum is –12dB, with settings made in 0.5dB increments.
i.LINK (IEEE 1394) The i.LINK is also known as IEEE 1394, an international specification. This unit is i.LINK (AUDIO) ready. By connecting an i.LINK (AUDIO)-capable device to the i.LINK (AUDIO) terminal on this unit using an i.
Troubleshooting In case you experience any problem with this unit, please take the time to look through this chart and see if you can solve the problem yourself before you call your dealer. No power e Check the connection to the AC power supply. Check and make sure the AC source is not a switched outlet and that, if it is, the switch is turned on. Make sure there is power to the AC outlet by plugging another item such as a lamp or fan. e Press the POWER button of the main unit to turn it on.
Specifications General System . . . . . . . . . . . . . . . . . . . . . . . . . . . . . . . . . . . . . . . . . . . . . . . . . . . . Super Audio CD and CD Power supply Europe model . . . . . . . . . . . . . . . . . . . . . . . . . . . . . . . . . . . . . . . . . . . . . . . . . . AC 230 V, 50 Hz U.S.A./Canada model . . . . . . . . . . . . . . . . . . . . . . . . . . . . . . . . . . . . . . . . . . . . AC 120 V, 60 Hz Korea model . . . . . . . . . . . . . . . . . . . . . . . . . . . . . . . . . . . . . . .
Sommaire ATTENTION < N’exposez pas cet appareil au ruissellement ni aux éclaboussures. Nous vous remercions pour l’achat d’un appareil Esoteric. Lire ce manuel avec attention pour obtenir les meilleures performances possibles de cet appareil. < Ne placez aucun objet contenant du liquide, tel qu’un vase, sur l’appareil. < N’installez pas cet appareil dans un espace confiné comme une bibliothèque ou similaire. Sommaire . . . . . . . . . . . . . . . . . . . . . . . . . . . . . . . . . . . . . . . .
Caractéristiques Le dernier mécanisme VRDS pour Super Audio CD (roulements à billes spécialement conçus pour un mécanisme VRDS optimal) Le mécanisme VRDS maintient de façon sûre le disque sur la platine dont le diamètre est exactement le même que celui du disque. Ce système élimine complètement les vibrations inhérentes aux supports amovibles et les vibrations indésirables produites par les systèmes mécaniques.
Avant utilisation Contenu du carton Veuillez vérifier que les accessoires suivants sont bien présents à l’ouverture du carton. Télécommande x 1 Piles (AA, R6, SUM-3) x 2 Pieds en feutre x 3 Cordon d’alimentation x 1 Manuel du propriétaire x 1 Carte de garantie x 1 Conventions adoptées dans ce manuel < Les instructions de ce manuel décrivent les commandes de la télécommande. Vous pouvez aussi utiliser les boutons de la face avant s’ils ont des noms identiques ou similaires à ceux de la télécommande.
Disques Types de disques lisibles par ce système Ce lecteur peut lire les disques portant n’importe lequel des logos suivants : CD audio : • Disques de 12 cm ou 8 cm • Audio numérique PCM linéaire Les CD audio sont divisés en plages. Super Audio CD : • Simple couche, double couche ou hybride • Disques de 12 cm ou 8 cm • Audio numérique (DSD) Les Super Audio CD sont divisés en plages. A propos des CD-R/CD-RW Les CD-R/RW enregistrés au format CD audio et correctement finalisés sont lisibles.
Télécommande Comment insérer les piles Retirez le capuchon de la télécommande avec un tournevis. Après avoir vérifié la polarité (+/_) des deux piles AA, insérez-les, replacez le capuchon et ses vis. < Faites attention de ne pas pincer les câbles avec le berceau des piles. Restauration des réglages d’usine Si vous avez apporté beaucoup de changements à la configuration, et si vous désirez revenir à des réglages connus, ramenez l’appareil aux réglages d’usine comme suit : 1.
Connexions Générateur d’horloge maître (G-0s etc.) WORD SYNC OUT Amplificateur surround Amplificateur stéréo AUDIO IN L i.LINK (AUDIO) R Câble i.LINK Câble coaxial BNC Câble XLR A D C F B E DIGITAL IN (COAXIAL) 5.1CH AUDIO IN Amplificateur surround Brochage d’une XLR symétrique Convertisseur N/A DIGITAL IN (OPTICAL) Appareil audio numérique (enregistreur de CD, platine MD, etc.
ATTENTION : < Eteignez tous vos équipements avant de faire des connexions. < Lisez les instructions concernant chaque élément que vous désirez employer avec cet appareil. < Veillez à bien insérer chaque fiche. Pour éviter les ronflements et les bruits, évitez de regrouper les câbles de modulation (de signal) et le cordon d’alimentation ou les câbles d’enceintes.
Description de la face avant A B C D E Face avant A POWER F GH I J K c d Afficheur a b e f Utilisez cet interrupteur d’alimentation pour allumer et éteindre l’appareil. Quand l’appareil est en service, le pourtour de l’interrupteur est allumé. Cet équipement tire un courant nominal non fonctionnel de la prise secteur quand l’interrupteur POWER est en position off.
Comprendre la télécommande C PLAY AREA Utilisez cette touche pour sélectionner la zone de lecture des Super Audio CD. D SCAN (m/,) Utilisez ces touches pour une recherche rapide durant la lecture. I E STOP Utilisez cette touche pour stopper la lecture. A F PLAY J L B K M C N D O E P F Utilisez cette touche pour lancer la lecture. G Touches curseur et ENTER Utilisez ces touches dans le menu de configuration (setup).
Lecture 3 2 4 1 5 Appuyez sur la touche PLAY pour lancer la lecture. 5 1 Mettez l’appareil sous tension. Mise en pause de la lecture Chaque pression de l’interrupteur POWER allume et éteint l’appareil. Le pourtour de l’interrupteur POWER et l’afficheur s’allument quand l’appareil est sous tension. 2 Appuyez sur la touche OPEN/CLOSE. Le volet s’ouvre et le tiroir de disque sort. Appuyez sur la touche PAUSE pour mettre la lecture en pause (le pourtour de la touche PAUSE s’allume sur l’appareil).
Saut de lecture Appuyez répétitivement sur la touche MUSIC SKIP . ou / ) jusqu’à obtention de la plage désirée. La plage sélectionnée sera lue depuis son début. < Si on appuie une fois sur la touche . durant la lecture, la lecture recommence au début de la plage en cours. Si on appuie une seconde fois dans la seconde suivant le début de cette plage, la lecture revient au début de la plage précédente (de même appuyer deux fois rapidement sur ce bouton fera revenir en arrière de deux plages, etc.).
Lecture programmée La lecture programmée permet de reproduire 30 plages dans l’ordre que vous aurez choisi. Effacement de la dernière plage de la liste Appuyez sur la touche CLEAR pour effacer la dernière plage de la liste. 1 Appuyez sur la touche PROGRAM (durant la lecture ou à l’arrêt). Si une plage est actuellement reproduite, elle est ajoutée comme premier élément de la liste de lecture programmée. Ajout de plages à la liste Utilisez les touches numériques pour ajouter des plages à la liste.
Mode Repeat (lecture en boucle) Utilisez la touche REPEAT pour sélectionner le mode de lecture en boucle. Appuyer répétitivement sur la touche REPEAT passe en revue les options suivantes: REPEAT TRK (plage en boucle) REPEAT DSC (tout le disque en boucle) REPEAT OFF (pas de répétition) < Interrompre la lecture annule le mode de lecture en boucle (Repeat). Atténuation de l’afficheur L’afficheur de l’appareil peut être atténué pour convenir à l’environnement dans lequel vous écoutez la musique.
Changement du mode d’affichage MODE Durant la lecture, il est possible de changer l’affichage comme indiqué ici. 1 Appuyez répétitivement sur la touche MODE pour sélectionner le paramètre de menu à changer. < La touche DISPLAY ne fonctionne pas durant la lecture programmée. WORD DAC LAYER (affichage normal) Plage actuellement lue Temps écoulé sur la plage actuelle < Si l’appareil reste inutilisé durant 10 secondes, le mode de réglage est annulé.
Réglage de la synchro word, du DAC, de la zone à lecture prioritaire et de la sortie i.LINK (1) Paramètres de menu et options disponibles WORD (Synchro Word) Utilisez cette fonctionnalité pour verrouiller la totalité de votre système sur un seul signal (horloge) de synchronisation en reliant cet appareil au G-0s Esoteric ou à un dispositif similaire produisant un signal de synchronisation. Les options « ON » ou « OFF » sont disponibles.
Réglage de la synchro word, du DAC, de la zone à lecture prioritaire et de la sortie i.LINK (2) LAYER (zone à lecture prioritaire) Il existe deux types de Super Audio CD, les normaux qui contiennent des données de stéréo 2 canaux et de stéréo multicanal, et les hybrides (disques à deux couches) qui contiennent des données de Super Audio CD et de CD ordinaire. Ce réglage vous permet de déterminer quelle couche (à lecture prioritaire) sera d’abord sélectionnée pour la lecture d’un Super Audio CD hybride.
Réglages (introduction) 1 Mettez l’appareil sous tension. 4 Quand une option marquée d’un « > » est affichée, utilisez les touches curseur Haut ou Bas pour changer le réglage et appuyez sur la touche ENTER pour confirmer votre choix. 2 Appuyez sur la touche SETUP pour entrer dans le menu de configuration. < Quand une valeur numérique (telle qu’une distance d’enceinte) est changée, la valeur est confirmée sans avoir à appuyer sur la touche ENTER.
Réglages (Tableau du menu de configuration) AudioSetup GeneralSet Analog Out options DigitalOut CD Direct SP Setup SP Size L/R Size options options C Size options options SR/SL Size options SW ON/OFF options L/R *.*m options C *.*m options SR/SL *.*m options LR ***.*dB options C ***.*dB options SR ***.*-dB options SL ***.*dB options SW ***.
Réglages (Configuration audio) Sortie analogique (Analog Out) Quand une option marquée d’un « > » est affichée, utilisez les touches curseur Haut ou Bas pour changer le réglage et appuyez sur la touche ENTER pour confirmer votre choix. 2ch Produit l’audio 2 canaux par la prise i.LINK (AUDIO) et les prises de sortie audio analogique 2 canaux (FRONT L et R). Si un programme multicanal est lu, il subira un mixage de réduction en deux canaux, et l’indicateur DOWN MIX sera allumé dans l’afficheur.
Réglages (Configuration d’enceintes pour les prises i.LINK et de sortie audio analogique 5.1) Utilisez ces menus de configuration d’enceintes quand la prise i.LINK (AUDIO) ou les prises de sortie audio analogique 5.1 sont reliées à un amplificateur de son surround, et quand vous ne voulez pas employer les paramétrages d’enceintes de l’amplificateur. Cette configuration est inutile si vous n’employez pas la prise i.LINK (AUDIO) ou les prises de sortie audio analogique 5.
Distance des enceintes (Distance) Cette configuration n’agit que dans le cas suivant: Réglez le mode DAC sur « M.bit » ou « 1bit », lisez des Super Audio CD et produisez le son par les prises de sortie analogique 5.1. Ce réglage n’a pas d’effet sur la prise i.LINK (AUDIO). Idéalement, les enceintes doivent être placées de façon à toutes être à la même distance de la position d’écoute. Si cela n’est pas possible, vous devez utilisez la méthode décrite ici pour régler individuellement leur distance.
i.LINK (IEEE 1394) voulez brancher avant de faire toute connexion. La liaison i.LINK est aussi connue sous le nom IEEE 1394, une norme internationale. Cet appareil est compatible i.LINK (AUDIO). En branchant un appareil compatible i.LINK (AUDIO) à la prise i.LINK (AUDIO) de cette unité au moyen d’un câble i.
Guide de dépannage Si vous rencontrez un quelconque problème avec cet appareil, veuillez prendre le temps de lire ce qui suit et voyez si vous pouvez résoudre le problème vous-même avant d’appeler votre revendeur. Pas d’alimentation e Vérifiez la connexion au secteur. Contrôlez et assurez-vous que la prise secteur n’a pas d’interrupteur et, si elle en a un, qu’elle est en service. Vérifiez qu’il y a du courant dans la prise en y branchant un autre appareil comme une lampe ou un ventilateur.
Spécifications Généralités Système . . . . . . . . . . . . . . . . . . . . . . . . . . . . . . . . . . . . . . . . . . . . . . . . . . . . Super Audio CD et CD Alimentation Modèle Europe. . . . . . . . . . . . . . . . . . . . . . . . . . . . . . . . . . . . . . . . . . . . . . . . . . . 230 Vca 50 Hz Modèle Etats-Unis/Canada . . . . . . . . . . . . . . . . . . . . . . . . . . . . . . . . . . . . . . . . . . 120 Vca 60 Hz Modèle Corée . . . . . . . . . . . . . . . . . . . . . . . . . . . . . . . . . . . . .
Inhalt Vielen Dank für den Kauf dieses Esoteric-Geräts. Bitte lesen Sie diese Anleitung sorgfältig durch, um die Leistungs-fähigkeit dieses Geräts optimal nutzen zu können. Ausstattungsmerkmale . . . . . . . . . . . . . . . . . . . . . . . . . . . . . . . . . . . . . . . . . . . . . . . . . . . . . . . . . . . 52 Vor der ersten Inbetriebnahme . . . . . . . . . . . . . . . . . . . . . . . . . . . . . . . . . . . . . . . . . . . . . . . . . . . . . 54 Wiederherstellen der Werkseinstellungen . . . . . . . . .
Ausstattungsmerkmale VRDS-Laufwerk der neuesten Generation zur Wiedergabe von Super Audio CDs (mit speziell entwickelten Kugellagern) Dank seines CD-Halterungssystems, das die CD vollflächig an den Drehtellermechanismus anpresst, verhindert dieses VDRS-Laufwerk jegliche durch die CD und das Laufwerk selbst hervorgerufene Vibration.
Unübertroffene Ausstattungsmerkmale Super Audio CD-Player mit umfangreichstem Funktionsumfang und herausragender Performance. • Das Leistungsnetzteil besitzt einen sehr effizienten digitalen R-Core Transformator sowie einen weiteren Transformator für das Analogteil. Die Leistungsschaltkreise sind ebenfalls für digitalen und analogen Bereich getrennt aufgebaut. • Auch die Zweikanal-Audioschaltkreise sind so aufgebaut, dass der linke und der rechte Kanal jeweils auf einer eigenen Platine untergebracht sind.
Vor der ersten Inbetriebnahme Lieferumfang Bitte überprüfen Sie, direkt nach Öffnen der Verpackung, das mitgelieferte Zubehör des X-01 D2 auf Vollständigkeit: Fernbedienung x 1 Batterien (AA, R6, SUM-3) x 2 Filzpolster x 3 Netzkabel x 1 Bedienungsanleitung x 1 Garantiekarte x 1 Hinweise zur Verwendung dieser Bedienungsanleitung < Die Hinweise in dieser Bedienungsanleitung beziehen sich auf die Tasten der Fernbedienung.
Wiederherstellen der Werkseinstellungen Aufstellen des X-01 D2 Die aus gehärtetem Werkzeugstahl gefertigten, spitz zulaufenden Standpins sind fest mit dem Gehäuseboden verbunden. Obwohl es den Anschein haben könnte, dass die Standfuß-Unterteile locker seien, werden diese durch das Gewicht des X-01 D2 fest und sicher fixiert. Dieser Aufbau trägt in hohem Maße zu einer effektiven Erschütterungs- und Vibrationsdämpfung bei.
Discs Zur Wiedergabe mit dem X-01 D2 geeignete Disc-Formate Folgende Disc-Formate sind zur Wiedergabe mit dem X-01 D2 nicht geeignet: Der X-01 D2 eignet sich zur Wiedergabe von Discs, die eines der folgenden Logos: • DVD, CD-G, der Datenteil einer CD-EXTRA, PHOTO-CD, CDROM und DVD-ROM • Illegal produzierte Discs • Verkratzte oder defekte Discs • durch Staub, Fett oder Fingerabdrücke verschmutzte Discs Audio CD: • 12cm sowie 8cm Discs • Linear PCM Digital Audio Audio-CDs sind generell in Musiktitel unter
< Legen Sie eine Disc immer mit der bedruckten Labelseite nach oben in die Disc-Schublade. (Bei Compact Discs kann nur eine Seite beschrieben und wiedergegeben werden.) < Verwenden Sie einen weichen Filzschreiber, dessen Tinte auf einer Öl-Emulsion basiert, um die Labelseite Ihrer CDs zu beschriften. Verwenden Sie niemals einen Kugelschreiber oder Ball-Pen- oder Roller-Pen Stift.
Anschlüsse Master Clock Generator (G-0s o. ä.) WORD SYNC OUT A/V-Surround-Verstärker Stereoverstärker AUDIO IN L i.LINK (AUDIO) R i.LINK-Kabel BNC Koaxialkabel XLR-Kabel A D C F B E DIGITAL IN (COAXIAL) Wandsteckdose 5.1CH AUDIO IN A/V-Surround-Verstärker Symmetrische Belegung von XLR-Anschlüssen D/A-Konverter DIGITAL IN (OPTICAL) DigitalAudio-Komponente (CD-Rekorder, MD-Deck, usw.
ACHTUNG: < Bevor Sie die einzelnen Komponenten Ihrer HiFi-Anlage miteinander verbinden, schalten Sie diese bitte aus. < Lesen Sie bitte auch die Bedienungsanleitungen der jeweiligen Komponenten, die Sie am X-01 D2 anschließen möchten. < Vergewissern Sie sich bitte, dass sämtliche Verbindungen korrekt und sicher vorgenommen wurden. Zur Vermeidung von Brummen und Rauschen sollten Audiosignalkabel niemals verdrillt oder parallel zu Netz- sowie Lautsprecherkabeln verlegt werden.
Fernbedienung Einsetzen von Batterien Entfernen Sie die Batteriefachabdeckung mittels Schraubenzieher. Setzen Sie zwei frische Batterien des Typs AA ein. Achten Sie hierbei auf deren korrekte Polarität (+/_) und schließen Sie die Batteriefachabdeckung wieder, indem Sie die Schrauben wieder festschrauben. < Achten Sie beim Batteriewechsel bitte darauf, dass keine der Kabel im Batteriefach gequetscht werden.
Bedienelemente auf der Gerätevorderseite A B C D E A POWER Diese Taste dient zum Ein- oder Ausschalten des X-01 D2. Im eingeschalteten Zustand leuchtet die Umrandung der Taste. Auch wenn sich der POWER-Schalter in der OFF-Position befindet, verbraucht der X-01 D2 eine geringe Strommenge. F GH I J K H STOP Hiermit können Sie die Wiedergabe beenden. Nach dem Betätigen der STOP-Taste leuchtet deren Umrandung. I PLAY Hiermit starten Sie die Wiedergabe.
Verwenden der Fernbedienung A Zifferntasten Verwenden Sie die Zifferntasten zur direkten Eingabe einer Titel-, Kapitelnummer usw. B 2CH/MULTI dient zum Umschalten zwischen Zweikanal- (Stereo) und Mehrkanal-Surround-Wiedergabe. C PLAY AREA (Wiedergabebereich) I D SCAN (m/,) A J L B K Wenn Sie eine dieser Tasten während der Wiedergabe betätigen, wird die im Laufwerk befindliche Disc in der jeweils gewählten Laufrichtung mit erhöhter Geschwindigkeit wiedergegeben.
Display L FL DIMMER Mittels dieser Taste können Sie die Helligkeit des Frontdisplay ändern. M REPEAT Mittels dieser Taste wählen Sie die gewünschte Wiedergabewiederholungsfunktion aus. N PROGRAM Diese Taste dient zum Programmieren einer Titelfolge. O MUSIC SKIP (.//) Hiermit aktivieren Sie die Titelsprungfunktion sowie den schnellen Vor- oder Rücksuchlauf. a k j b i c e d h f g a Disc-Typ zeigt den Typ der momentan im Laufwerk befindlichen Disc an.
Wiedergabe 3 2 4 1 5 5 Betätigen Sie zum Starten der Wiedergabe die PLAY- Taste. Unterbrechen der Wiedergabe (Pause) 1 Schalten Sie den X-01 D2 mittels POWER-Taste an der Komponente ein. Durch Betätigen der POWER-Taste können Sie den X-01 D2 jeweils ein- oder ausschalten. Nach dem Einschalten leuchten die Umrandung der POWERTaste und das Display. 2 Betätigen Sie die OPEN/CLOSE-Taste. Der Verschluss öffnet sich und die Disc-Schublade fährt heraus.
Verwenden der SKIP-Tasten Betätigen Sie wiederholt eine der MUSIC SKIP-Tasten (. oder /), bis Sie den gewünschten Musiktitel gefunden haben. Die Wiedergabe beginnt dessen Titelanfang. < Wenn Sie die .-Taste einmal während der Wiedergabe betätigen, beginnt die Wiedergabe erneut ab dem Anfang des aktuellen Titels. Wenn Sie die Taste innerhalb der ersten Sekunde eines Titels betätigen, beginnt die Wiedergabe ab dem Anfang des vorangegangenen Titels.
Wiedergabe einer programmierten Titelfolge Bei einer programmierten Titelfolge können Sie bis zu 30 Titel in der von Ihnen gewünschten Reihenfolge wiedergeben. Löschen des letzten Titels einer Liste Betätigen Sie die CLEAR-Taste, um den letzten Titel einer Liste zu löschen. 1 Betätigen Sie die PROGRAM-Taste (während der Wiedergabe oder im Stoppmodus). Sofern gerade ein Titel wiedergegeben wird, erscheint die Nummer dieses Titels als erster Eintrag in der zu programmierenden Titelfolge.
Wiedergabewiederholung Einstellen der Display-Helligkeit Verwenden Sie zur Auswahl der Wiedergabewiederholungsfunktion die REPEAT-Taste. Durch wiederholtes Betätigen der REPEAT-Taste können Sie jeweils zwischen den folgenden Optionen umschalten: REPEAT TRK (Titelwiederholung) Die „OFF“-Einstellung bleibt beim Ausschalten des X-01 D2 nicht erhalten. Nach dem Wiedereinschalten wird die Display-Helligkeit automatisch auf den niedrigsten Wert eingestellt.
Ändern der Displayanzeige MODE Während der Wiedergabe ändert sich bei jedem Betätigen der DISPLAY-Taste die Anzeige im Display wie folgt: 1 Betätigen Sie zur Auswahl des zu ändernden Menüeintrags wiederholt die MODE-Taste. < Die DISPLAY-Taste kann während der Wiedergabe einer programmierten Titelfolge nicht verwendet werden.
Einstellen von Word Sync, DAC, des bevorzugten Wiedergabebereichs sowie der i.LINK-Schnittstelle (1) Verfügbare Menüeinträge und Optionen WORD (Word Sync) Außerordentlich präzise Wiedergabequalität erzielen Sie, indem Sie das Word Sync (Clock) Signal einer externen Komponente, wie etwa des Esoteric G-0s oder eines ähnlichen Clock-Generators, die ein entsprechendes SyncSignal ausgeben, zur Synchronisierung Ihres kompletten Audiosystems verwenden. Die verfügbaren Einstellmöglichkeiten sind „ON“ oder „OFF“.
Einstellen von Word Sync, DAC, des bevorzugten Wiedergabebereichs sowie der i.LINK-Schnittstelle (2) LAYER (bevorzugter Wiedergabebereich) i.LINK Es gibt zwei unterschiedliche Arten von Super Audio CDs: solche, auf denen 2-Kanal-Stereo- und Mehrkanalaudiodaten vorliegen und Hybrid-Discs (Doppelschicht-Discs), auf denen sowohl Super Audio CD- als auch Audio-CD-Daten aufgezeichnet sind. Mittels dieser Option können Sie das i.LINK-Ausgangsformat einstellen. Wählen Sie bei Verwendung der i.
Einstellungen (Einleitung) 1 Schalten Sie den X-01 D2 ein. 4 Verwenden Sie zum Einstellen der Werte von Menüpunkten, die durch das „>“-Symbol markiert sind, die Auf- oder Abwärts-Cursortasten. Bestätigen Sie Ihre Einstellungen durch Betätigen der ENTER-Taste. 2 Betätigen Sie zum Aufruf des Setup-Menüs die SETUP- Taste. < Änderungen numerischer Werte (wie etwa den Abständen von Lautsprechersystemen) werden auch ohne Betätigen der ENTER-Taste vorgenommen.
Einstellungen (Setup-Menü-Diagramm) AudioSetup GeneralSet Analog Out Option DigitalOut CD Direct SP Setup SP Size L/R Size Option Option C Size Option Option SR/SL Size Option SW ON/OFF Option L/R *.*m Option C *.*m Option SR/SL *.*m Option LR ***.*dB Option C ***.*dB Option SR ***.*-dB Option SL ***.*dB Option SW ***.
Einstellungen (Audio Setup) Analogausgang (Analog Out) Digitalausgang (DigitalOut) Verwenden Sie zum Einstellen der Werte von Menüpunkten, die durch das „>“-Symbol markiert sind, die Auf- oder Abwärts-Cursortasten. Bestätigen Sie Ihre Einstellungen durch Betätigen der ENTER-Taste. Verwenden Sie zum Einstellen der Werte von Menüpunkten, die durch das „>“-Symbol markiert sind, die Auf- oder Abwärts-Cursortasten. Bestätigen Sie Ihre Einstellungen durch Betätigen der ENTER-Taste.
Einstellungen (Lautsprechereinstellungen bei Verwendung der i.LINK- oder 5.1ch-Anschlüsse) Verwenden Sie die Lautsprechermenüs, wenn an der i.LINK (AUDIO) Schnittstelle oder 5.1chAnalogausgängen ein Surround Sound A/V-Verstärker angeschlossen ist und Sie die Lautsprechereinstellungen des Verstärkers nicht verwenden. Diese Einstellungen müssen nicht vorgenommen werden, wenn Sie die i.LINK (AUDIO) Schnittstelle oder die 5.
Abstand der Lautsprechersysteme zur Hörposition (Distance) Diese Einstellung wirkt sich nur unter folgenden Voraussetzungen aus: Bei Wiedergabe von Super Audio CDs wurde als DAC-Modus “M.bit” oder “1bit” gewählt und die Wiedergabe erfolgt über die 5.1ch-Analogausgänge. Diese Einstellungen wirken sich auf die über die i.LINK (AUDIO) Schnittstelle nicht aus. Idealerweise sollten die Lautsprechersysteme so aufgestellt werden, dass sie alle den gleichen Abstand zur Hörposition aufweisen.
i.LINK (IEEE 1394) Bei i.LINK handelt es sich um einen internationalen Standard, der auch unter den Bezeichnungen IEEE 1394 oder FireWire bekannt ist. Der X-01 D2 unterstützt ausschließlich Verbindungen im i.LINK (AUDIO) Format. Die Verwendung der IEEE 1394 (oder i.LINK (AUDIO)) Schnittstelle des X-01 D2 zum Anschluss einer i.LINK (AUDIO)fähigen Komponente mittels FireWire-Kabel ermöglicht die Übertragung des digitalen Mehrkanal-Audiosignals einer Super Audio CD. Dies war bisher nur analog möglich.
Technische Daten Allgemein System . . . . . . . . . . . . . . . . . . . . . . . . . . . . . . . . . . . . . . . . . . . . . . . . . . . . Super Audio CD und CD Spannungsversorgung Europa-modell . . . . . . . . . . . . . . . . . . . . . . . . . . . . . . . . . . . . . . 230 V Wechselspannung, 50 Hz USA/Kanada-modell. . . . . . . . . . . . . . . . . . . . . . . . . . . . . . . . . . 120 V Wechselspannung, 60 Hz Korea-modell . . . . . . . . . . . . . . . . . . . . . . . . . . . . . . . . . . . . . . .
Hilfe bei Funktionsstörungen Falls wider Erwarten mit dem X-01 D2 Probleme auftreten sollten, nehmen Sie sich bitte ein wenig Zeit, um die folgende Auflistung durchzulesen. In den meisten Fällen werden Sie das Problem selbst lösen können, ohne dass Sie sich an Ihren Händler wenden müssen. Keine Netzversorgung e Überprüfen Sie bitte, ob der Netzstecker korrekt an einer Wandsteckdose angeschlossen ist.
Die Umrandung der MODE-Taste blinkt und im Display wird die Meldung „No Word!“ angezeigt e Der Word Sync-Modus wurde ausgewählt, obwohl keine Word Clock Signalquelle vorhanden ist. Schalten Sie den Word Sync-Modus aus. e Der X-01 D2 empfängt kein Word Clock Signal. Überprüfen Sie bitte die Kabel, die Verbindung und die Einstellungen des Clock Signalgenerators. Die Umrandung der MODE-Taste blinkt und im Display erscheint die Meldung „WRD UNLCK e Der X-01 D2 empfängt ein ungültiges Word Clock-Signal.
TEAC ESOTERIC COMPANY 3-7-3, Nakacho, Musashino-shi, Tokyo 180-8550, Japan Phone: (0422) 52-5132 e-mail: eso-os@tec.teac.co.jp TEAC AMERICA, INC. 7733 Telegraph Road, Montebello, California 90640 Phone: (323) 726-0303 TEAC CANADA LTD. 5939 Wallace Street, Mississauga, Ontario L4Z 1Z8, Canada Phone: (905) 890-8008 TEAC MEXICO, S.A. De C.