Z 9A10513000 DR-H300DAB DVD Receiver OWNER’S MANUAL
IMPORTANT SAFETY INSTRUCTIONS 1) Read these instructions. CAUTION: TO REDUCE THE RISK OF ELECTRIC SHOCK, DO NOT REMOVE COVER (OR BACK). NO USER-SERVICEABLE PARTS INSIDE. REFER SERVICING TO QUALIFIED SERVICE PERSONNEL. 2) Keep these instructions. 3) Heed all warnings. 4) Follow all instructions.
< Do not expose this apparatus to drips or splashes. < Do not place any objects filled with liquids, such as vases, on the apparatus. < Do not install this apparatus in a confined space such as a book case or similar unit. < The apparatus draws nominal non-operating power from the AC outlet with its STANDBY/ON switch in the standby position. < The apparatus should be located close enough to the AC outlet so that you can easily grasp the power cord plug at any time.
Contents Thank you for choosing TEAC. Read this manual carefully to get the best performance from this unit. Important safety instructions. . . . . . . . . . . . . . . . . . . 2 Settings for DVD playback . . . . . . . . . . . . . . . . . . . 38 Contents . . . . . . . . . . . . . . . . . . . . . . . . . . . . . . . . . 4 TV Display . . . . . . . . . . . . . . . . . . . . . . . . . . . . . 39 Before Use . . . . . . . . . . . . . . . . . . . . . . . . . . . . . . . . 5 OSD Language . . . . . . . . . . . .
Before Use Read this before operation < As the unit may become warm during operation, always leave sufficient space around the unit for ventilation. The ventilation holes should not be covered. Make sure there is at least 20 cm of space above and at least 5 cm of space on each side of the unit. Do NOT place anything on top of the unit. < The voltage supplied to the unit should match the voltage as printed on the rear panel. If you are in any doubt regarding this matter, consult an electrician.
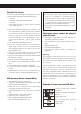
Discs 1 Type of discs that can be played on this system This player can playback discs bearing any of the following logos: DVD Video: • Single-sided or double-sided discs • Single layer or dual layer discs • Dolby Digital, DTS, MPEG or Linear PCM digital audio • MPEG-2 digital video • This unit can play DVD-R discs recorded in DVD video format. • This unit can play DVD-RW discs recorded in DVD video format or DVD video recording format. Discs are generally divided into one or more titles.
Playable file format This unit can play following files recorded on a CD-R, CD-RW, DVD-R, DVD-RW or USB memory device: • MP3 files • Windows Media-formatted audio files • JPEG files • DivX video files (DivX 5, DivX 4, DivX 3 and DivX VOD video content) < File names should be alphanumeric characters. This unit cannot display symbols and full-size or doublebyte characters (such as Japanese, Chinese, etc.) correctly. Also, be sure to use the file extension. (‘.mp3’ for MP3 files, ‘.wma’ for WMA files, ‘.
Discs 2 < Always place the disc on the disc tray with the label side up. (Compact discs can be played or recorded only on one side.) < To remove a disc from its storage case, press down on the center of the case and lift the disc out, holding it carefully by the edges.
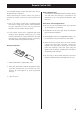
Remote Control Unit The provided Remote Control Unit allows the unit to be operated from a distance. When operating the remote control unit, point it towards the remote sensor on the front panel of the unit. Battery Replacement If the distance required between the remote control unit and main unit decreases, the batteries are exhausted. In this case replace the batteries with new ones.
Speaker Connection SUBWOOFER 10
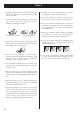
Caution: To avoid damaging the speakers with a sudden high-level signal, be sure to switch the power off before connecting the speakers. Check the impedance of your speakers. Connect speaker with an impedance of 4 ohms or more. The black speaker terminals are – (negative). Generally, the + side of the speaker cable is marked to make it distinguishable from the – side of the cable. Connect this marked side to the + terminal and the unmarked side to the black – terminal.
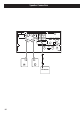
Connection to a TV CAUTION: < Switch off the power to all equipment before making connection. < Read the instructions of each component you intend to use with this unit. < Be sure to insert each plug securely. To prevent hum and noise, avoid bundling the signal interconnection cables together with the AC power cord or speaker cables. C B TV (Monitor) S-VIDEO IN Component video cable HDMI IN VIDEO IN 12 D S-Video cable SCART A HDMI cable RCA video cable SCART cable Connect one of these cables.
< Adjust the video aspect ratio to match that of the television (see page 39) . < This unit adopts analog copy protection features. If the unit is connected to a TV through a video recorder, the resulting playback may be affected. Connect the unit directly to the television. < In all cases, use the highest quality cables for the best possible picture. < Select proper setting in the Video Output setup (see page 41).
Connection to audio equipments etc. CAUTION: < Switch off the power to all equipment before making connection. < Read the instructions of each component you intend to use with this unit. < Be sure to insert each plug securely. To prevent hum and noise, avoid bundling the signal interconnection cables together with the AC power cord or speaker cables. F I H G R L Cassette tape deck etc.
F DAB/FM Indoor Antenna G Digital audio output terminals Connect the supplied T-type DAB/FM antenna to the ANTENNA socket by turning the antenna’s screw cap clockwise. Extend the lead vertically and attach it to a window frame or wall with thumbtacks, or the like, where reception is best. < You can check the antenna adjustment or positioning for the best reception by viewing the signal strength on the display (see page 45).
Identifying the Parts 1 P A A O B N C D M E F G H I J K L H G I F E L K J M Note: To simplify explanations, instructions in this manual refer to the names of the buttons and controls on the front panel only. Associated controls on the remote control will also operate similarly.
A STANDBY/ON Use this button to turn the unit on and standby. The standby indicator lights in the standby mode. It turns off when the unit is turned on. The equipment draws nominal non-operating power from the AC outlet with its STANDBY/ON in the standby position. B PHONES jack For private listening, insert the headphones plug into this jack, and adjust the volume using the VOLUME knob. I FUNCTION Use this button to select a function (FM, DAB, DISC, USB, AUX1 or AUX2).
Identifying the Parts 2 A Number buttons Use these buttons to key in track numbers, passwords, preset channels, etc. B SETUP Use this button to enter the setup menu where you can set up the parameters of the unit. K A L N C ANGLE Use this button to select camera angles during DVD playback. M D REPEAT A-B B C P O In DISC or USB mode, use this button to specify a section and play it repeatedly. D E DIMMER E F H I Q G J Use this button to change the brightness of the front panel display.
J LOUDNESS Use this button to compensate for the loss of bass at low volumes. S Cursor buttons and ENTER Use these cursor buttons for navigation of onscreen menus and the ENTER button to confirm selections. K SLEEP, TIMER When the unit is on, use this button to set sleep timer. T MENU Use this button with menu-enabled DVD discs to bring up the DVD menu. In the standby mode, use this button to set timer.
Basic Operation 1 3 3 Play the source, and adjust the volume using the VOLUME knob. 1 2 1 Press the STANDBY/ON button to turn the unit on. < The unit turns on with the source that was last selected. The volume is adjustable from MIN (00) to MAX (63). You can hold down the VOLUME – or + buttons of the remote control unit to reduce or bring up the volume continuously. < Press the STANDBY/ON button to put the unit in the standby mode when it is not being used.
Dimmer Muting To mute the sound temporarily, press the MUTE button. Press the MUTE button again to restore the sound. You can dim the front panel’s display. Use the DIMMER button to cycle between these settings: Full brightness Medium brightness Minimum brightness < While muting is engaged, ‘Muting’ blinks on the display. < If you change the volume during the muting, the muting will be cancelled. Headphones Preset Equalizer Press the P-EQ button repeatedly to select a preset equalizer.
MP3 Basic Operation 2 WMA JPEG DIVX Listening to a USB Memory Device S-BASS (Super Bass) button 2 Press the S-BASS button to turn the Bass boost function on or off. 1 3 < Do NOT use a high-capacity USB hard disc with this unit. 1 Press the FUNCTION button to select ‘USB’. < The S-BASS and the LOUDNESS buttons don’t work together. 2 Plug your USB memory device into the USB LOUDNESS button connector. < You can reverse steps 1 and 2 .
DVD VCD CD MP3 WMA JPEG DIVX Listening to a Disc 3 2 4 1 5 1 Press the FUNCTION button to select ‘DISC’. < When no disc is loaded in the CD player, ‘NO DISC’ is displayed. 2 Press the OPEN/CLOSE button (L) to open the tray. 4 Press the OPEN/CLOSE button (L) again to close the tray. The tray will close. Take care that you don’t catch your fingers in the tray. The unit reads the disc (this may take a little time). Some discs may automatically start playback.
DVD VCD MP3 WMA JPEG On-screen menu An on-screen menu is shown when a DVD or video CD with playback control (PBC) content is loaded. The way in which the menu works may differ from disc to disc. Video CDs with PBC When a Video CD (Version 2.0) or Super Video CD with Playback Control functions (PBC) is loaded, press the MENU button to turn the PBC function on or off. DVD menus Use the cursor buttons to select the menu item from a DVD, and confirm the selection using the ENTER button.
MP3 and Windows Media-formatted audio files When a disc or USB is loaded, a list of directories appears on the screen. Select a directory by pressing the 5/b buttons and press the ENTER button. File names will appear on the screen. Select a file and press the ENTER button or the PLAY/PAUSE (y/J) button. Playback will start from the selected file. < Press the MENU button to switch between the folder list and the file list.
DVD VCD CD MP3 WMA JPEG DIVX Basic Operations for a Disc and USB Memory Device Pausing playback (freezing the picture) Press the PLAY/PAUSE button to pause audio playback. Any DVD or video CD image is frozen. Press the PLAY/PAUSE button again to restart playback. < Caution - do not leave player in the ‘pause’ mode for extended periods of time. Damage to your television or the player may occur.
DVD VCD CD MP3 WMA JPEG DIVX Skipping playback Press the SKIP button (. or /) repeatedly until the desired chapter or track is found. The selected chapter or track will be played from the beginning. < When playing back video CDs with PBC, the . button is disabled. DVD VCD CD MP3 WMA JPEG DIVX Fast scanning Search for a part of a chapter/track To search quickly the disc in the forward or reverse direction, press the SCAN buttons (m or ,) during playback.
DVD VCD CD MP3 WMA JPEG DIVX Selecting a chapter or track Use the number button to select tracks or chapters for playback. Example (DVD, VCD, CD) To select No.3, press ‘3’. To select No.10, press ‘0/10’. To select No.12, press ‘10+’ and ‘2’. To select No.20, press ‘10+’ and ‘0/10’. To select No.23, press ‘10+’, ‘10+’ and ‘3’. DVD VCD CD MP3 WMA JPEG DIVX Selecting audio Many DVD discs include audio in different languages, as well as stereo and multi-channel surround versions of the soundtrack.
DVD DVD Selecting subtitles Use the SUBTITLE button to select DVD subtitles. Repeated presses of this button cycle through available languages on a disc until OFF is reached (no subtitle). < Subtitles do not always appear immediately after the language has been selected. It may be necessary to wait a few seconds until the subtitles appear. Changing camera angle When a scene recorded with multiple angles is played, the angle icon appears on the screen.
DVD VCD JPEG DIVX DVD VCD DIVX Picture Zoom Slow motion To zoom the picture, press the ZOOM button during playback. For video discs only (DVD and VCD) To play a disc in slow motion, press the SLOW button.
DVD VCD CD MP3 WMA JPEG DIVX Repeat playback Repeat and Shuffle playback Each time the REPEAT button is pressed, the mode is changed as follows: Each time the REPEAT button is pressed, the mode is changed as follows: DVD: REPEAT CHAPTER q REPEAT TITLE q REPEAT ALL q OFF CD/VCD: REPEAT TRACK q REPEAT ALL q OFF REPEAT ONE q REPEAT FOLDER q SHUFFLE q OFF < If one of the following buttons is pressed, repeat mode will be canceled: STANDBY/ON, FUNCTION < This feature is not available for all discs.
DVD VCD CD MP3 WMA DIVX A-B repeat playback Repeat Playback of a Designated Section (A-B Repeat) DVD VCD CD DIVX Changing the display mode Each time the OSD button is pressed during playback, following information appears on the screen. DVD 1. Start playback and designate the point at which the A-B repeat should start (point A) by pressing the A-B button.
VCD CD MP3 WMA Time Search (VCD/CD) Time Search (MP3/WMA) 1. During playback, press the TIME button. If you want to search the entire disc, press the TIME button once. ‘DT: - - : - -’ is highlighted on the screen. 1. During playback, press the TIME button twice. ‘- - : - -’ is highlighted on the screen. If you want to search within the current track, press the TIME button twice. ‘TT: - - : - -’ is highlighted on the screen. 2.
DVD Chapter Search/ Time Search (DVD) Chapter Search Time Search 1. During playback, press the TIME button once. 1. During playback, press the TIME button. 2. Within 7 seconds, enter your desired chapter number (2 digit) using the numeric buttons. If you want to search within the current title, press the TIME button twice. If you want to search within the current chapter, press the TIME button three times. 2. Within 7 seconds, enter your desired hour, minute and second using the numeric buttons.
DIVX Chapter Search/ Time Search (DivX) Chapter Search Time Search 1. During playback, press the TIME button once. 1. During playback, press the TIME button twice. ‘GO TO -:- - - -’ appears on the screen. ‘SELECT - - -’ appears on the screen. 2. Within 7 seconds, enter your desired hour, minute and second using the numeric buttons. 2. Within 7 seconds, enter your desired file number (3 digit) using the numeric buttons. Playback starts from the selected part. Playback starts from the selected file.
DVD VCD CD Programmed playback Up to 20 chapters/tracks can be programmed in the desired order. < If you made a mistake, move the cursor on the track number and overwrite it using the numeric buttons. 1 If another source is selected, press the DISC < To program more than 11 chapters/tracks, press the / button to advance to the next program page (or select ‘tl’ using the cursor buttons and press the ENTER button). Press the . button to return to the previous page.
MP3 WMA Programmed playback 1 If another source is selected, press the FUNCTION button to select ‘DISC’ or ‘USB’. 2 Select a file using the cursor buttons and press the PROGRAM button. 4 Highlight the first file in the program list using the cursor buttons. 5 Press the ENTER button or the PLAY/PAUSE button to start programmed playback. < If you press one of the following buttons, the programmed contents will be cleared.
DVD VCD Settings for DVD playback (introduction) This chapter describes how to use the SETUP menu. Most settings and adjustments are required to be set when you first use the system. Using the SETUP menu, you can adjust the picture size, set a preferred language for audio and the OSD (on screen displays), limit playback by children, et cetera. If no cursor is visible on the screen, use the left and right buttons to select a page.
Settings (General Setup Page) TV Display Because the shape of the television or monitor may not match the shape of the movie frame, you may need to change the way in which the image is displayed to avoid distortion on older televisions, which use a 4:3 aspect ratio; high-definition televisions use 16:9 (as do movies). Note that you may need to read your television’s manual in conjunction with this section in order to achieve the best results.
Settings (Audio Setup Page) Digital Audio Setup SPDIF OFF: Select this when you don’t use the DIGITAL OUT or the HDMI terminal. No signal is output from these terminals. ALL: Select this when the unit is connected to an audio component equipped with a built-in Dolby Digital or DTS decoder via the DIGITAL OUT or the HDMI terminal. PCM only (Default): Select this when the unit is connected to an audio component such as amplifier/receiver, CD recorder or MD deck via the DIGITAL OUT or the HDMI terminal.
Settings (Video Setup Page) Video Output Color Setting Select proper setting in accordance with the connection (see page 12-13). 1. Highlight ‘COLOR SETTING’ and press the right button. S-VIDEO Select this when your TV or monitor is connected to the S-VIDEO terminal. 2. Use the up and down buttons to select the parameter. Y Cb/Pb Cr/Pr Select this when your TV or monitor is connected to the COMPONENT VIDEO terminals. Sharpness Adjusts the sharpness of the picture shown on the monitor.
Settings (Video Setup Page) Settings (Preference Page) HDMI TV Type ON Select this when your TV or monitor is connected to the HDMI terminal. PAL (Default): Select this when the unit is connected to a PAL TV. OFF Select this when you don’t use the HDMI terminal. No signal is output from the HDMI terminal. < When your TV isn’t connected to the HDMI terminal, never select ‘ON’. No picture will be shown on the TV. Resolution AUTO: Select this when the unit is connected to a MULTI TV.
Settings (Password Setup Page) Parental (Parental control) Playback of some DVD discs can be limited depending on the age of the users. The parental comtrol system allows the playback limitation level to be set by the parent. The default setting is ‘8’. Notes < The lower the level, the stricter the limitation. < If the rating of the loaded DVD disc is higher than the level you set, the system will require a password. Enter your password and press the ENTER button to start playback.
Listening to the DAB Radio TUNING 3 When the scanning process has finished, press the TUNING button (+ or –) to select the station you want to listen to. FUNCTION SCAN SELECT Auto Tuning Manual Tuning 1 Select DAB using the FUNCTION button (or the 1 While listening to DAB radio, press and hold DAB/FM button of the remote control unit). the SELECT button for longer than a second. When the unit is switched to DAB mode for the first time, the auto tuning process will start automatically.
Display Setting of the DAB You can choose the type of information displayed in the second line of the display while listening to or tuning in a DAB station. Ensemble name This displays the name of the Ensemble that is broadcasting the programme. Each time the INFO/REPEAT button is pressed, the information is displayed as follows: Date and time This displays the current date and time, which is supplied by the radio station and should always be accurate.
Listening to the FM Radio 1 Select FM using the FUNCTION button (or the DAB/FM button of the remote control unit). 2 Select the station you want to listen to (auto selection). FM mode Pressing the SELECT button in FM mode alternates between Auto (Stereo) mode and Mono mode. Auto: FM stereo broadcasts are received in stereo. Mono: To compensate for weak FM stereo reception, select this mode. Reception will now be forced monaural, reducing unwanted noise.
Display Setting of the FM (RDS) The Radio Data System (RDS) is a broadcasting service which allows stations to send additional information along with the regular radio programme signal. You can choose the type of information displayed in the second line of the display while listening to or tuning in a FM station. Each time the INFO/REPEAT button is pressed, the information is displayed as follows.
Preset Stations You can store up to 20 DAB and 20 FM stations. To store more stations, repeat steps 1 through 3 . Manual Memory Presetting (DAB/FM) < If you store a new station to a channel, the station previously stored in the channel will be overwritten. PRESET MEMORY 1 Tune in a station you want to listen to. Automatic Memory Presetting (FM only) 1 Select FM using the FUNCTION button (or the DAB/FM button of the remote control unit). 2 Press the MEMORY button.
How to select preset stations 1 Select DAB or FM using the FUNCTION button (or the DAB/FM button of the remote control unit). How to erase preset stations (System Reset) 1 In DAB or FM mode, press and hold the INFO/REPEAT button for longer than 2 seconds. 2 Select a preset channel using the PRESET buttons (or the numeric buttons of the remote control unit). ‘System Reset’ is displayed. < To cancel the system reset, press the INFO/REPEAT button twice.
About DAB With this unit you can receive and listen to Digital Audio Broadcast (DAB) programmes. DAB uses digital, not analogue signals, resulting in near CD-quality audio with virtually interference-free reception. Along with superior quality audio, DAB can also deliver additional audio channels and text. In the future, computer data and images are also possible. Digital radio is broadcast as groups of data called Ensembles or Multiplexes.
Listening to an External Source 1 Connect the PHONES jack (audio output jack) 3 Play the source, and adjust the volume using of a portable audio player to the AUX 2 IN jack of the DR-H300DAB using the supplied stereo mini plug cable. the VOLUME knob of the DR-H300DAB and of the audio player. 2 Press the FUNCTION button or the AUX button When using the PHONES jack of your mini player, you must adjust the volume of the mini-player or you may hear no sound from your DR-H300DAB. to select ‘AUX2’.
Setting the Clock 1 If the unit is on, press the STANDBY/ON switch 4 Press the CLOCK button. to turn it standby. The ‘minute’ value starts blinking 2 Press the CLOCK button. 5 Press the VOLUME button to set the current minute. (If ‘- -:- -’ blinks on the display, press the CLOCK button again.) The ‘hour’ value starts blinking. < If no button is pressed for 10 seconds, the time setting mode will be cancelled. 6 Press the CLOCK button. 3 Press the VOLUME button to set the current hour.
Sleep Timer 7 Press the VOLUME button to turn on or off the RDS/DAB sync function. The power can be switched off after a specified amount of time. Press the SLEEP button repeatedly until desired time appears on the display. RDS/DAB Sync ON The clock setting will be automatically adjusted according to the time data from an RDS/DAB station. If you tune in an RDS/DAB station broadcasting incorrect time data, the clock might be wrongly adjusted, and that may eventually affect the timer operation.
Setting the Timer 4 Press the VOLUME button to set the start time TIMER (minute), and then press the TIMER button. VOLUME ‘ON’ or ‘OFF’ starts blinking. < The unit can be programmed to turn on at a specified time. < Adjust the clock before setting the timer. 5 Press the VOLUME button to turn ON or OFF the timer function, and then press the TIMER button. 1 If the unit is on, press the STANDBY/ON switch to turn it standby 2 Press the TIMER button. Select ON to turn the timer function on.
Software Version 7 Press the STANDBY/ON button to turn the unit How to display the software version off (standby). The clock and the TIMER indicator are displayed. < The unit will turn on at the specified time every day. < The unit turns on with the source that was last selected. Don’t forget to turn the unit off (standby), or the timer won’t work. 1. In DAB or FM mode, press and hold the INFO/REPEAT button for longer than 2 seconds. ‘System Reset’ is displayed. 2. Press the INFO/REPEAT button.
Troubleshooting If you have problems with your system, look through this chart and see if you can solve the problem yourself before calling your dealer or TEAC service center. General No power e Check the connection to the AC power supply. Check and make sure the AC source is not a switched outlet and that, if it is, the switch is turned on. Make sure there is power to the AC outlet by plugging another item such as a lamp or fan. e Press the STANDBY/ON button to turn the unit on.
Picture noise. e If video from this system has to go through your VCR to get to your TV, the copy-protection applied to some DVD programs could affect picture quality. Please connect the unit directly to your TV. The image is distorted or monochromatic. e Make sure that the PAL-NTSC setting matches the television/monitor (see page 42). e Adjust the aspect ratio to correspond to the television/monitor in use (see page 39). The aspect ratio of the screen cannot be changed.
Specifications DVD/CD Player Pickup Semiconductor laser, Wave length 650/790 nm Color System NTSC/PAL Video signal horizontal resolution More than 480 lines (DVD) Video signal-to noise ratio More than 50 dB (DVD) Audio frequency response 20 Hz to 20 kHz (+1 / –3dB) Audio signal-to-noise ratio 62 dB Dynamic range 80 dB S-Video output Y (luminance) - Output level: 1.0 Vp-p (75 Ω) C (color) - Output level: 286 mVp-p (75 Ω) Jacks: S-VIDEO jack Video output Output level: 1.
Z TEAC CORPORATION 3-7-3, Nakacho, Musashino-shi, Tokyo 180-8550, Japan Phone: (0422) 52-5081 TEAC AMERICA, INC. 7733 Telegraph Road, Montebello, California 90640 Phone: (323) 726-0303 TEAC CANADA LTD. 5939 Wallace Street, Mississauga, Ontario L4Z 1Z8, Canada Phone: (905) 890-8008 TEAC MEXICO, S.A. De C.