51 cm colour television DVTV5190F TV + OWNER S MANUAL IMPORTANT! WARRANTY INFORMATION INSIDE. PLEASE READ www.teac.com.
Please read this warranty card. Keep your purchase receipt to enable you to proceed quickly in the event of a Warranty Service. Warranty Terms & Conditions 1. TEAC warrants to the original retail purchaser only, that this product is free from defects in material and workmanship under normal domestic use and authorises free service during the warranty period at any TEAC Authorised Centre only. TEAC warranty only applies to products purchased, used and serviced in Australia. 2.
WARRANTY PROCEDURES Please keep this information for your own records. Please refer to the owner s manual to ensure that you have followed the correct installation and operating procedures. 1. Read owner s manual carefully. 2. If you require Warranty Service, please contact the TEAC Service Center. 3. Please have your purchase receipt as your proof of purchase and the following details completed for a valid Warranty. Owner s Name Owner s Address Postcode Model Name/No.
CONTENTS Before Operation Safety and Precautions...............................................................................2 Installation...................................................................................................3 Aerial connection........................................................................................3 Preparation of the remote control...............................................................3 Function buttons and external sockets............................
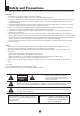
Safety and Precautions To ensure safe and reliable operation of the TV set ,please observe the following precaution, operation and maintenance. Attention: 1.Pay attention to the power supply cord before installing the TV set. Do not hang anything on the cord, and avoid treading on the cord. 2.The slots on the housing back are designed for ventilation to ensure reliable operation of the TV set and prevent overheating. They must never be covered or blocked.
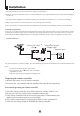
Installation 1.First read carefully the relevant instructions in Safety and precautions . 2.Place the TV set in a room where there is no direct sunlight on it. Any light reflecting from the screen will cause fatigue of your eyes. 3.Use gentle indirect lighting for comfortable watching. The best distance of watching is 5~7 times the screen height. 4.Keep a space of 10cm or over between the TV set and wall for good ventilation. 5.
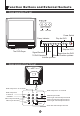
Function Buttons and External Sockets Front panel the TV set VIDEO L-AUDIO-R Video R/LAudio Power Switch Power Indicator TV/DVD MENU Play the DVD V- V+ P- P+ Stop the DVD The DVD Player Menu Signal Receiver TV/DVD Switching Open/close the DVD Channel Position up/down Volume up/ down Rear panel of the TV set Y Cb Cr COAXIAL OUT IN VIDEO L R AUDIO DVD component Cb terminal DVD component Cr terminal DVD component Y terminal COAXIAL Video output terminal Video input terminal Y Cb Cr C
Using the Remote Control Buttons on the remote control Stand By POWER DVD/TV MUTE OPEN/CLOSE DVD Open/close TV/DVD I-II 1 2 Mute Number Buttons 3 (Not available) Digital Selector Call Screen Display Former Program CALL TIME EXIT SWAP Exit TV Menu Time Menu P.STD TV/AV Picture Mode TV/AV Exchange P+ Volume Adjust MENU VOL- VOL+ Channel Selection TV MENU P- CALENDAR SCAN Calendar Scan through TV channels REV PREV FWD DVD FAST REVERSE / FAST FORWARD NEXT PAUSE/STEP H.
Switching on/ off the TV set This section explains the use of the power button and remote handset to turn your unit on and off. Switching the TV set on/ off Switching the TV set on/ off 1 Press the AC power switch on the front of the TV. The power indicator will light. 2 If the indicator is lighting in red, press the button on the remote control again.
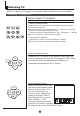
Watching TV You can watch a TV program on a channel which has been tuned to a broadcast. Watching TV programs How to select TV program Select the desired program 1 Using number buttons 1 2 Directly enter the channel number with the numeric keypad on the remote control.
Watching TV continued Press the SWAP button to select the channel you were watching previously. Auto scan function scans through all programs in memory including those with "skip" set to "off" (see "Program skip" on page 12). Program swap and auto scan functions Program swap Press the SWAP button to select the channel you were watching previously. 18 AUTO BG 8 AUTO BG SWAP 18 AUTO BG Auto program scan SCAN 1 Press the SCAN button to scan through all the memorised TV programs.
Searching channel This TV set has three methods to set the channels, which are respectively full automatic, semi- automatic and manual fine tune. In this section, how to use the remote control to set the channel is explained. You can also use the buttons on the TV set to set channel. Full automatic mode Automatic search 1 Press the MENU button. The MAIN MENU will appear with the PIC (picture) icon flashing. Press the MENU button a further 3 times until the TUN (tuning) icon is flashing.
Searching channel Continued Semi-automatic search Semi-automatic search 1 Press the P+/- buttons or the PROGRAMME NUMBER (0-9) to choose the desired channel (e.g. Channel 1). 1 AUTO BG P+ MENU VOL- VOL+ P- 2 Press the MENU button. The MAIN MENU will appear with the PIC (picture) icon flashing. Press the MENU button a further 3 times until the TUN (tuning) icon is flashing. Press P- to enter the TUNING menu. 3 Press the P+/- buttons to select "SEARCH".
Searching channel Continued Manual fine tune Manual fine tune If the picture and/or sound are poor, try using the FINE TUNE feature. Do not use this feature unless reception is poor. P+ MENU VOL- VOL+ P- 1 Press the P+/- buttons or PROGRAM NUMBER 0-9 button to choose the desired channel (e.g. channel 1). 1 AUTO BG 2 Press the MENU button. The MAIN MENU will appear with the PIC (picture) icon flashing. Press the MENU button a further 3 times until the TUN (tuning) icon is flashing.
Searching channel Continued Program skip Program skip Channels can be set so that they are skipped during program selection. P+ MENU VOL- VOL+ 1 Press the P+/- buttons or PROGRAM NUMBER 0-9 button to choose the desired channel (e.g. channel 1). 1 AUTO BG P- 2 Press the MENU button. The MAIN MENU will appear with the PIC (picture) icon flashing. Press the MENU button a further 3 times until the TUN (tuning) icon is flashing.Press P- to enter the TUNING menu.
Convenient picture and sound control functions Multiple picture modes How to select picture modes You can quickly select the desired picture mode from STANDARD four preset modes and one customized mode. Press the P.STD button to select the desired picture quality. Five kinds of picture modes P.STD (i.e., "STANDARD","RICH", "USER","LISTEN", "SOFT" ) can be selected in turn.
Convenient picture and sound control functions Continued Black Stretch Automatically increases the contrast range Noise Reduce Picture Noise & Grain Reduction Circuit. (Use only on poor reception) Black stretch and noise reduce How to select BLACK STRETCH 1 Press the MENU button. The MAIN MENU will appear with the PIC (picture) icon flashing.Press the MENU button a further 2 times until the FUN (function) icon is flashing.Press P- to enter the FUNCTION menu.
Convenient picture and sound control functions Continued Mute and Fade Sound mute 1 Press the MUTE button on the remote control to turn off the sound. MUTE will appear on the top left of the display. MUTE MUTE 2 Press MUTE again to turn the sound back on. Fade When FADE is turned on, the TV will protect the tube by fading the picture in when the TV is switched on, and fading the picture out when the TV is switched off. P+ MENU VOL- VOL+ P- 1 Press the MENU button.
Time functions Clock setting and timer on/off functions Clock setting The clock will only work if the TV set if left turned on or in standby. When the set is disconnected from the power supply or is turned off by the main power on the front panel, the clock loses power and will need to be reset when the power is reconnected. TIME 1 Press the TIME button, and the TIME menu appears on the screen.
Time functions Continued Sleep timer and program preset Sleep timer The sleep timer switches the set to stand-by after the sleep time has elapsed. Sleep time can be set in 10 minute intervals up to 180 minutes, as shown in the illustration. Setting the sleep time to zero turns off the sleep timer. TIME 1 Press the TIME button, and the TIME menu appears on the screen. P+ MENU VOL- VOL+ P- 2 Press the P+/- buttons to select "SLEEP TIME ". 3 press the VOL-/+ buttons to set the value of the SLEEP TIMER.
Set up function Screen saver and Calendar How to start screen saver function When the background function is ON a bouncing 'NO SIGNAL' will be displayed on a blue back ground. P+ MENU VOL- VOL+ NO SIGNAL 1 Press the MENU button. The MAIN MENU will appear with the PIC (picture) icon flashing. Press the MENU button a further 2 times until the FUN (function) icon is flashing.Press P- to enter the FUNCTION menu. P- 2 Press the P+/- buttons to select BACKGROUND.
Set up function Continued AVL AVL function Automatic Volume Level control reduces the effect of large volume changes. For instance, when advertisements come on. P+ MENU VOL- VOL+ P- 1 Press the MENU button. The MAIN MENU will appear with the PIC (picture) icon flashing. Press the MENU button a further 2 times until the FUN (function) icon is flashing.Press P- to enter the FUNCTION menu. BACKGROUND BLACK STRETCH NOISE REDUCE FADE AVL P+ MENU VOL- VOL+ 2 Press the P+/- button to select "AVL" .
Organise functions ORGANISE ORGANISE This feature enables TV programmes that may be on a wrong program number to be moved to another number. This feature is very useful when Automatic Search Tuning has been used because programmes are stored in the order they are found, which is usually not the desired order. When organising, it is best to start from the lowest programme number first. P+ MENU VOL- VOL+ P- MENU VOL+ P- P+ MENU VOL- PROG NO ORGANISE SEARCH FINE TUNE AUTO SEARCH 2.
Setting the Lock This TV set provides the option of locking various parts of the TV to guard against unauthorised viewing. Changing your password Changing your password This TV set can set a four digit password, the original one is 0000, if you want to reset it, please follow the instructions below. H.LOCK 1 Press H.LOCK button, the screen will show as the form on the right. P+ MENU VOL- VOL+ P- 1 2 3 2 Press the 0 button four times, and enter the menu of LOCK setting.
Setting the Lock(continued) Setting the Lock Setting the Lock There are TUNING LOCK,AV LOCK, and CHILD LOCK, etc,you can set it due to your need. H.LOCK 1 2 1 Press the H.LOCK button, the screen will show as the form on the right. 3 2 Press the PROGRAM NUMBER 0-9 button 0 for four times(or input the password you set), and enter the LOCK menu. INPUT PASSWORD ---- LOCK SET CHANGE PW.
Basic Playback Basic Playback Preparations Press the DVD/TV button on the remote control or the TV to turn on the DVD player. Basic playback 1. Press OPEN/CLOSE to open the disc tray, place a disc on the disc tray. There are two different disc sizes. Place the disc in the correct guide on the disc tray. If the disc is out of the guide, it may damage the disc and cause the DVD player to malfunction. Do not place a disc which is unplayable in this DVD player (see "Playable discs"). 2.
Advanced Playback Advanced Playback IMPORTANT NOTE: ALL DESCRIBED FUNCTIONS ARE FOR DVD DISCS. There will be some differences for other kinds of disc. CAPTION Press " CAPTION ", the screen will display "SUBTITLE 01/XX XXXXX", "01" indicates the ordinal number of this language; "XX" indicates total number of language; "XXXXXX" indicates the language of country. (the number of language depends on disc). This function can select up to 32 languages displayed on screen.
Special Function Playback JPEG DISC PLAYBACK Users can record pictures from digital camera or scanner onto a CD-R or CD-RW disc using a personal computer, CD recording drive and suitable software. Be sure to use good quality recordable discs and trustworthy software with good instructions. Take care with recording settings: the disc must be recorded as data disc ISO9660 format, short file names (8 characters) are best, no multi-session and must be "finalised".
Special Function Playback(Continued) Kodak Picture CD A Kodak Picture CD has the size and shape of a regular CD. You can order a Kodak Picture CD simply by checking the box on the photofinishing envelope when you drop off a roll of film (35 mm or Advanced Photo System (APS) color print film) at the time of processing in Kodak Express store displaying "Kodak Picture CD" sign.
DVD System Setup DVD System Setup General Setup Process SETUP 1.Press the SETUP button, the General Setup Page,Preference Page will be displayed in turn. 2.Press CH+/or b item, then press submenu. PLAY/ENTER to select, the to enter the or bu to select then 3.Press CH+/press PLAY/ENTER to confirm. 4.Press EXIT key or press SETUP repeatedly to exit the set-up menus. ..General Setup Page.. TV Display Angle Mark OSD Lang Spdif Output Caption Screen Saver LB 4 3/Ps On 4 3/Lb ENG 16 9 On Off ..
DVD System Setup(Continued) DVD System Setup General Setup Page ANGLE MARK: Users can select a particular camera angle .when playing a DVD which offers multiple angles. This item allows you to set Angle Mark ON or OFF. On Screen Display (OSD) Language: Users can select on-screen display language. SPDlF OUTPUT MODE: Sets the audio outputs. This DVD player includes three kinds of audio output: 1. SPDlF OFF: An analog surround sound format is output through the back-paneI connections for 2-CH audio out or 5.
DVD System Setup(Continued) DVD System Setup Preference Page SETUP PLAY/ENTER SETUP The Preference Page is only available when there is no disc in the player. These settings are applied consistently to all discs which are inserted and played. TV TYPE: This player supports different TV output, including MULTI(Auto), NTSC, and PAL systems. Usually please set to MULTI. ..Preference Page..
Playable Discs The following discs can be played: You cannot play discs other than those listed above. You cannot play non-standard discs, even if they may be labelled as above. The performance of CD-R or CD-RW discs depends on the way the disc is prepared - see under "Special function playback - JPEG disc playback".
Disc Protection and DVD Characteristics Compare DVD disc with other discs: DVD Encode method LD Digital/MPEG Singleside doublelayer 9.4G Doubleside doublelayer 17G 133 242 266 Playing Time minutes minutes minutes 484 minutes Capacity Disc diameter Singleside singlelayer 4.7G Double -side single -layer 8.
Connecting the TV set to the other video and audio equipment Connection of AV input /output terminal The figure below shows hot to connect external equipment using AV signals. LASER DISC VCR Audio right input Audio left input Video input Audio right output VCR Audio left output VCR Video output VCR There is also an AV input on the side of your television. Use the Left Audio input (white terminal on the TV), if you are connecting equipment with mono sound.
Troubleshooting guide TV troubleshooting BREAKDOWN PHENOMENON PICTURE SOUND CHECKING The aerial direction and connection Picture with snow Double or Triple Image Noise Normal This is called ghosting which can be minimized with an outside aerial, and good quality cable and terminations. Altering the aerial direction can also minimize this effect. Electrical interference which can be caused by cars, motorbikes etc, Fluorescent lamps and dirty insulators on overhead power cables.
Troubleshooting guide DVD and general troubleshooting Problems Things to check or try Power System does not turn on, or does not respond to controls. Make sure AC mains plug is secure in the outlet, and outlet has power. Make sure main power switch is on. Disconnect the main supply, wait 5 minutes and re-connect. If the unit still does not respond, disconnect the mains again and call a service engineer. DISC Disc won't play Make sure FUNCTION is set to DVD mode. Make sure disc label is facing up.
Specifications Specifications Model Colour system PAL, NTSC PLAYBACK Sound system BG Picture tube 21"colour picture tube (51cm viewable) Sound output power 2X2W 10% THD Power requirements AC 240V Power consumption 80W Dimension Accessories 504 Width 50Hz x482 Remote control Owner's manual Battery(AA) Depth x512 Height mm X1 X1 X2 Improvements may result in changes to features or specifications without prior notice.
TEAC CORPORATION 3-7-3, Nakacho, Musashino-shi, Tokyo 180-8550, Japan Phone: (0422) 52-5081 TEAC AUSTRALIA PTY.,LTD. HEAD OFFICE A.B.N.:80 005 408 462 280 William Street, Melbourne, VIC 3000 Phone : (03)9672 2400 Pier 31 Lorimer Street, Port Melbourne, VIC 3207 32 Lonsdale Street, Dandenong, VIC 3175 Unit 8, 20-22 Foundry Rd., Seven Hills, NSW 2147. 335 Montague Road, West End, QLD 4101. 2446 Gold Coast Highway, Mermaid Beach, QLD 4218 273 Great Eastern Highway, Belmont, WA 6104. Cnr. Sir D.