USER’S MANUAL HDRM7250 Many thanks for purchasing your TEAC product. In order to get the best performance and experience from your product, please read this manual thoroughly. We also suggest you refer to our website for news and further updates. Revision 1.
Disclaimer: We make our sincere effort to ensure the accuracy of the material described herein; however the author and TEAC Australia Pty Ltd make no warranty expressed or implied with respect to the quality, correctness, reliability, currentness, accuracy or freedom of error of this document of the product it describes. We make no representation or warranty with respect to the contents hereof and specifically disclaim any implied warranties of fitness for any purpose.
TABLE OF CONTENTS PRODUCT SAFETY NOTICE ........................................................................................................................ 3 PLEASE READ BEFORE USE....................................................................................................................... 4 What happens when first time connected?....................................................................................... 4 Is Digital TV reception available in your home?.............................
SLOW MOTION ............................................................................................................................. 15 RECORDING PROGRAMMES..................................................................................................................... 16 HARD-DRIVE MANAGEMENT.................................................................................................................... 17 RECORDING TIMERS ........................................................................
PRODUCT SAFETY NOTICE WARNING! Do not open this product as there is a risk of electric shock. Under no circumstances should you try to repair the receiver yourself as this will invalidate your product warranty. If a fault occurs, check the troubleshooting guide at the rear of this manual. Should problems continue to persist, contact the National Customer Service Centre on 1800 656 700 between 9am to 5pm weekdays. • Always allow a minimum of 5cm of free space around the product for adequate ventilation.
PLEASE READ BEFORE USE Product Installation Notice What happens when first time connected? When power is first applied, you product will introduce a step-by-step setup process on screen. At the same time, the internal hard-drive will begin the checking process (takes about 10 minutes). Whilst this process is taking place, the rewind, record and pause television functions cannot be used.
WARRANTY STATEMENT Keep your purchase receipt to enable you to proceed quickly in the event of a Warranty Service. Terms & Conditions for HDRM7250 DVR set-top box 1. TEAC warrants to the original retail purchaser only, that this product is free from defects in material and workmanship under normal domestic use and authorizes free service during the warranty period at any TEAC Authorized Centre only. TEAC warranty only applies to products purchased, used and serviced in Australia. 2.
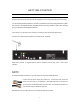
THE REMOTE CONTROLLER STANDBY – used to toggle HDTV – used to display information your receiver on and off. about the HDTV mode. [0-9] – directly access your television channels. CANCEL – either cancel or close some On some input fields, multiple menus and services. pressing results in the character entry [A-Z] similar to using a mobile telephone. MENU – to access the receivers options, tuning functions and other preferences. LIST - displays a list of services available for viewing.
GETTING STARTED INTRODUCTION Digital Television had begun January 2001 within Australia. Since this time, digital television programs and services have evolved and all Australians can now enjoy this exciting new technology. You will find today additional television channels not available on the older analogue television system. This product is compatible with both Standard Definition and High Definition viewing and recording giving you the best possible digital experience.
HDTV For High Definition Televisions, you have a choice of either Component Video (YPbPr) or a Digital HDMI connection. Note that the HDMI lead is not supplied with this product. HDMI CONNECTION HDMI is the newest cable type designed specifically to provide an easy method to connect digital video and audio signals between set-top boxes (and some DVD players) to a new flat panel screen. Simply connect the HDMI lead between the set-top box and your television.
THE SET-UP PROCESS Assuming you have connected a HDMI cable or Component Video cable between your set-top box and you flat panel television screen, the following will automatically appear when using this product for the first time. If no screen appears, unplug the HDMI cable and connect again. This will force the settop mode into this mode (i.e. it’ll automatically switch). Every 10 seconds, the video screen mode will change to a lower resolution.
Use the numerical keys to enter your 4 digit postcode. The press joystick to select the state you live in. Once finished, press the key to continue. You must read the copyright disclaimer, then press to continue. Use the coloured button keys to enter a 6 colour code. This parental control code will be used later by you to block channels and the time-shifting buffer from other viewers in the home. When finished, press the key to continue. The last step is to tune your digital channels.
BASIC OPERATION SERVICE LIST MODE Now that your digital receiver is set-up and working, you are able to watch television by simply pressing the key on the remote controller. Within seconds, a channel list similar to the picture is shown. Using the joystick; press or to scroll to the desired channel. To watch it, simply press firmly the centre of the joystick to select the function. This is known as “zapping to a channel.
INFO MODE The key gives you more information about the program you are watching. or will toggle NEXT programme Moving the joystick either between NOW and information from the broadcaster. You can get further programme information by pressing the red (MORE INFO) key. This shows an extended description about the program, including its duration. red key again for LESS INFO. Press the CLOSED-CAPTIONING Some programs are closed captioned for the hearing impaired or hard of hearing.
The ‘english’ selection is the default. This is known as MPEG stereo sound and is available at all times for Standard Definition broadcasts. The ‘english5.1’ option is available when either an (1) optical TOSLINK cable or (2) coaxial cable is connected between the set-top box and a Digital Surround Sound Amplifier. Troubleshooting: Although the set-top box will indicate 5.1 sound, most programmes however are 2/0 surround sound.
THE DIGITAL RECORDER PAUSE LIVE TELEVISION (TIME-SHIFTING) Imagine watching television and the phone rings. Simply press the key (or the key) to pause the picture. Once you have finished your telephone conversation, you may watch the program from where you left off. Pressing firmly on the joystick executes the key function. You will immediately notice the information bar across the bottom of the screen with the II (pause) symbol appearing to the left.
To stop rewinding and watch television, press the key. As described above you are now watching time-shifted television. To watch live television again, press either the key or use the key to forward to live picture. Whilst you are time-shifting (i.e. watching rewound television), it is also possible to make a recording. Press the key and then press red to start the recording within a time-shift buffer. Note: The rewind and forward feature sometimes may appear to you to give erratic results.
RECORDING PROGRAMMES To record a programme, press the desired channel number. Press key to display the recording options. There are two options available: Red key = manual recording Green key = automatic recording Selecting manual will start a recording from the current time. The duration will be preset to 3 hours later. Selecting automatic will record the current program. The duration of recording is subject to the accuracy of the information from the broadcaster.
HARD-DRIVE MANAGEMENT It is possible to enable (and disable) the hard-drive to prolong its performance. In addition, you have the option to ERASE the hard-drive or just the TIMESHIFT buffer. To access the DIGITAL RECORDER menu, press the MENU key. The following options will appear. to highlight the Diagnostics option. Now Move the joystick TV GUIDE MEDIAPLAYER HD press the key to enter.
RECORDING TIMERS It is possible to set a timer recording (similar to your old video-recorder). To set a recording timer, press the key. The following options will appear. MENU TV GUIDE MEDIAPLAYER HD Move the joystick option. Now press the to highlight the RECORDING TIMERS key to enter. MY RECORDINGS RECORDING TIMERS PARENTAL LOCK PREFERENCES DIAGNOSTICS INTERNET Press the blue key to add a new timer. Navigate the joystick to set the desired channel, its occurrence, date, and start and end times.
PLAYBACK RECORDINGS key. The following options will appear. To access your recorded programmes, press the MENU TV GUIDE MEDIAPLAYER HD MY RECORDINGS RECORDING TIMERS Move the joystick Now press the to highlight the MY RECORDINGS option. key to enter. The following screen will appear. PARENTAL LOCK PREFERENCES DIAGNOSTICS INTERNET The My Recording screen shows the network, program name, date and time of the recordings.
ELECTRONIC PROGRAM GUIDE One of the most important features of Digital Television is the Electronic Program Guide (commonly known as the ‘EPG’). Today, broadcasters send within their transmission NOW and NEXT programme information. In some areas, extended EPG information may be available. An EPG can be represented in many ways. A basic NOW & NEXT guide is the most common.
Note: Currently, you cannot set dual timers that overlap (in time). Therefore a timer and reminder feature cannot be simultaneously set at the same times. To exit the guide, press the key again. The guide may also be accessed from the main menu. Press the will be highlighted. Press the key; the option TV GUIDE key to select. VIDEO PROGRAM GUIDES Broadcasters also broadcast extra television channels known as VPG’s (i.e. Video Program Guides).
PARENTAL LOCK The Parental Lock option allows you to block television channels and other interactive services. It also allows you to restrict programs by their classification and block the time-shifting video on the hard-drive from playback. Press the key and the following options will appear. MENU TV GUIDE MEDIAPLAYER HD MY RECORDINGS RECORDING TIMERS PARENTAL LOCK PREFERENCES Move the joystick Now press the to highlight the Parental Lock option. key to enter.
PREFERENCES key. The following options will appear. To access the preferences, press the MENU Move the joystick TV GUIDE press the MEDIAPLAYER HD to highlight the Preferences option. Now key to enter. MY RECORDINGS PREFERENCES RECORDING TIMERS TUNING-IN PARENTAL LOCK FAVOURITE CHANNELS PREFERENCES AUDIO & VIDEO DIAGNOSTICS DISPLAY INTERNET NETWORK RECORDINGS EXPORT TUNING-IN Tuning services may be done using two methods: - Automatic and Manual.
FAVOURITE CHANNELS Favourite channels allow you to hide or skip those unwanted services that appear in your channel list. Here is how it works. Move joystick Press or to select the broadcast channel. Press once to SKIP the service. Press again to HIDE the service. Press a third time to go back to normal. blue to save your options. It is also possible to renumber channels by selecting the desired channel and pressing the green key.
The HDTV (HDMI) MODE selection is available only when a HDMI cable is connected. When the HDMI cable is not connected, the YUV MODE (YPbPr) selection becomes available. When using a HDMI connection, the available video modes are 576p, 720p and 1080i. You can key on the remote controller. For Component adjust the preferred mode by pressing the Video the available video formats are 576p, 720p and 1080i.
NETWORKING To connect your set-top box to your home network, you simply are required to connect a standard Ethernet cable between the rear of the set-top box (labeled Ethernet) and to a spare port on the rear of your home router. Your home router is normally defaulted to DHCP mode (i.e. it assigns an IP address to computers and other devices connected to it.) key. The following options will To access the network settings on the set-top box, press the appear.
EXPORT RECORDINGS Note: This feature should be attempted by experienced PC users that understand how to create share folders on a Windows XP system, or have a Network hard-drive (NAS device) that is supporting SAMBA (SMB) protocol. The export option allows you to transfer your recordings over the home network either to your home PC or a network hard-drive. The method to configure this feature on a Windows XP machine is explained below. Your first step is to enable File and Printer sharing.
Next at the command prompt, type ipconfig /all Look for the Host Name. You will find the Host Name (computer name) and IP Address for your home computer listed amongst other networking information. To set-up this feature, in MY RECORDINGS you must press the blue key. On the set-top box, you will see the following screen appear. You will need to enter your Hostname (or IP address of your PC) and the Shared PC folder name. Press the yellow key to test the configuration.
MEDIAPLAYER-HD The Mediaplayer allows you to playback video, movie, music and view photos. In order to use the Mediaplayer, you must have either have:(i) a compatible USB hard-drive connected to the USB port, or (ii) a home network with a Windows XP PC running ‘Windows Media Connect’ The procedure below describes when an external USB drive is connected. It will be identified as SDA1. To access the Mediaplayer, press , move down to MEDIAPLAYER-HD and press Select SDA1 a press . .
INTERNET The Internet browser on your set-top box is very different from your home computer. It is not designed to be a substitute for the home personal computer. It is based on W3C standards and is designed for interactive television applications (better known as a TV browser). It allows you an easy method to access media files that may be available on the Internet or on other devices. Web addresses are entered using the remote controller.
BOOKMARKS The Bookmarks feature allows you to store your own links. This is also known as storing your favourites on a home computer. The set-top box has an added feature where you can also assign a channel number to the destination link. Any number between 550~599 may be used for this purpose. To access bookmarks press the blue key. The following screen will be shown. Simply type in the name and destination address to build a bookmark. An optional channel number can be assigned to it.
NOTES SOFTWARE SERIAL NUMBER When contacting TEAC for any support, please write down the information as shown below. You can find this information by pressing the i key on the front panel. The MAC address is used by every computer or product connected to the Internet. It uniquely identifies the product. This is known as the ‘MAC serial number’ or ‘software serial number’. The software version helps us identify what features are available to you and how they operate.
FREQUENTLY ASKED QUESTIONS Q. When I do an automatic tuning, not all channels are received. Why? A. TEAC recommends you review your aerial and cabling set-up. Digital Broadcast Australia highly recommends that you use RG6 Quad shield cabling from your television antenna directly to the settop box. It is best to consult a professional antenna installer for more information. Q. Some channels break-up occasionally. Why? A. As per above, your antenna set-up may not be adequate.
Q. Some web pages I try to access will restart the set-top box. Why? A. Many web pages include multiple pop-ups or other code intentionally designed to get data (sometimes unauthorized) from you. These pages may be beyond the capabilities of this product. Q. When I select the GUIDE, not all data is available. Why? A. Currently, broadcasters do not provide cross-carry information. They also do not provide data beyond what is showing now and what is showing next. This is normal.
Q. When I record, the recording is not playing back properly. It is breaking-up. A. This is possible if your signal level is too low. Check the Diagnostics->TV Signal menu. If SNR is less than 20.0dB, then this problem may exist. As a rule, if the set-top box detects a low signal level, it will give more signal to the first tuner so you may continue to watch digital television and timeshift. You will need to improve your reception a little. Try using some small antenna signal booster. Q.
SPECIFICATIONS Hardware core system: Processor: Sigma Designs SMP8635 Secure HDTV Processor Graphics: True colour + alpha blending, flicker filtering, font anti-aliasing. Memory: 16 MB Flash, 256 MB RAM Software Core System: Operating system: Embedded Linux Middleware: NETGEM DVB/HTML, remote channel management Remote management: Secure terminal management (settings, PKI, certificates) Upgrade: Secure software downloading through network and USB key System Applications: Enhanced Content: HTML 4.
Power Consumption: Less than 35 watts when hard-drive is active. Input Voltage 240V, 50Hz Tuning: Range 174 ~ 862 Mhz VHF+UHF (IEC Female Connector) Input Impedance 75ohm. Dimensions & Weight: 70mm (h) x 405mm (w) x 315mm (d) 4.5kg Disclaimer: Some specifications are subject to change without notice.
NATIONAL CUSTOMER SERVICE CENTRE (NCSC) Free call: 1800 656 700 Between Monday to Friday – EST 9AM to 5PM TEAC AUSTRALIA PTY.,LTD. HEAD OFFICE A.B.N.: 11 113 998 048 30 Tullamarine Park Road, Tullamarine, VIC 3043 Phone : (03)8336 6500 30 Tullamarine Park Road, Tullamarine, VIC 3043 Phone : (03)8336 6544 Unit 41, 65 Marigold St., Revesby, NSW 2212. Phone : (02)9774 1075 335 Montague Road, West End, QLD 4101. Phone : (07)3010 0100 273 Great Eastern Highway, Belmont, WA 6104.