9A10067300 MC-DV250 DVD Home Theater System OWNER’S MANUAL MANUEL DU PROPRIÉTAIRE MANUAL DEL USUARIO
CAUTION The product shall not be exposed to dripping or splashing and that no object filled with liquids, such as vases, shall be placed on the product. Do not install this equipment in a confined space such as a book case or similar unit. ATTENTION Ne pas exposer l’appareil à l’humidité ou aux projections d’eau ; ne pas poser d’objets contenant de l’eau, tels qu’un vase, ou un liquide quelconque, sur l’appareil. Ne pas installer l’appareil dans un endroit clos tel qu’une bibliothèque ou un meuble fermé.
Sommaire Indice Nous vous remercions pour l’achat d’un appareil TEAC. Lire ce manuel avec attention pour obtenir les meilleures performances possibles de cet appareil. Enhorabuena por la adquisición de un TEAC. Lea detenidamente este manual a fin de obtener el mejor rendimiento de esta unidad. Avant utilisation . . . . . . . . . . . . . . . . . . . . . . . . . . . . . . . . . . . 5 Disques . . . . . . . . . . . . . . . . . . . . . . . . . . . . . . . . . . . . . . . . . 10 Raccordement . . . . . . . . .
”DTS” and “DTS 2.0 + Digital Out” are trademarks of Digital Theater Systems, Inc. Manufactured under license from Dolby Laboratories. “Dolby”, “Pro Logic” and the double-D symbol are trademarks of Dolby Laboratories. This product incorporates copyright protection technology that is protected by method claims of certain U.S. patents and other intellectual property rights owned by Macrovision Corporation and other rights owners.
Avant utilisation 1 Previo al empleo 1 Contenu de l’emballage Contenido del embalaje Vérifiez que les accessoires suivants se trouvent bien dans le carton.
Before Use 2 < Do not open the cabinet as this might result in damage to the circuitry or electrical shock. If a foreign object should get into the set, contact your dealer or service company. < When removing the power plug from the wall outlet, always pull directly on the plug, never yank the cord. < To keep the laser pickup clean, do not touch it, and do not forget to close the disc tray. < Do not attempt to clean the unit with chemical solvents as this might damage the finish.
Avant utilisation 2 Previo al empleo 2 < N’ouvrez jamais l’appareil pour ne pas endommager les circuits ou vous exposer à un risque d’électrocution. Au cas où un objet tomberait par inadvertance dans l’appareil, contactez votre revendeur ou la société chargée de la maintenance. < Pour débrancher le cordon de la prise murale, retirer directement la prise, ne jamais tirer sur le cordon.
Discs Type of Discs That Can be Played on This System This player can playback discs bearing any of the following logos: DVD Video: • Single-sided or double-sided discs • Single layer or dual layer discs • Dolby Digital, DTS, MPEG or Linear PCM digital audio • MPEG-2 digital video • This unit can play DVD-R/DVD-RW/DVD+R/ DVD+RW discs recorded in DVD video format. Discs are generally divided into one or more titles. Titles may be further subdivided into chapters.
Following discs cannot be played with this unit: < CD-G, Data part of CD-EXTRA, PHOTO CD, CD-ROM, SACD, DVD-Audio, DVD-RAM and DVD-ROM discs < discs recorded in a color system other than PAL or NTSC < illegally produced discs < scratched discs < discs that are dusty, soiled or marked with fingerprints Warning: If you attempt to play back such discs, there is a risk that sudden loud noise can blast over the speakers at full volume and cause damage to the speakers and your hearing.
Disques Type de disques utilisables sur ce système Ce lecteur permet de lire tous les disques portant les logos suivants : DVD-Vidéo : • Disques simple face ou double face • Disque simple couche ou double couche • Dolby Digital, DTS, MPEG ou audio numérique Linear PCM • Vidéo numérique MPEG-2 • Cet appareil peut lire des disques DVD-R/ DVD-RW/DVD+R/DVD+RW enregistrés au format vidéo DVD. Les disques comprennent généralement un ou plusieurs titres. Les titres peuvent de plus être subdivisés en chapitres.
ATTENTION : < Si vous enregistrez un disque à partir d’un PC (ou un enregistreur de DVD), même si le disque est gravé dans un format compatible, dans certains cas le disque ne pourra pas être lu en raison du paramétrage du logiciel utilisé pour créer le disque (demander de plus amples informations auprès de l’éditeur du logiciel). < Les disques DVD-R/RW non finalisés ne peuvent pas être lus.
Discos Tipos de discos admitidos por el equipo La unidad puede reproducir discos con los siguientes logotipos: DVD-Vídeo: • Discos de cara simple o doble • Discos de capa simple o doble • Dolby Digital, DTS, MPEG o audio digital PCM lineal • Vídeo digital MPEG-2 • La unidad puede reproducir discos DVD-R/ DVD-RW/DVD+R/DVD+RW grabados en formato DVD-Vídeo. Los discos generalmente se dividen en uno o más títulos. A su vez, los títulos se pueden subdividir en capítulos.
PRECAUCIÓN: < Si graba un disco con un ordenador normal (o grabadora de DVD), y aunque sea en un formato compatible, se dan casos en los que no podrá reproducirse debido a la configuración del software utilizado para crear el disco (Solicite más detalles al responsable del software.). < No se podrán reproducir los discos DVD-R/RW que no tengan cerrada la sesión. < Coloque siempre el disco en la bandeja con la cara de la etiqueta hacia arriba. (Los discos compactos sólo se reproducen y graban por una cara.
Connection 1 (FM antenna) A CAUTION: < Switch off the power to all equipment before making connections. < Read the instructions of each component you intend to use with this unit. < Be sure to insert each plug securely. To prevent hum and noise, avoid bundling the signal interconnection cables together with the AC power cord or speaker cables. A FM Indoor Antenna In an area with strong FM signals, the T-type FM antenna provided with this unit is sufficient.
Raccordement 1 (antenne FM) Conexión 1 (Antena de FM) ATTENTION : < Coupez l’alimentation de tous les appareils avant d’effectuer les raccordements. < Lisez les instructions qui accompagnent chaque appareil que vous avez l’intention d’utiliser en association avec cet appareil-ci. < Veillez à ce que chaque fiche soit soigneusement insérée.
Connection 2 (AM antenna) AM Indoor Loop Antenna The high-performance AM loop antenna provided with this unit is sufficient for good reception in most areas. To stand the loop antenna on a surface, fix the claw to the slot in the antenna base. Connect the loop antenna’s wires to the AM antenna terminals.
Raccordement 2 (antenne FM) Antenne-cadre AM intérieure Conexión 2 (Antena de AM) Antena de cuadro de AM interior L’antenne-cadre AM haute performance fournie avec cet appareil permet une très bonne réception dans la plupart des régions. Pour placer l’antenne sur une surface, fixez la griffe dans la fente. Raccordez les fils de l’antenne-cadre aux bornes AM de l’antenne. En la mayoría de las zonas será suficiente con la antena de cuadro de AM facilitada con la unidad.
MD, CD-R, etc. MD, VCR, etc. AUDIO IN SPEAKER AUDIO OUT DIGITAL IN SPEAKER L R SUBWOOFER D A C B TV TAPE L R L R AUDIO IN LINE IN L R LINE OUT Connection 3 Connection to an audio component C Speaker Connections CAUTION: To avoid damaging the speakers with a sudden high-level signal, be sure to switch the power off before connecting the speakers. A DIGITAL OUT terminal If the component has an DIGITAL IN terminal, connect it with an optical cable.
Raccordement 3 Conexión 3 Raccordement à un appareil audio Conexión a un componente de audio A Prise DIGITAL OUT A Terminal DIGITAL OUT Si le composant dispose d’une prise DIGITAL IN, connectez-le avec un câble optique. DIGITAL OUT (MC-DV250) q DIGITAL IN (CD-R, MD, etc.) < Sélectionnez le mode de sortie numérique en fonction du raccordement effectué (voir page 73). B Prises AUDIO IN/OUT Les signaux analogiques 2 voies peuvent être appliqués sur ces prises, ou disponibles en sortie.
Connection 4 TV (monitor) VIDEO IN COMPONENT VIDEO IN Y PB PR S-VIDEO IN SCART CAUTION: Switch off the power to all equipment before making connections. Read the instructions of each component you intend to use with this unit. Be sure to insert each plug securely. To prevent hum and noise, avoid bundling the signal interconnection cables together with the AC power cord or speaker cables. Connection to a TV Connect one of these cables. Connectez l’un de ces câbles. Conecte uno de estos cables.
Raccordement 4 Conexión 4 ATTENTION : Mettre tous les éléments du système hors tension avant d’effectuer les différents raccordements. Lire attentivement les instructions fournies pour chacun des éléments que vous comptez utiliser avec cet appareil. Veillez à bien brancher chaque prise en l’enfonçant complètement. Pour éviter les bruits et bourdonnements, éviter de regrouper les câbles d’interconnexion avec le cordon d’alimentation CA ou avec les câbles des haut-parleurs.
I H Connection 5 H AC Power Cord When all connections have been made, plug the AC power cord into an AC wall socket. Before Going On Once a connection with the TV or monitor has been made, you need to set the following settings. Otherwise, distorted images or no picture at all would appear on the TV screen. COLOUR SYSTEM I Cooling fan The fan turns on only when temperature inside the unit becomes high. Do not touch the fan when it is hot. The fan emits audible noise when turning.
Raccordement 5 H Cordon d’alimentation CA Une fois ces différents branchements terminés, brancher le cordon d’alimentation CA sur la prise murale de l’alimentation secteur. I Ventilateur Conexión 5 H Cable de alimentación (c.a.) Una vez realizadas todas las conexiones, conecte el cable de alimentación a una toma mural (corriente alterna). I Ventilador de refrigeración Le ventilateur se met en marche seulement lorsque la température de l’appareil devient élevée.
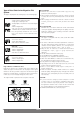
Names of Each Control A M B C D E L F K Front Panel G H I J G Play/Pause button (G/J) Use this button to start or pause playback. A STANDBY/ON switch Press this switch to turn the unit on or standby. H Stop button (H) The equipment draws nominal non-operating power from the AC outlet with its STANDBY/ON switch in the STANDBY position. Use this button to stop playback. I Open/Close button (L) Use this button to open and close the disc tray.
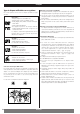
a A B C D E F G H J I V Y XW L K U b c d e f N P Q M O T S R g Front Panel Display Subwoofer A Play indicator a POWER switch Press this switch to turn the unit on or off (standby). Noise may be generated when the unit is turned on or off. B Pause indicator C Disc type indicator The equipment draws nominal nonoperating power from the AC outlet with its POWER switch in the OFF position. D title E chapter b STANDBY indicator F track When the subwoofer is on, the indicator turns blue.
Names of Each Control F SELECT button D A B C This button is used to adjust BASS, TREBLE or BALANCE. Press this button repeatedly to select BASS, TREBLE or BALANCE, and then press the VOLUME button to adjust. S T G SEARCH button U Use this button to display the Search Menu on the TV screen. E H Numeric buttons Use these buttons to key in track numbers, passwords, etc. G J F V H W X Y Z a b c d e f g I STEP button ( JG) Used for single stepping playback.
Remote Control Unit The provided Remote Control Unit allows the unit to be operated from a distance. When operating the remote control unit, point it towards the remote sensor on the front panel of the unit. V LISTENING button Use this button to select a listening mode. W AUDIO button (L/R) Use this button to select the desired language for audio playback.
Désignation des commandes A M B C D E L F K Panneau avant H I J G Touche de lecture/pause (G/J) Utilisez cette touche pour commencer ou suspendre la lecture. A Interrupteur STANDBY/ON Appuyez sur cet interrupteur pour mettre l’appareil sous tension ou hors tension (veille). L’équipement se rapproche de l’alimentation nominale de nonfonctionnement à partir de la prise CA avec son interrupteur STANDBY/ON (veille/brancher) dans la position STANDBY (veille).
a A B C D E F G H J I V Y XW L K U b c d e f N P Q M O T S R g Affichage du Panneau Avant Haut-parleur de basses A Indicateur Play (lecture) a Interrupteur d’ALIMENTATION (POWER) Pressez cet interrupteur pour brancher et débrancher l’appareil (veille). L’appareil peut faire du bruit lorsqu’on l’allume ou que l’on l’éteint.
Désignation des commandes G Touche SEARCH D A B C Utilisez cette touche pour afficher le Menu de Recherche sur l’écran TV. S T H Touches numériques Utilisez ces touches pour saisir les numéros de piste, mots de passe, etc. U E I Touche STEP ( JG) Utilisez cette touche pour une lecture d’un seul pas. G F J Touche SLOW ( H J V I K L M N O P Q R ) Utilisez cette touche pour la lecture au ralenti.
Boîtier de télécommande V Touche LISTENING Utilisez ce bouton pour sélectionner un mode d’écoute. W Touche AUDIO (L/R) Utilisez cette touche pour sélectionner la langue désirée pour la lecture de la partie audio. Le boîtier de télécommande fourni permet la commande à distance defourni permet la commande à distance de l’appareil.
Nombres de los controles A M B C D E L F K Panel frontal G H I J G Botón Reproducción/Pausa (G/J) Utilice este botón para iniciar o poner en pausa la reproducción. A Interruptor STANDBY/ON Pulse este interruptor para encender o apagar la unidad (posición de espera). El equipo extrae potencia nominal no operativa de la ficha de CA cuando el interruptor STANDBY/ON se encuentra en la posición STANDBY. H Botón de parada (H) Utilice este botón para interrumpir la reproducción.
a A B C D E F G H J I V Y XW L K U b c d e f N P Q M O T S R g Vista del panel frontal Altavoz para sonidos graves A Indicador de reproducción a Interruptor POWER (encendido) Pulse este interruptor para encender o apagar la unidad (standby). Se puede generar ruido cuando se enciende o se apaga la unidad.
Nombres de los controles TREBLE o BALANCE y luego presione el botón VOLUME para ajustar. D A B C S T G Botón SEARCH Utilice este botón para mostrar el Menú Search en la pantalla del televisor. U H Botones numériques E G F V I Botón STEP ( JG) Se utiliza para reproducción de avance. H J Utilice estos botones para introducir números de pista, contraseñas, etc. I K L M N O P Q R W X Y Z a b c d e f g J Botón SLOW ( ) Utilice este botón para la reproducción a cámara lenta.
Mando a distancia U Botón TOP MENU Utilice este botón para visualizar el menú de títulos del disco. V Botón LISTENING La unidad de control remoto suministrada le permite controlar el aparato a distancia. Cuando opere con el control remoto, diríjalo hacia el sensor remoto en el panel frontal del aparato. Utilice este botón para seleccionar un modo de escucha. W Botón AUDIO (L/R) Utilice este botón para seleccionar el idioma deseado de reproducción de audio.
Basic Operation 1 2 1 1 Press the STANDBY/ON switch to turn the unit on. < If the PLAY/PAUSE button or the OPEN/CLOSE button is pressed in the standby mode, the unit is also turned on. 3 2 Select a source by pressing the FUNCTION button. The selected source is shown on the front panel’s display. DVD Tuner (FM or AM, and Frequency is displayed) TAPE AUX 1 3 Play the source, and gradually turn up the volume to the required level by pressing the VOLUME buttons.
Opérations de base 1 Operación básica 1 1 Appuyez sur l’interrupteur STANDBY/ON pour mettre 1 Pulse el interruptor STANDBY/ON para encender la l’appareil en service. < Si on appuie sur la touche PLAY/PAUSE ou sur la touche OPEN/CLOSE pendant le mode attente, l’appareil est aussi mis sous tension. unidad. < Si se pulsa el botón PLAY/PAUSE o el botón OPEN/CLOSE en el modo standby, la unidad también se enciende. 2 Seleccione una fuente presionando el botón FUNCTION.
Basic Operation 2 A A Tone Control 1. Press the SELECT button to select “TRBL”, “BASS” or “BAL”. Each time the SELECT button is pressed, the mode is changed as follows: TRBL BASS BAL To adjust the level of high frequency sound range, select “TRBL (treble)”. To adjust the level of low frequency sound range, select “BASS”. To adjust left-right sound balance, select “BAL” (balance). B 2. Press the 5/b/g/t buttons (or the VOLUME buttons of the main unit) to change the setting.
Opérations de base 2 A Correction des tonalités A Control de tonalidad 1. Appuyez sur la touche SELECT pour sélectionner “TRBL”, “BASS” ou “BAL”. Chaque pression sur la touche SELECT, modifie comme suit les indications affichées: TRBL BASS Operación básica 2 BAL 1. Pulse el botón SELECT para seleccionar “TRBL”, “BASS” o “TRE”. Cada vez que se pulsa el botón SELECT, el modo cambia en el siguiente orden: TRBL BASS BAL Pour régler le niveau des fréquences hauteurs, sélectionnez “TRBL (treble)”.
Listening Mode Press the LISTENING button to select the listening mode. Each time the LISTENING button is pressed, the mode is changed as follows: A < When the LISTENING button is pressed once, the current listening mode is displayed. Press the LISTENING button repeatedly to select any other mode.
Mode d’écoute Modo Listening (escucha) Appuyez sur la touche LISTENING pour sélectionner le mode d’écoute. A chaque fois que la touche LISTENING est pressée, le mode change de manière suivante: A Presione el botón LISTENING para seleccionar este modo. Cada vez que se pulsa el botón LISTENING, el modo cambia de la siguiente manera: A < Chaque fois que vous appuyez sur la touche LISTENING, le mode d’écoute sélectionné s’affiche.
DVD / VCD / CD 2 4 Playback 1 1 < Turn the TV on and set its input to the correct position for DVD viewing (VIDEO, etc.). 1 Press the STANDBY/ON button to turn the unit on. 2 Press the OPEN/CLOSE button (L) to open the disc tray. 3 Place a disc on the tray with the printed label face up. Never place more than one disc on the tray. 1 2 4 Press the OPEN/CLOSE button (L) to close the disc tray. DVD When a DVD is loaded, the playback may start automatically.
Lecture 1 Reproducción 1 < Allumer le téléviseur et régler l’entrée sur la position correspondant à la lecture d’un DVD (VIDEO etc.). < Encienda el TV y seleccione su entrada apropiada para la visualización de DVD (VIDEO, etc.). 1 Appuyer sur l’interrupteur STANDBY/ON pour mettre l’appareil sous tension. 1 Pulse el interruptor STANDBY/ON para encender la unidad. 2 Appuyez sur la touche OPEN/CLOSE (L) pour ouvrir le plateau porte-disque. 2 Pulse el botón OPEN/CLOSE (L) para abrir la bandeja del disco.
DVD / VCD / CD / MP3 / JPEG Playback 2 Example: When playing back an MP3 disc Exemple: Lors de la lecture d’un disque MP3 Ejemplo: Durante la reproducción de un disco MP3 elapsed time of the current track temps écoulé de la piste sélectionnée tiempo transcurrido de la pista actual playback time of the current track temps de lecture de la piste sélectionnée tiempo de reproducción de la pista actual 00:03 02:51 96kb 002/006 PLAY My Best Album MP3 MP3 MP3 MP3 MP3 ..
Lecture 2 Reproducción 2 MP3 Lorsque vous insérez un disque MP3, la liste des répertoires s’affiche à l’écran. Sélectionnez un répertoire à l’aide des touches 5 /b /g / t puis appuyez sur la touche ENTER. Les numéros des pistes et les titres (noms des fichiers) s’affichent à l’écran. Sélectionnez une piste puis appuyez sur la touche ENTER ou sur la touche PLAY/PAUSE (y/J). La lecture démarre à la piste sélectionnée. MP3 Cuando se carga un disco MP3, aparece en la pantalla una lista de directorios.
DVD / VCD / CD / MP3 A B Playback 3 A To start playback In the stop mode, press the PLAY/PAUSE button (y/J). B To suspend playback temporarily (pause mode) Press the PLAY/PAUSE button (y/J) during playback. The image freezes with DVD or VCD discs, or music is interrupted with MP3 discs or CDs. To resume playback, press the PLAY/PAUSE button (y/J). C To stop playback of a CD, VCD, or MP3 Press the STOP button (H).
Lecture 3 A Pour démarrer la lecture A l’arrêt, appuyez sur la touche PLAY/PAUSE (y/J). Reproducción 3 A Para iniciar la reproducción Desde la posición de parada, pulse el botón PLAY/PAUSE (y/J). B Pour arrêter momentanément la lecture (mode pause) Appuyez sur la touche PLAY/PAUSE (y /J ) en cours de lecture. L’image s’immobilise en cas de lecture d’un DVD ou d’un CD Vidéo, ou la musique s’interrompt en cas d’écoute d’un disque MP3 ou d’un CD.
DVD / VCD / CD A Playback from a Specific Chapter/Track A To skip to a specific chapter/track During playback, press the SKIP buttons (. or/ ) repeatedly until the desired chapter or track is found. The selected chapter/track will be played from the beginning. When the . button is pressed during playback, the chapter/track being played will be played from the beginning. To return to the beginning of the previous track, press the . button twice.
Lecture à partir d’une section ou d’une piste précise A Pour positionner la tête de lecture sur une section ou une piste précise Pendant la lecture, appuyez plusieurs fois sur les touches SKIP (. ou/ ) jusqu’à ce que vous localisiez le chapitre (section) ou la piste désiré(e). Le chapitre (section)/piste sélectionné(e) sera lu(e) depuis le début. Quand on appuie sur la touche . pendant la lecture, le chapitre ou la piste en cours de lecture recommencera au début.
DVD / VCD Slow-Motion Playback For video discs only (DVD and VCD) To play a disc in slow motion, press the SLOW button ( ). Each time the SLOW button ( ) is pressed, the speed changes as follows: DVD: SF x1/2 SF x1/4 SF x1/8 SF x1/16 1 1 SLOW off SR x /16 SR x /8 SR x1/4 SR x1/2 VCD: SF x1/2 SF x1/4 SF x1/8 SF x1/16 SLOW off SF: slow forward, SR: slow reverse To resume normal playback, press the PLAY/PAUSE button (y/J). < The sound is muted during slow-motion playback.
Lecture à vitesse lente Reproducción a cámara lenta Pour les disques vidéo seulement (DVD et VCD) Pour lire un disque au ralenti, appuyez sur la touche SLOW ( ). À chaque pression sur la touche SLOW ( ), la vitesse change comme suit: Solamente para discos de vídeo (DVD y VCD) Para reproducir un disco a cámara lenta, pulse el botón SLOW ( ).
DVD / VCD / CD Search menu 1 The search menu lets you set the title/chapter, audio language/subtitle language/angle, playback time, repeat mode and time display. 1 1 During playback of a DVD, press the SEARCH button. The search menu appears on the screen. 2 Press the 5 and b buttons to select an item. 3 Press the t button to enter the item. 4 Press the 5 and b buttons to select a setting. Set the Title, Chapter, TT Time and CH Time using the numeric buttons (0 - 9).
Menu de recherche 1 Menú Search 1 Le menu de recherche permet d’ajuster le titre/chapitre, la langue audio/la langue du sous-titre/l’angle, le temps de lecture, le mode de répétition et le temps de visualisation. El menú de búsqueda le permite configurar el título/capítulo, idioma de audio/idioma del subtítulo/ángulo tiempo de reproducción, modo de repetición y tiempo. 1 Pendant la lecture d’un DVD, appuyez sur la touche 1 Durante la reproducción de un DVD, pulse el botón SEARCH (recherche).
Search menu 2 Time Disp. Current time mode in the bottom of this display is displayed. You can change the mode. TT Elapsed: elapsed playback time of the current title. TT Remain: remaining time of the current title. CH Elapsed: elapsed playback time of the current chapter. CH Remain: remaining time of the current chapter. VCD Track Total number of tracks is displayed. You can select a track. Disc Time Total playback time of the disc is displayed. You can set the desired time.
Menu de recherche 2 Time Disp. [Affichage (visualisation) du temps] Le mode du temps actuel au bas de cette visualisation est affiché. Vous pouvez changer le mode. TT Elapsed (Temps total écoulé du titre): Temps de lecture écoulé du titre actuel. TT Remain (Temps total restant du titre): Temps qui reste dans le titre actuel. CH Elapsed (Temps écoulé par chapitre): Temps de lecture écoulé du chapitre actuel. CH Remain (Temps restant par chapitre): Temps qui reste dans le chapitre actuel.
DVD / VCD / CD Display Press the DISPLAY button to view information about the currently playing disc on the TV. The display will go off after a few seconds. Notes < When playback is stopped, the display goes off. < For some VCDs, the time information may not appear on the TV, or you may not be able to switch to other display modes. < When a VCD is playbacked with PBC function, Total Elapsed and Total Remain will not be displayed.
Affichage Visualización Appuyez sur la touche DISPLAY pour visualiser les informations sur le disque en cours de lecture sur l’écran du téléviseur. L’affichage s’éteint après quelques secondes. Pulse el botón DISPLAY para ver en el televisor información sobre el disco actualmente en reproducción. La visualización desaparecerá después de unos segundos. Remarques < Lorsque la lecture s’arrête, l’affichage s’éteint. Notas < Cuando se interrumpe la reproducción, la visualización desaparece.
DVD / VCD Picture Zoom To zoom the picture, press the ZOOM button during playback. Each time the ZOOM button is pressed, the magnification level changes as follows: x2 w x3 w x4 w x1/2 w x1/3 w x1/4 w OFF < You can shift the zoom point by pressing the 5 /b /g /t buttons during zoom playback. < Zooming does not work on subtitles or menu screens. DVD Select a Subtitle Language To select a subtitle language, press the SUBTITLE button during playback.
Zoom sur une image Zoom de imagen Pour faire un zoom sur une image, appuyez sur la touche ZOOM pendant la lecture du disque. Para ampliar la imagen, pulse el botón ZOOM durante la reproducción.
DVD Select an Audio To select an audio on a DVD containing multiple language soundtracks, press the AUDIO button during playback. Each time the AUDIO button is pressed, the audio will change to the next one recorded on the DVD. < When no other audio is recorded on the disc, the PROHIBIT icon will be displayed. < Some discs allow you to change the audio only via the disc menu. In that case, press the MENU or TOP MENU button and change the settings.
Sélection de la partie audio Seleccione un audio Pour sélectionner la partie audio pour un DVD contenant plusieurs pistes sonores de langue, appuyez sur la touche AUDIO pendant la lecture. À chaque pression sur la touche AUDIO, la partie audio passe à la suivante enregistrée sur le DVD. Para seleccionar un audio en un DVD que contenga bandas sonoras en múltiples idiomas, pulse el botón AUDIO durante la reproducción.
DVD / VCD / CD Repeat Playback 1 Repeat Playback of a DVD Each time the REPEAT button is pressed during playback, the mode is changes as A . Chapter The chapter being played will be played repeatedly. If you select another chapter in Chapter mode, the chapter you selected will be played repeatedly. Title All the chapters of the current title will be played repeatedly. During programmed playback, programmed chapters will be played repeated.
Lecture répétée 1 Repetición 1 Lecture répétée d’un DVD Repetición de DVD À chaque fois que vous appuyez sur la touche REPEAT (répéter) pendant la lecture, le mode est changé comme A . Cada vez que pulse el botón REPEAT durante la reproducción, el modo cambia como A . Chapter (répéter le chapitre) La section en cours de lecture, sera reprise de façon répétée. Si vous sélectionnez une autre section alors que l’appareil est en mode Chapter, la section sélectionnée sera lue de façon répétée.
DVD / VCD / CD Repeat Playback 2 Repeat Playback of a Designated Section (A-B Repeat) 1 Start playback and designate the point at which the A-B repeat should start (point A) by pressing the A-B button. “A TO B SET A” appears on the screen and the “A” indicator lights up in the front panel display. 2 When the point at which repeat playback should end (point B) is reached, press the A-B button again. “A TO B SET B” appears on the screen and the “A-B” indicator lights up in the front panel display.
Lecture répétée 2 Repetición 2 Lecture répétée d’une section définie (A-B Repeat) Repetición de un fragmento específico (A-B) 1 Lancez la lecture du disque puis définir le point à partir 1 Active la reproducción y especifique el punto inicial (A) duquel vous souhaitez que commence la lecture répétée (point A) en appuyant sur la touche A-B. L’indication “A TO B SET A” s’affiche à l’écran et le voyant “A” s’allume sur l’affichage du panneau avant de l’appareil.
CD Programmed Playback Up to 20 tracks can be programmed in the desired order. 1 1 Press the PROGRAM button in the stop mode. < To cancel the program, press 5 , b , g and tbuttons to select “EXIT” and press ENTER button. < When no button is pressed for 30 seconds, the program mode will be cancelled. 2 Press numeric buttons to select a track. Program number Nombre du programme Número de programa Track Number Nombre de la piste Número de pista STOP example 1: To select track No.
Lecture programmée Reproducción programada Il est possible de programmer jusqu’à 20 pistes dans un ordre défini. Se pueden programar hasta 20 pistas en el orden deseado. 1 Appuyez sur la touche PROGRAM (programme) dans le 1 Pulse el botón PROGRAM en el modo de parada mode arrêt. < Pour annuler le programme, appuyez sur les touches 5, b, g et t pour sélectionner “EXIT” (sortir) et appuyez sur la touche ENTER (entrer).
Settings This chapter describes how to use the SETUP menu. Most settings and adjustments are required to be set when you first use the system. 1 Using the SETUP menu, you can adjust the picture size, set a preferred language for audio and the OSD (on screen displays), limit playback by children, et cetera. Note < Setting doesn‘t work during playback and resume mode of DVD. In that case, press the STOP button once or twice to stop playback completely.
Réglages Ajustes Ce chapitre vous indique comment utiliser le menu SETUP. La plupart des réglages et paramètres doivent être définis lorsque vous utilisez votre système pour la première fois. En esta sección se describe la forma de usar el menú de configuración (SETUP). La mayoría de los ajustes se deberán configurar la primera vez que utilice el sistema.
Settings (General Setup 1) A TV Type A --General Setup Page-TV Type TV Display Angle Mark OSD Lang SPDIF Output Captions Screen Saver Last Memory PAL LB ON ENG RAW OFF ON ON PAL NTSC NTSC: Select this mode if the unit is connected to an NTSC TV. PAL (Default): Select this mode if the unit is connected to a PAL TV. Set TV Standard < You can select this setting using the NTSC/PAL button of the remote control unit.
Réglages (Paramétrage général 1) A TV Type (Type de TV) Ajustes (Configuración general 1) A TV Type (Tipo de TV) NTSC: Sélectionnez ce mode si l’appareil est raccordé à un téléviseur NTSC. NTSC: Seleccione este modo si el aparato está conectado a un televisor NTSC. PAL (par défaut): Sélectionnez ce mode si l’appareil est raccordé à un téléviseur PAL. PAL (predeterminado): Seleccione este modo si el aparato está conectado a un televisor PAL.
Settings (General Setup 2) E SPDIF Output E --General Setup Page-TV Type TV Display Angle Mark OSD Lang SPDIF Output Captions Screen Saver Last Memory PAL LB ON ENG RAW OFF ON ON SPDIF OFF SPDIF/RAW SPDIF/PCM Setup SPDIF SPDIF OFF: Select this when you don’t use the DIGITAL OUT terminal. No signal is output from the DIGITAL OUT terminal. SPDIF/RAW (Default): Select this when the unit is connected to an audio component equipped with a built-in Dolby Digital or DTS decoder via the DIGITAL OUT terminal.
Réglages (Paramétrage général 2) E SPDIF Output (Sortie SPDIF) SPDIF OFF: Sélectionnez cette option lorsque vous n’utilisez pas la borne DIGITAL OUT. Aucun signal ne sort pas la borne DIGITAL OUT. SPDIF/RAW (par défaut): Sélectionnez cette option lorsque l’appareil est raccordé via la borne DIGITAL OUT à un appareil audio avec décodeur Dolby Digital ou DTS intégré.
Settings (Audio Setup) Dynamic (Dynamic range compression) --Audio Setup Page-Dynamic FULL 3/4 2/4 1/4 OFF Set DRC Off In many listening situations, you may find loud passages objectionable. Adjusting this setting allows you to compress the sounds into a range that you may find more suitable for a particular listening situation. Dolby Digital satisfies these needs through the dynamic range controlling. Select the dynamic range compression to fit the individual listening situation of the audience.
Réglages (Paramétrage audio) Dynamic (Compression de la gamme dynamique) Dans la plupart des conditions d’écoute, vous risquez de trouver les passages forts, imparfaits. Le réglage de ce paramètre vous permet de comprimer les sons dans une gamme qui vous paraîtra plus adaptée à une situation d’écoute particulière. Le Dolby Digital répond à ces besoins grâce à un contrôle de la gamme dynamique. Sélectionnez la compression de la gamme dynamique qui correspond aux attentes des personnes présentes.
Settings (Preference Setup 1) You can access the PREFERENCES menu only when the unit is in the stop mode. A Audio (Languages on DVD movies) A --Preference Page-Audio Subtitle Disc Menu Parental Password Default ENG ENG ENG English French Italian German Spanish Portaguese Dutch Korean Preferred Audio Language B You can select the preferred language for audio. < When you select a preferred language that is not recorded on the DVD, one of the recorded languages is automatically selected.
Réglages (Configuration de préférence 1) Ajustes (Ajuste de la preferencia 1) Vous ne pouvez accéder au menu PREFERENCES que lorsque l’appareil est en mode d’arrêt. Puede acceder al menú PREFERENCES (Preferencias) solamente cuando el aparato esté en modo de parada. A Audio (Langues des films DVD) A Audio (Idioma de las películas en DVD) Vous pouvez sélectionner la langue de votre choix pour l’audio.
Settings (Preference Setup 2) D Parental (Parental control) D --Preference Page-Audio Subtitle Disc Menu Parental Password Default ENG ENG ENG 1 2 3 4 5 6 7 8 KID SAFE G PG PG-13 PG R R NC-17 ADULT Set Parental Control Playback of some DVD discs can be limited depending on the age of the users. The parental comtrol system allows the playback limitation level to be set by the parent. The default setting is “ADULT”. Notes < The lower the level, the stricter the limitation.
Réglages (Configuration de préférence 2) D Parental (Niveau d’autorisation Parentale) Il est possible de contrôler la lecture de certains DVD en fonction de l’âge de l’utilisateur. Le système de Niveau d’Autorisation Parentale permet aux parents de régler ce niveau d’autorisation. Le réglage par défaut de ce paramètre est “ADULT”. Remarques < Plus le niveau sélectionné est bas, plus la restriction est sévère.
Tuner 1 1 Select FM or AM by pressing the FM/AM button (or the FUNCTION button of the main unit). Make sure the antennas have been connected (see page 14-16). 2 Press the TUNING button to tune in a station. Hold down the TUNING button of the remote control unit for more than 0.5 seconds. The AUTO indicator lights, and the unit starts searching for a station. 2 When a station is tuned in, the tuning process will stop automatically. If you want to stop the tuning process, press the TUNING button.
Syntoniseur Sintonizador 1 Sélectionnez FM ou AM en appuyant sur la touche 1 Seleccione FM o AM presionando el botón FM/AM FM/AM (ou la touche FUNCTION de l’appareil principal). Assurez-vous que les antennes sont branchées (voir page 15-17). 2 Appuyez sur la touche TUNING pour vous accorder sur une station. Maintenir la touche TUNING de la télécommande enfoncée pendant un peu plus de 0,5 secondes. L’indicateur AUTO s’allume, et l’appareil se met à chercher une station.
Preset Tuning You can store up to 30 stations. 2 Manual Memory Presetting 1 Tune in a station you want to listen to (see steps 1 to 2 on page 80). 2 Press the PROGRAM button. 3 While the Preset number is blinking, select a preset channel to store the station using the PRESET buttons, and then press the PROGRAM button. You can also use the numeric buttons to select a preset channel. 3 example 1: To select channnel No.3 example 2: To select channel No.
Syntonisation préréglée Vous pouvez enregistrer jusqu’à 30 stations. Préréglage de mémoire manuel 1 Réglez la station que vous souhaitez écouter (voir étapes 1 à 2 de la page 81). 2 Appuyez sur la touche PROGRAM. 3 Pendant que le numéro de Préréglage clignote, sélectionnez Presintonías Es posible almacenar hasta 30 emisoras en la memoria de la unidad. Presintonización manual 1 Sintonice una emisora que desee oír (véanse los pasos 1 a 2 de la página 81). 2 Pulse el botón PROGRAM.
RDS Search 1 A station can be searched by this function. 1 Select FM by pressing the FM/AM button (or the FUNCTION button of the main unit). 2 Press the SEARCH MODE button. Each time the SEARCH MODE button is pressed, the search mode is changed as follows: RDS search 2 Select “RDS SRCH” by pressing the SEARCH MODE button, and within 8 seconds press the TUNING or PRESET button. The unit starts searching and “RDS SRCH” blinks.
Recherche de RDS Búsqueda RDS Il est possible de rechercher une station à l’aide de cette fonction. Mediante esta función puede buscarse una emisora. 1 Sélectionnez FM en appuyant sur la touche FM/AM (ou 1 Seleccione FM presionando el botón FM/AM (o el botón la touche FUNCTION de l’appareil principal). 2 Appuyez sur la touche SEARCH MODE.
RDS (EON PTY/EON TA) 1 EON PTY (EON: Enhanced Other Networks information) Use this feature to automatically search and receive the desired programme type while listening to a RDS station. 1 While listening to a RDS station, press the EON PTY button. Current programme type is displayed. 2 Select the desired programme type by pressing the PTY SELECT button. 2 < If one of the preset stations is broadcasting the selected programme type, it will be tuned in while listening to a RDS station.
RDS (EON PTY/EON TA) RDS (EON PTY/EON TA) EON PTY EON PTY (EON, Enhanced Other Networks) Utilisez cette fonction pour rechercher automatiquement et recevoir le type de programme désiré sur une station RDS. (EON: redes de emisoras mejoradas) Utilice esta función para buscar y recibir automáticamente el tipo de programa deseado mientras oye una emisora RDS. 1 Alors que vous être réglé sur une station RDS, appuyez 1 Mientras escucha una emisora RDS, pulse el botón EON sur la touche EON PTY.
PTY Programs NEWS : brief announcements, events, public opinion, reports, actual situations. AFFAIRS : a kind of suggestion including practical announcements other than news, documents, discussion, analysis and so on. INFO : daily information or reference such as weather forecast, consumer guide, medical assistance and so on. SPORT : sports related programs. EDUCATE : educational and cultural information. DRAMA : all kinds of radio concert and serial drama.
Programmes PTY NEWS (nouvelles) : communiqués, événements, sondages, reportages, situations vécues. AFFAIRS (informations générales) : suggestions diverses, telles que des annonces pratiques, à l’exception des nouvelles, documents, débats, analyses, etc. INFO (informations pratiques) : informations pratiques du jour ou informations de référence, notamment prévisions météo, guide du consommateur, informations médicales utiles, etc. SPORT : émissions sportives.
Setting the Clock 1 Press the TIME ADJ button. The “hour” value blinks. < You can not adjust the clock when the unit is in the standby mode. < The unit uses the 24 hour “military” clock. 2 Press the 5/b buttons to set the current hour and press the g/t buttons to set the current minute. 3 Press the ENTER button. 4 Press the TIME ADJ button to return to normal display.
Régler l’Heure Ajuste del reloj 1 Appuyez sur la touche TIME ADJ (Ajuster l’heure). 1 Pulse el botón TIME ADJ. La valeur de l’”heure” clignote. < Vous ne pouvez pas ajuster l’heure quand l’appareil est en mode de veille. < L’appareil utilise les 24 heures “militaires”. El valor “hora” parpadea. < Usted no puede ajustar el reloj cuando la unidad se encuentra en modo detenido (Standby). < La unidad usa el reloj “militar” de 24 horas.
Sleep Timer 1 1 Press the SLEEP button. 2 Within 3 seconds, press g/t button to select one of the following preset times: OFF s w 10 (minutes) s w 20 s w 30 s w 60 s w 90 When the sleep timer is set, the display is dimmed. 2 To confirm the remaining time of the sleep timer Press the SLEEP button after setting. To cancel the sleep timer 1 Press the SLEEP button. 2 Press g button until OFF is displayed. Note < If you turn off the unit’s power, the sleep timer setting will be cancelled.
Arrêt différé (Sleep Timer) Temporizador de reposo 1 Appuyez sur la touche SLEEP (sommeil). 1 Pulse el botón SLEEP. 2 Dans un délai de 3 secondes, pressez la touche g/t 2 En tres segundos, presione el botón g /t para pour sélectionner un des temps préréglés: OFF s w 10 (minutes) s w 20 s w 30 s w 60 s w 90 seleccionar uno de los siguientes tiempos prefijados: OFF s w 10 (minutos) s w 20 s w 30 s w 60 s w 90 Lorsque la fonction d’arrêt différé est activée, la luminosité de l’affichage est atténuée.
ON Timer 1 Press the TIMER button for 3 seconds to enter the timer setting mode. 2 When “TMR OFF” appears on the display, press the ENTER button to switch the display to “TMR ON”. 3 Press the TIMER button. 4 Press the 5 and b buttons to set the ON time (hour). 5 Press the g and t buttons to set the ON time (minutes). 6 Press the TIMER button. 7 Press the 5 and b buttons to set the OFF time (hour). 8 Press the g and t buttons to set the OFF time (minutes). 9 Press the TIMER button.
Minuteur ON Encendido del Temporizador (ON TIMER) 1 Appuyez sur la touche TIMER pendant 3 secondes pour entrer en mode de réglage du minuteur. 1 Presione el botón TIMER durante 3 segundos para 2 Quand “TMR OFF” apparaît sur l’écran, appuyez sur la touche ENTER pour que l’écran affiche “TMR ON”. 2 Cuando aparece “TMR OFF” en pantalla, pulse ENTER 3 Appuyez sur la touche TIMER. 3 Pulse el botón TIMER. 4 Appuyez sur les touches 5 et b pour régler l’heure de mise en marche (ON) (les heures).
Troubleshooting In case of any trouble with this unit, please take the time to look through this chart and see if you can solve the problem yourself before you call your dealer or a TEAC service center. General No power. e Check the connection to the AC wall outlet. Severe hum or noise is heard. e Check that the speakers and components are connected securely. e This unit cannot play some discs, such as CD-ROMs. Use only supported discs. e Check that the cables are not near a transformer or motor.
Specifications DVD Player Pickup . . . . . . Semiconductor laser, Wave length 650/790 nm Signal System . . . . . . . . . . . . . . . . . . . . . . . . . . . . . NTSC/PAL Video signal horizontal resolution . More than 480 lines (DVD) Video signal-to noise ratio . . . . . . . . . More than 50 dB (DVD) Audio frequency response . . . . . . 20 Hz ~ 20 kHz (+1 / –3dB) Audio signal-to-noise ratio . . . . . . . . . . . . . . . . . . . . . . 62 dB Dynamic range . . . . . . . . . . . . . . . . . . . . . . . . . . . .
Dépannage En cas de problème, prenez le temps de lire le tableau ci-après et de voir si vous pouvez résoudre le problème tout seul avant de faire appel à votre revendeur ou au centre d’assistance TEAC. Général L’appareil ne s’allume pas e Vérifier que l’appareil est bien branché au niveau de la prise murale. Un bourdonnement ou des parasites importants se font entendre. e Assurez-vous que les enceintes et les appareils sont correctement raccordés.
Caractéristiques techniques Lecteur de DVD Ramassage. . . . . . . . Semi-conducteur laser, Longueur d’onde 650/790 Signal nm Système . . . . . . . . . . . . . . . . . . . . . . . . . . . . . . . . . NTSC/PAL Résolution horizontale du signal vidéo . . . . Plus de 480 lignes (DVD) Rapport signal-bruit vidéo . . . . . . . . . . . . Plus de 50 dB (DVD) Réponse de fréquence audio . . . . 20 Hz ~ 20 kHz (+1 / –3dB) Rapport signal-bruit audio . . . . . . . . . . . . . . . . . . . . . . . 62 dB Portée dynamique . .
Solución de problemas Si surge algún problema con la unidad, consulte esta tabla por si pudiera resolverlo antes de ponerse en contacto con su distribuidor o con un centro de asistencia técnica TEAC. Aspectos generales No hay corriente e Revise la conexión a la toma mural. Se oyen zumbidos y ruidos fuertes. e Compruebe que los altavoces y el resto de componentes están correctamente conectados. e Este aparato no puede reproducir algunos discos, por ejemplo los CD-ROM. Utilice solamente discos compatibles.
Especificaciones Reproductor de DVD Captación . . . Semiconductor láser, longitud de onda Señal de 650/790 nm Sistema . . . . . . . . . . . . . . . . . . . . . . . . . . . . . . . . . . NTSC/PAL Resolución horizontal de señal de video . . . Más de 480 líneas (DVD) Relación señal/ruido de video . . . . . . . . . Más de 50 dB (DVD) Respuesta en frecuencia de audio . . . . 20 Hz ~ 20 kHz (+1 / –3dB) Relación señal/ruido de audio . . . . . . . . . . . . . . . . . . . . 62 dB Gama dinámica . . . . . . . . . . .
Language Code List / Liste des codes de langue / Lista de códigos 102 Code Language Code Language Code Language 6566 Abchazian 7383 Icelandic 8388 Sindhi 6565 Afar 7378 Indonesian 8373 Singhalese 6570 Afrikaans 7365 Interlingua 8375 Slovak 8381 Albanian 7165 Irish 8376 Slovenian 6577 Amharic 7384 Italian 8379 Somali 6582 Arabic 7465 Japanese 6983 Spanish 7289 Armenian 7487 Javanese 8385 Sidanese 6583 Assamese 7578 Kannada 8387 Swahili 6583 Aymara 758
Z TEAC CORPORATION 3-7-3, Nakacho, Musashino-shi, Tokyo 180-8550, Japan Phone: (0422) 52-5081 TEAC AMERICA, INC. 7733 Telegraph Road, Montebello, California 90640 Phone: (323) 726-0303 TEAC CANADA LTD. 5939 Wallace Street, Mississauga, Ontario L4Z 1Z8, Canada Phone: (905) 890-8008 TEAC MEXICO, S.A. De C.