® MP3 Player MP-290 User Manual
Disposing of the Product Your device should not be placed in municipal waste. Please check local regulations for disposal of electronic products. z Changes in specifications and features may be made without notice or obligation. z Copyright © 2009, TEAC Europe GmbH. All rights reserved. Edition: December 2009 z Company and product names provided herein are trademarks of their respective companies.
Content Important Hints.....................................................................................................4 Warning ................................................................................................................4 Cautions ...............................................................................................................5 Notice ...................................................................................................................6 Key Features......
Important Hints z The supplied batteries are subject to wearout. Their capacity and therefore their life time depend on the number of charge/decharge cycles. And even without using them there is a deterioration of capacity. Changes in temperature like high or low temperatures, mechanical stress (like dropping down) or other environmental influences may reduce the capacity of the batteries.
z Only use batteries, charging adapters, and accessories which were approved from TEAC for using it with a certain device model. Using other types of equipment may void the approval for use, and/or warranty claims. Furthermore there may be dangerous implications. Please ask in case your vendor for approved accessories. z Supplied or connected to units cabling is subject to wearout.
Notice z Please charge the battery immediately when the display indicates low battery, or the device will be powered off automatically. z Please disconnect the player from PC properly to avoid data loss. z The transfer rate displayed on the PC may be different depending on the operating system. Exact transfer rate should be subject to the player's indication. z When the recorded voice file is too large, the response of the device may be slow.
Key Features z MP3, WMA, WAV, FLAC and APE player z AVI video player z JPEG, BMP image viewer z Browser function z Voice recorder z FM tuner z FM encoding z Removable storage device z Built-in rechargeable lithium-ion battery z Customized settings z microSD card slot SDHC up to 8GB System Requirements z Hardware: IBM PC & Compatible PC, Notebook with USB interface z Operating System: Windows2000/XP, Windows Vista, Windows 7 Package Content Please check the package for the following items.
Before Using Driver This player is plug & play for WIN2000/XP/Vista and Windows 7. Connect to a PC and download audio files To connect the player with the PC for transferring files: 1. Plug the larger end of the USB cable to the USB port of the PC, and plug the smaller end to the USB port of the player. 2. When the “ ” icon appears at the right bottom of the PC screen, double click “My Computer” on the desktop, you see a removable disk which indicates the player.
Charging the battery The device has a rechargeable built-in lithium-ion battery. It is charged via USB connection. You are required to charge it when you use it for the first time. It takes about 3 hours to fully charge the battery. To charge the battery, connect the larger end of the USB cable to the USB interface of PC, and connect the other smaller end of the USB cable to the USB interface of this player. The device is connected to PC and being charged.
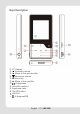
Keys Description c d e f g h i j k l LC Display Increase volume Move to the previous file. Decrease volume M Menu key Move to the next file.
Power On/Off To power on: Push and hold On/Off button up to turn on the power. To power off: Push and hold On/Off button up to turn off the power. Resume Function The player stores the respective last state in any of the modes. If another mode is used and the previously used mode is entered again, or the player is switched off and on, the player resumes playing at the stored location. Automatic Power On/Off If there is no more user input, the player is turned off automatically after a while (approx.
microSD Card Slot After connecting the player to the computer, you will find two removable devices. One is the built-in memory device and the other one is the device associated to the microSD card. The player supports direct playing of songs/videos on microSD cards. Insert the card into the slot. The contacts have to be arranged in the direction of the screen. To use a memory card: 1. Press and hold the M button to display the main menu. 2.
Basic Operation Function Operation Play/Pause Press the Adjust Volume Shortly or long press the or button to decrease or increase the volume. Move to the previous file Under playback mode shortly press the button. Move to the next file Under playback mode shortly press the button. Fast Forward Press and hold the button. Rewind Press and hold the button. Move to main menu Press and hold the M button to display the main menu. Confirm selection Press button selected item.
Browser Function To browse all files stored in the player: 1. In the music, video, photo and text mode, shortly press the M button to enter browser mode. The Browser shows the current playing/displaying file. 2. Press the / button to select a folder or a file, and press the button to confirm selection or press and hold the M button to return to main menu. 3. Under browser mode, press M button to go back to previous menu; or select folder icon then press button to confirm and go back to previous menu.
Viewing Photos To view photos: 1. Press and hold the M button to display the main menu. 2. Select “Photo” and press the button to confirm. 3. In browser mode, press the / button to select a folder or image, and press the to confirm. 4. In the full screen mode, you can press the / button to display the previous or the next photo, press to start auto slide show (by setting the time interval between 1 and 5 in “SETTING/ Auto Slide Show/Photo”) or press the M button to enter browser mode.
Using bookmark 1. Go to the page that you want to mark. 2. Shortly press the button to show up a “Save BookMark” window for saving bookmark. / button to select a line of the menu and press the button to confirm. The bookmark is saved. It starts from the first line of current page. 4. To read the page that you marked, press and hold the button to show up the “Load BookMark” window. Select the bookmark and press the button to confirm. You will be guided to that page. 5. Press the M button to cancel/return.
Deleting File To delete a file: 1. In the browser modes Music, Video, Photo, E-Book, select the file that you want to delete. 2. Press and hold the button until a dialogue box shows up. 3. Use the / button to select “YES” and press the button to confirm. Radio On the main menu, select “FM” and press the the FM radio. button to turn on Search Station 1. Shortly press the key to show the submenus. You see the menu items displayed. You can press the / button to switch highlighted menu. 2.
Listen to Station To listen to saved station, 1. Shortly press the button to activate submenus. 2. Press the / button to switch to the “Preset” menu and press the button to enter the PRESET mode. 3. In the PRESET mode, press the / button to select a saved station for listening. Delete station 1. Shortly press the button to activate submenus. 2. Press the / button to switch to the “Delete” menu and press the button to continue. 3. Press the / button to select the station that you want to delete.
Customizing Settings To customize the player settings: 1. On the main menu, select the “SETTING” item and press the button to enter the system settings mode. 2. Press the / button to select setting item and press the button to confirm or press the M button to cancel and return to the previous menu.
Radio Auto Slide Show Stereo Switch (Enable or disable stereo effect) On, Off FM Region China, Europe, Japan, U.S.A. Text (Set interval between the previous and the next page when the device is in auto page up/down mode.) Photo (Set interval between the previous and the next slide in auto slide show mode.
Converting Videos The player supports AVI video format at a resolution of 160x128. Please use the software on the provided CD to convert videos. The converting tool AVIConverter supports the conversion to many different video formats (AVI, RM, RMVB, MPG, MPG4, ASF, DAT, WMV, etc.). AVI Converter Tool Setup Locate the file Nano_Video_convert.exe on the provided CD and double click on it. Please follow the instructions on the screen to setup the AVI Converter tool on your PC.
Converting Videos to AVI format Please run AVIConverter from PC to convert videos and proceed as shown in the following. 1) Click Add 2) Select Resolution: 160x128 3) Select original input video 4) Select saving Location 5) Input target file name 6) Select quality, ratio and segment. 7) Click Save 8) Click Close 9) Click Convert After converting is finished, copy the converted video file to the player, and enjoy watching it on the player.
Firmware Upgrade If the player behaves erroneously upgrading or restoring the firmware may help. Please locate the firmware upgrade tool and the firmware file on the provided CD to upgrade the player. Proceed as described in the following: Important! Please note before upgrading: 1. Don’t upgrade firmware if the player works correctly. 2. Backup files on the player to other storage (to your PC for example) before upgrading. a. Locate the software file RKnanoTool.
“UsbBoot download successfully!” and show flash information. Then proceed with step c. If connecting fails, the dialog box will display “USB device not found!”. Please connect the player again. c. After connecting successfully, proceed as shown in the following. 1) Select firmware. (firmware file is on the CD, named with extension .BIN). 2) Click Upgrade 3) After upgrading has been finished, click Exit d. Disconnect the player from PC, and start the player again. Now the player should work properly.
Digital Rights Management File (DRM9) Protection This player supports DRM9 file protection (WMA), to play DRM9 protected files: 1. Download songs protected by DRM9 from relevant websites to your PC or notebook. 2. Open the downloaded files using Windows© Media Player. Follow the instructions from Windows© Media Player to play back the files. 3. Connect the player to PC or notebook by USB cable. 4. Copy the DRM9 protected songs to the player using Windows© Media Player.
Troubleshooting Problem Possible Cause Solution Battery is too low. Charge the battery. The keys are locked. Unlock the Hold switch by push On/Off button to the middle. The keys are locked by Hold switch Unlock the Hold switch by push On/Off button to the middle. The volume is too low. Adjust the volume. Bad audio file. Delete or skip the file. The player cannot be connected to the PC. The USB interface is not supported by PC’s motherboard. Update or replace the PC’s motherboard.
Problem Possible Cause Solution Some of MP3 files cannot be played properly. The MP3 file is compressed by a standard, such as MPEG I Layer 1 or Layer 2 that the player does not support. 1. Delete the unsupported MP3 files. 2. Use MPEG I Layer 3 standard to compress the unsupported MP3 files. The file format is not supported. Make sure the video is in AVI format. If not, use the provided converting tool to convert it.
Technical Specifications Item Specification Capacity The MP-290 is available with several different capacities. Please refer to the values on the packaging. Battery Type Rechargeable Lithium Ion Battery Battery Life About 10 hours of music playback or 4 hours of video playback LCD Display 1.8-inch CSTN screen 128 x 160 pixel Earphone Power 5mW+5mW Video Format AVI (XviD) Audio Format MP3, WMA, DRM9, FLAC, APE Photo Format JPEG Image Resolution 7000 X 7000 (max.