D01323020D Z NT-505 ENGLISH FRANÇAIS USB DAC/ Network Player ESPAÑOL For information about this unit’s network functions, see the TEAC HR Streamer User’s Manual. The Owner’s Manual and TEAC HR Streamer User’s Manual can be downloaded from the TEAC Global Site (http://www.teac-global.com/). To use network functions and USB flash drive playback, you must also use a tablet or smartphone that has the TEAC HR Streamer app (free) installed and is connected to the same network as the unit.
IMPORTANT SAFETY INSTRUCTIONS 10) Protect the power cord from being walked on or pinched particularly at plugs, convenience receptacles, and the point where they exit from the apparatus. 11) Only use attachments/accessories specified by the manufacturer. CAUTION: TO REDUCE THE RISK OF ELECTRIC SHOCK, DO NOT REMOVE COVER (OR BACK). NO USERSERVICEABLE PARTS INSIDE. REFER SERVICING TO QUALIFIED SERVICE PERSONNEL.
VVPrecautions concerning batteries Misuse of batteries could cause them to rupture or leak leading to fire, injury or the staining of nearby things. Please read and observe the following precautions carefully. oo Be sure to insert the batteries with correct positive (¥) and negative (^) orientations. oo Use batteries of the same type. Never use different types of batteries together. oo If the remote control is not used for a long time (more than a month), remove the batteries to prevent them from leaking.
IMPORTANT SAFETY INSTRUCTIONS (continued) Compliance of radio transmitter and interference This product has the function of broadband transmitter using 2.4GHz Band. Use frequency range: 2402 MHz – 2480 MHz Maximum output power: Bluetooth® Class 2 (less than 2.5 mW) Please use only in the country where you purchased the product. Depending on the country, restrictions on the use of Bluetooth wireless technology might exist.
Trademarks and copyrights The MQA logo is a trade mark of MQA Limited. “DSD” is a registered trademark. Contents Thank you for choosing TEAC. Read this manual carefully to get the best performance from this unit. After reading it, keep it in a safe place for future reference. The Bluetooth® word mark and logos are registered trademarks owned by Bluetooth SIG, Inc. and any use of such marks by TEAC CORPORATION is under license. ATTENTION Qualcomm aptX is a product of Qualcomm Technologies, Inc.
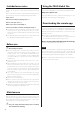
Included accessories Check to be sure the box contains all the included items shown below. Please contact the store where you purchased this unit if any of these items are missing or have been damaged during transportation. Power cord × 1 Using the TEAC Global Site You can download updates for this unit from the TEAC Global Site: http://teac-global.com/ In the TEAC Downloads section, click the desired language to open the Downloads website page for that language.
Network connections Connection example To Internet EN oo The Wi-Fi router must be connected to the Internet when installing apps on the iPad, iPhone or other device, when updating the NET firmware of this unit, and when listening to Internet radio. a b NAS LAN cable d Wi-Fi™ router c iPad, iPhone, etc. NT-505 a NAS (Network Attached Storage) Use to store audio files. Operation as a UPnP server is necessary to use it as a media server.
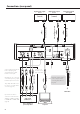
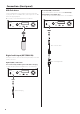
Connections (rear panel) Digital audio output device Digital audio output device Device that outputs clock signal Digital output (OPTICAL) Digital output (COAXIAL) CLOCK SYNC OUT B C E F Connect cables for the pair set for line output (page 23). Sound will only be output from the selected pair. BNC coaxial cable RCA coaxial digital cable Optical digital cable A G D H The polarity of the XLR connectors can be set so that either 2 or 3 is HOT (page 23).
A ETHERNET port Connect a commercially-available LAN cable to this port when you want to connect this unit to a wired network or the Internet. oo When switching input sources, this port is labeled “NET”. B OPTICAL digital audio input connector Use this to input digital audio. Connect the optical digital audio output connector of an audio device to it. Use a commercially-available optical digital cable with a square connector (TOSLINK) for connection.
Connections (front panel) USB flash drives Connect USB flash drives to the USB port on the front of the unit. To play music files on a USB flash drive, set the input source to NET and use the app for playback. Coaxial (COAX) connection Use the included RCA conversion cable and a commerciallyavailable RCA coaxial digital cable. To enable this input, turn the SOURCE knob to select COAXIAL2. oo For details, see the TEAC HR Streamer User’s Manual.
Connecting headphones Using the remote control Precautions for use VVMisuse of batteries could cause them to rupture or leak, which might result in fire, injury or the staining of nearby materials. Please carefully read and observe the precautions on page 3. oo When using the remote control, point it toward the remote control signal receiver on the main unit from a distance of 5 m (16 ft) or less. Do not place obstructions between the main unit and the remote control.
Names and functions of parts (main unit) A B C D E F A POWER switch Use to turn the unit on and off. oo If the display is dark even though the POWER switch is set to ON, the cause is usually one of the following. oo The power is on, but DIMMER (display brightness) is set to OFF (page 24). oo The automatic power saving function has put the unit into standby. oo The power cord is disconnected.
Upconversion H PHONES jack Connect headphones with a 3.5mm (1/8") stereo mini plug here (page 11). oo This headphone amp circuit uses a four-pole connector with independent left and right for grounding. Ordinary plugs with 3 or 4 poles can be used. oo When headphones are connected to this unit, headphone output will be turned on and audio will stop being output from the analog audio output (LINE OUT) connectors on the rear panel.
Names and functions of parts (remote control) a STANDBY/ON button Press to put the unit into standby mode or turn it on. g a b Input selection buttons Use to select the playback source. b oo The LINE button has no function. c INFO button Press to show information, including upconversion (page 16). c h d j e l f i k m d UPCONVERT button Press to change the upconversion setting. e FILTER button Press to change the filter setting. This changes the filter according to the input (PCM or DSD).
Display When on Playback source name Z c This shows the name of the selected source. The names on the display correspond to the selected connectors as follows. The names in parentheses appear when switching.
Display (continued) Playback format information display Press the INFO button on the remote control during playback to show playback format information. Example when the playback source is USB, COAX1, COAX2, OPT1 or OPT2 oo The input signal and playback signal displays will be the same when the upconversion setting is “OFF”. Input signal format Playback signal format PCM 44. 1kHz Input signal sampling frequency DSD 11.
Basic operation 1 Shift the POWER switch to its ON position to turn the unit on. 3 Operate the playback device. Refer to the operation manual of that device. EN 4 Adjust the volume. When using the line outputs When LINE OUT LEVEL is set to VARIABLE, turn this unit’s VOLUME knob to adjust the volume. When LINE OUT LEVEL is set to any other setting, the volume cannot be adjusted from this unit. Use the stereo amplifier or other device connected to this unit to adjust the volume.
Bluetooth® wireless technology Bluetooth® notes NOTE When using this unit with a mobile phone or other Bluetooth devices, they should be no more than about 10 m (33 ft) apart. Depending on the circumstances of use, however, the effective transmission distance might be shorter. Wireless communication with every device that supports Bluetooth wireless technology is not guaranteed.
Pairing with another Bluetooth device Playback from a Bluetooth device Pairing this unit with another Bluetooth device is necessary the first time it is used and when connecting to a different Bluetooth device for the first time. oo Pair this unit the first time you use it and when you want to connect it with a different Bluetooth device for the first time (page 19). 1 Turn the SOURCE knob to select Bluetooth.
Bluetooth® wireless technology (continued) Changing the connected device 1 Press the SOURCE knob to show DEVICE SELECT. The bottom line of the display shows the name of the last connected device. Display example MENU DEVICE SELECT Player_1 Name of last connected device 2 Turn the SOURCE knob to show already paired Bluetooth devices. oo The unit can remember a maximum of eight device pairings. oo If no paired device is available, the display will appear as follows.
Settings 1 Press the MENU button to open the menu 3 Press the SOURCE knob. screen. EN 2 Turn the SOURCE knob to show the item that you want to set. oo You can also press the ENTER button on the remote control. oo The currently set value is shown on the display. 4 Turn the SOURCE knob to change the setting value. oo You can also use the up and down (k, j) buttons on the remote control. oo Press the MENU button to return to setting item selection. 5 Press the SOURCE knob.
Settings (continued) Upconversion PCM digital filter Use to activate the upconversion circuit when receiving PCM signals. This sets the type of digital filter used when converting PCM signals from digital to analog. oo See page 13 for the relationships between input sampling frequencies and sampling frequencies after upconversion. oo During MQA playback, 4× Fs upconversion will be used regardless of the setting.
DSD digital filter Line output This sets the type of digital filter used when converting DSD signals from digital to analog. Use to select the connectors that output analog audio. MENU DIGITAL FILTER(DSD) WIDE NARROW The cutoff frequency will be set according to the DSD signal as follows. DSD signal 2.8 MHz 5.6 MHz 11.2 MHz 22.5 MHz Cutoff frequency 39 kHz 78 kHz 156 kHz 312 kHz WIDE The cutoff frequency will be set according to the DSD signal as follows. DSD signal 2.8 MHz 5.6 MHz 11.2 MHz 22.
Settings (continued) Display brightness Automatic power saving function This unit has an automatic power saving function. MENU DIMMER BRIGHT oo The automatic power saving function is on when the unit is shipped new from the factory. MENU AUTO POWER SAVING ON DARK Dark SLIGHTLY BRIGHT Lit dimly BRIGHT Lit brightly AUTO OFF Unlit automatically OFF The automatic power saving function is disabled.
Playing back music on a computer Installing the driver About transmission mode This unit can be connected with computers running the following operating systems. Operation with other operating systems is not guaranteed (as of November, 2017). This unit can transfer data using Isochronous or Bulk Pet mode. The sampling frequencies that can be transmitted are 44.1, 48, 88.2, 96, 176.4, 192, 352.8, 384, 705.6 and 768 kHz.
Playing back music on a computer (continued) Playing back audio files from a computer 5 Start playback of an audio file on the computer. 1 Connect the USB port on the back of this unit By maximizing the output volume from the computer and adjusting the volume output from the stereo amplifier, better sound quality can be achieved. to the computer using a USB cable. Minimize the stereo amplifier volume before beginning playback. Then, gradually increase it.
MQA (Master Quality Authenticated) MQA is an award-winning British technology that delivers the sound of the original master recording. The master MQA file is fully authenticated and is small enough to stream or download. Troubleshooting If you experience a problem with the unit, please take a moment to review the following information before requesting service. If it still does not operate correctly, contact the retailer where you purchased the unit. Visit mqa.co.uk for more information.
Troubleshooting (continued) Connections with a computer Computer does not recognize this unit. ee See page 25 for information about supported operating systems. Operation with unsupported operating systems is not guaranteed. Restoring default settings 1 While pressing and holding the MENU button, set the POWER switch to ON. Noise occurs. ee Starting other applications during playback of an audio file may interrupt playback or cause noise. Do not start other applications during playback.
Specifications Analog audio outputs Connectors XLR connectors. . . . . . . . . . . . . . . . . . . . . . . . . . . . . . . . . . . . . . . 1 pair (L/R) RCA connectors. . . . . . . . . . . . . . . . . . . . . . . . . . . . . . . . . . . . . . 1 pair (L/R) Output impedance. . . . . . . . . . . . . . . . . . . . . . . . . . . . . . . . . . . . . . XLR: 188 Ω RCA: 150 Ω Maximum output level (1 kHz/full-scale, into 10 kΩ) FIXED 0dB. . . . . . . . . . . . . . . . . . . . . . . . . . . . . . . . . . . . .
INSTRUCTIONS DE SÉCURITÉ IMPORTANTES 1) Lisez ces instructions. 2) Conservez ces instructions. 3) Tenez compte de tous les avertissements. AT T E N T I O N : P O U R R É D U I R E L E R I S Q U E D’ÉLECTROCUTION, NE RETIREZ PAS LE CAPOT (OU L’ARRIÈRE). AUCUNE PIÈCE INTERNE N’EST RÉPARABLE PAR L’UTILISATEUR. CONFIEZ TOUTE RÉPARATION À UN SERVICE APRÈS-VENTE QUALIFIÉ.
ATTENTION oo N’exposez pas cet appareil aux gouttes ni aux éclaboussures. oo Ne placez pas d’objet rempli de liquide sur l’appareil, comme par exemple un vase. oo N’installez pas cet appareil dans un espace confiné comme une bibliothèque ou un meuble similaire. oo L’appareil doit être placé suffisamment près de la prise de courant pour que vous puissiez à tout moment attraper facilement la fiche du cordon d’alimentation.
INSTRUCTIONS DE SÉCURITÉ IMPORTANTES (suite) Conformité de l’émetteur radio et brouillage Exigences pour l’exposition aux rayonnements Ce produit fait fonction d’émetteur large bande sur la bande des 2,4 GHz. Cet équipement est conforme à la réglementation reconnue internationalement en matière d’exposition humaine aux ondes radio générées par l’émetteur.
Marques déposées et copyrights The MQA logo is a trade mark of MQA Limited. “DSD” is a registered trademark. The Bluetooth® word mark and logos are registered trademarks owned by Bluetooth SIG, Inc. and any use of such marks by TEAC CORPORATION is under license. Qualcomm aptX is a product of Qualcomm Technologies, Inc. and/ or its subsidiaries. Qualcomm is a trademark of Qualcomm Incorporated, registered in the United States and other countries.
Accessoires fournis Utilisation du site mondial TEAC Vérifiez que l’emballage contient bien tous les éléments indiqués ci-dessous. Veuillez contacter le magasin dans lequel vous avez acheté cette unité si l’un de ces éléments manque ou a été endommagé durant le transport.
Connexions réseau Exemple de connexion Vers Internet oo Le routeur Wi-Fi doit être connecté à Internet lors de l’installation des applis sur un iPad, iPhone ou autre appareil, lors de la mise à jour du firmware NET de cette unité et lors de l’écoute de la radio par Internet. FR a b NAS Routeur Wi-Fi™ Câble réseau local (LAN) d c iPad, iPhone, etc. NT-505 a Serveur NAS (Network-Attached Storage) de stockage en réseau Sert à stocker les fichiers audio.
Branchements (face arrière) Appareil à sortie audio numérique Appareil à sortie audio numérique Appareil qui produit le signal d’horloge Sortie numérique (OPTICAL) Sortie numérique (COAXIAL) Sortie de synchronisation d’horloge C F Branchez les câbles à la paire choisie pour la sortie ligne (page 51). Le son ne sera produit que par la paire sélectionnée. D G H La polarité des prises XLR peut être réglée pour avoir comme point chaud la broche 2 ou 3 (page 51).
A Port ETHERNET Connectez un câble réseau local (LAN) du commerce à ce port si vous souhaitez raccorder cette unité à un réseau filaire ou à Internet. oo Lorsque vous passez en revue les sources d’entrée, ce port apparaît sous le nom « NET ». F Port USB (arrière) Sert à recevoir le signal audio numérique d’un ordinateur. Reliez-le au port USB d’un ordinateur. Pour le branchement, utilisez un câble USB 2.0 (type A-B) du commerce.
Branchements (face avant) Clés USB Connexion coaxiale (COAX) Branchez les clés USB au port USB en face avant de l’unité. Pour lire les fichiers musicaux d’une clé USB, réglez la source d’entrée sur NET et utilisez l’appli pour la lecture. Utilisez le câble de conversion RCA fourni et un câble numérique coaxial RCA du commerce. Pour activer cette entrée, tournez le sélecteur SOURCE afin de sélectionner COAXIAL2. oo Pour des détails, voir le mode d’emploi de TEAC HR Streamer.
Branchement d’un casque Emploi de la télécommande Précautions d’emploi VVUn mauvais emploi des piles peut entraîner leur rupture ou leur fuite, avec pour conséquence un incendie, des blessures ou la salissure des objets proches. Veuillez attentivement lire et respecter les précautions en page 31. oo Pour utiliser la télécommande, pointez-la vers le capteur de télécommande de l’unité principale dans un rayon maximal de 5 m. Ne placez pas d’obstacles entre l’unité principale et la télécommande.
Nomenclature et fonctions des parties (unité principale) A B C D E F A Interrupteur d’alimentation POWER Sert à mettre l’unité sous et hors tension. oo Si l’écran reste sombre même après mise sous tension avec l’interrupteur d’alimentation POWER, une des raisons suivantes en est généralement la cause. oo L’unité est sous tension, mais la luminosité de l’écran (DIMMER) est réglée sur OFF (page 52). oo La fonction d’économie automatique d’énergie a fait passer l’unité en veille.
Conversion ascendante H Prise casque (PHONES) Branchez ici un casque à fiche mini-jack 3,5 mm stéréo (page 39). oo Ce circuit d’amplification pour casque utilise un connecteur à 4 points avec mise à la masse indépendante pour la gauche et la droite. Des fiches ordinaires à 3 ou 4 points peuvent être utilisées. oo Quand un casque est connecté à cette unité, la sortie casque est activée et le son cesse d’être produit par les prises de sortie audio analogique (LINE OUT) de la face arrière.
Nomenclature et fonctions des parties (télécommande) a Touche STANDBY/ON g a b Appuyez sur cette touche pour mettre l’unité en veille ou pour l’allumer. b Touches de sélection d’entrée Servent à sélectionner la source de lecture. oo La touche LINE n’a pas de fonction. c Touche INFO c h d j e l i k Affiche des informations, dont la conversion ascendante (page 44). d Touche UPCONVERT Appuyez sur cette touche pour changer le réglage de conversion ascendante.
Écran À la mise sous tension Nom de la source de lecture Z c Affiche le nom de la source sélectionnée. Les noms affichés correspondent aux prises sélectionnées comme suit : Les noms entre parenthèses apparaissent lors du changement. USB (USB) Port USB de la face arrière COAX1 (COAXIAL 1) Prise d’entrée audio numérique coaxiale RCA (COAXIAL) de la face arrière NT-505 NETWORK PLAYER Après l’apparition des messages ci-dessus, la source d’entrée s’affiche à l’écran.
Affichage (suite) Affichage d’informations sur le format de lecture Appuyez sur la touche INFO de la télécommande pendant la lecture pour afficher des informations sur le format de lecture. Exemple avec la source de lecture réglée sur USB, COAX1, COAX2, OPT1 ou OPT2 oo Les affichages de signal entrant et de signal de lecture seront les mêmes si la conversion ascendante est réglée sur « OFF ». Format du signal d’entrée Format du signal de lecture PCM 44. 1kHz DSD 11.
Fonctionnement de base 1 Basculez l’interrupteur d’alimentation POWER en position ON pour allumer l’unité. 3 Lancez la lecture sur l’appareil source. Référez-vous au mode d’emploi de cet appareil. 4 Réglez le volume. Quand on utilise les sorties ligne Quand LINE OUT LEVEL (niveau de sortie ligne) est réglé sur VARIABLE, tournez le bouton VOLUME de cette unité pour régler le volume. Si LINE OUT LEVEL est réglé différemment, le volume ne peut pas être contrôlé depuis cette unité.
Technologie sans fil Bluetooth® Notes pour la technologie sans fil Bluetooth® Si vous utilisez cette unité avec un téléphone mobile ou d’autres dispositifs à technologie sans fil Bluetooth, ils ne doivent pas être éloignés l’un de l’autre de plus de 10 m. Toutefois, selon les conditions d’utilisation, la distance effective de transmission peut être réduite. La communication sans fil ne peut pas être garantie pour tous les appareils à technologie sans fil Bluetooth.
Appairage avec un autre appareil Bluetooth L’appairage de cette unité avec un autre appareil Bluetooth est nécessaire la première fois que vous l’utilisez et la première fois que vous la connectez à un autre appareil Bluetooth. 1 Tournez le bouton SOURCE pour choisir Bluetooth. Bluetooth Lecture depuis un appareil Bluetooth oo Appairez cette unité la première fois que vous l’utilisez et lorsque vous souhaitez la connecter pour la première fois à un nouvel appareil Bluetooth (page 47).
Technologie sans fil Bluetooth® (suite) Changement d’appareil connecté 1 Tournez le sélecteur SOURCE pour afficher DEVICE SELECT (sélection d’appareil). La ligne du bas de l’écran affiche le nom du dernier appareil connecté. Exemple d’affichage MENU DEVICE SELECT Player_1 Nom du dernier appareil connecté 2 Tournez le sélecteur SOURCE pour afficher les appareils Bluetooth déjà appairés. oo L’unité peut mémoriser un maximum de huit appairages d’appareil.
Réglages 1 Appuyez sur la touche MENU pour ouvrir 3 Appuyez sur le sélecteur SOURCE. l’écran de menu. FR 2 Tournez le sélecteur SOURCE pour choisir le paramètre que vous souhaitez régler. oo Vous pouvez aussi appuyer sur la touche ENTER de la télécommande. oo La valeur actuellement réglée s’affiche à l’écran. 4 Tournez le sélecteur SOURCE pour changer la valeur de réglage. oo Vous pouvez aussi utiliser les touches Haut et Bas (k, j) de la télécommande.
Réglages (suite) Conversion ascendante Filtre numérique PCM Sert à activer le circuit de conversion ascendante quand des signaux PCM sont reçus. Détermine le type de filtre numérique utilisé lors de la conversion de signaux numériques PCM en analogique. oo Voir page 41 pour les relations entre les fréquences d’échantillonnage en entrée et celles après conversion ascendante. oo Pendant la lecture de fichiers MQA, la conversion ascendante 4× Fs est utilisée quel que soit ce réglage.
Filtre numérique DSD Sortie ligne Détermine le type de filtre numérique utilisé lors de la conversion de signaux numériques DSD en analogique. Sert à sélectionner les prises d’où sortira le signal audio analogique. MENU DIGITAL FILTER(DSD) WIDE oo La sortie ne peut pas se faire en même temps par les prises RCA et les prises XLR. MENU LINE OUT SELECT RCA NARROW La fréquence de coupure sera définie en fonction du signal DSD comme suit.
Réglages (suite) Luminosité de l’écran MENU DIMMER BRIGHT DARK Sombre Fonction d’économie automatique d’énergie Cette unité a une fonction d’économie automatique d’énergie. oo La fonction d’économie automatique d’énergie est activée lorsque l’unité quitte l’usine. MENU AUTO POWER SAVING ON SLIGHTLY BRIGHT Faiblement éclairé BRIGHT Brillamment éclairé OFF La fonction d’économie automatique d’énergie est désactivée.
Lecture de musique sur un ordinateur Installation du pilote À propos du mode de transmission Cette unité peut être branchée à des ordinateurs ayant les systèmes d’exploitation suivants. Le fonctionnement avec d’autres systèmes d’exploitation n’est pas garanti (en date de novembre 2017). Cette unité peut transférer les données en mode isochrone ou Bulk Pet. Les fréquences d’échantillonnage qui peuvent être transmises sont 44,1, 48, 88,2, 96, 176,4, 192, 352,8, 384, 705,6 et 768 kHz.
Lecture de musique sur un ordinateur (suite) Lecture de fichiers audio depuis un ordinateur 1 Reliez le port USB de la face arrière de cette unité à l’ordinateur au moyen d’un câble USB. Câble USB 5 Lancez la lecture d’un fichier audio sur l’ordinateur. En réglant au maximum le volume de sortie de l’ordinateur et en ajustant le volume de sortie depuis l’amplificateur stéréo, une meilleure qualité sonore peut être obtenue.
MQA (Master Quality Authenticated) Guide de dépannage Le MQA est une technologie britannique primée qui restitue le son de l’enregistrement d’origine. Le fichier MQA maître est totalement authentifié et est suffisamment petit pour le streaming ou le téléchargement. Si vous rencontrez un problème avec l’unité, veuillez prendre un moment pour lire les informations suivantes avant de solliciter une réparation.
Guide de dépannage (suite) Branchements à un ordinateur L’ordinateur ne reconnaît pas cette unité. ee Voir page 53 pour plus d’informations sur les systèmes d’exploitation pris en charge. Le fonctionnement avec des systèmes d’exploitation non pris en charge n’est pas garanti. Restauration des réglages par défaut 1 En maintenant pressée la touche MENU, basculez l’interrupteur d’alimentation POWER sur ON. Du bruit se produit.
Caractéristiques techniques Sorties audio analogiques Prises Prises XLR. . . . . . . . . . . . . . . . . . . . . . . . . . . . . . . . . . . . . . . . . . . 1 paire (L/R) Prises RCA. . . . . . . . . . . . . . . . . . . . . . . . . . . . . . . . . . . . . . . . . . . 1 paire (L/R) Impédance de sortie. . . . . . . . . . . . . . . . . . . . . . . . . . . . . . . . . . . . . XLR : 188 Ω RCA : 150 Ω Niveau maximal de sortie (1 kHz/pleine échelle, sous 10 kΩ) FIXED 0dB. . . . . . . . . . . . . . . . . . . . . .
INSTRUCCIONES IMPORTANTES DE SEGURIDAD 11) Use solo accesorios / complementos especificados por el fabricante. PRECAUCIÓN: PARA REDUCIR EL RIESGO DE DESCARGA ELÉCTRICA, NO QUITE LA CUBIERTA (NI EL PANEL POSTERIOR). NO HAY PIEZAS INTERNAS QUE EL USUARIO PUEDA REPARAR. PARA REPARACIONES, REMÍTASE A UN SERVICIO TÉCNICO CUALIFICADO.
VVPrecauciones con respecto a las pilas Un mal uso de las pilas puede hacer que se rompan o que tengan fugas y ello causar fuego, lesiones u oxidación en los objetos cercanos. Por favor, lea y observe las siguientes precauciones cuidadosamente. oo Asegúrese de introducir las pilas siempre con la correcta orientación de los polos positivo (¥) y negativo (^). oo Use pilas del mismo tipo. Nunca utilice juntas pilas de tipos diferentes.
INSTRUCCIONES IMPORTANTES DE SEGURIDAD (continuación) Cumplimiento de las normas de interferencias y transmisión de radio Requerimientos acerca de la exposición a radiaciones La función de transmisor de banda ancha de este producto opera en la banda de los 2,4 GHz. Este equipo cumple con la regulación internacionalmente reconocida para los casos de exposición humana a ondas de radio generadas por un transmisor.
Marcas y derechos The MQA logo is a trade mark of MQA Limited. “DSD” is a registered trademark. The Bluetooth® word mark and logos are registered trademarks owned by Bluetooth SIG, Inc. and any use of such marks by TEAC CORPORATION is under license. Qualcomm aptX is a product of Qualcomm Technologies, Inc. and/ or its subsidiaries. Qualcomm is a trademark of Qualcomm Incorporated, registered in the United States and other countries. aptX is a trademark of Qualcomm Technologies International, Ltd.
Accesorios incluidos Compruebe que la caja contiene todos los accesorios incluidos que se indican a continuación. Por favor, póngase en contacto con el establecimiento donde adquirió esta unidad si falta cualquiera de estos accesorios o si alguno ha sufrido desperfectos durante el transporte.
Conexiones de red Ejemplo de conexión A Internet oo El router wi-fi debe estar conectado a Internet cuando se instalen las apps en un iPad, iPhone u otro dispositivo, cuando se actualice el firmware NET (de red) de esta unidad y cuando se escuche la radio por Internet. ES a b NAS Cable LAN d Router Wi-Fi™ c iPad, iPhone, etc. NT-505 a NAS (dispositivo de almacenamiento conectado en red) Se utiliza para almacenar los archivos de audio.
Conexiones (panel posterior) Dispositivo que emite audio digital Dispositivo que emite audio digital Dispositivo que emite señal de reloj Salida digital (ÓPTICA) Salida digital (COAXIAL) SALIDA DE SINCRONIZACIÓN DE RELOJ B C E F G D H Cable de corriente incluido Conecte los cables que correspondan a la pareja fijada como salida de línea (página 79). El sonido solo saldrá por la pareja seleccionada.
A Puerto ETHERNET Conecte en este puerto a un cable LAN de los que se venden en establecimientos comerciales cuando desee conectar esta unidad a una red cableada o a Internet. oo Al cambiar de fuente de entrada, este puerto se identifica como “NET”. F Puerto USB (posterior) Se utiliza para introducir audio digital procedente de un ordenador. Conéctelo al puerto USB del ordenador. Para esta conexión, utilice un cable USB 2.0 (tipo A-B) de los que se venden en establecimientos comerciales.
Conexiones (panel frontal) Unidades flash USB Conexión coaxial (COAX) Puede conectar unidades flash USB al puerto USB del frontal de esta unidad. Para reproducir archivos de música de una unidad flash USB, ajuste la fuente de entrada en NET y utilice la app para la reproducción. Utilice el cable de conversión RCA incluido y un cable digital coaxial RCA de los que se pueden adquirir en establecimientos comerciales. Para activar esta entrada, gire el mando SOURCE para seleccionar COAXIAL2.
Conexión de unos auriculares Uso del mando a distancia Precauciones de uso VVUn mal uso de la pilas podría hacer que se rompan o se sulfaten (pierdan líquido), lo que podría originar fuego, lesiones o la oxidación de materiales cercanos. Por favor, lea atentamente y observe las instrucciones de las precauciones de la página 59. oo Cuando utilice el mando a distancia, apunte con él hacia el receptor de la señal del mando a distancia que hay en la unidad principal, a una distancia de 5 m o menos.
Nombres y funciones de las partes (unidad principal) A B C D E F A Interruptor POWER Se utiliza para encender y apagar la unidad. oo Si la pantalla permanece oscura aunque el interruptor POWER esté en ON (activado), normalmente la causa es una de las siguientes: oo La unidad está encendida, pero DIMMER (brillo de la pantalla) está ajustado en OFF (página 80). oo La función de ahorro de energía automático ha puesto la unidad en reposo (standby). oo El cable de corriente está desconectado.
Sobreconversión H Salida de auriculares PHONES Conecte aquí unos auriculares con un minijack estéreo de 3,5 mm (página 67). oo Este circuito amplificador de auriculares utiliza un terminal de cuatro polos, con masas de tierra independientes para el canal izquierdo y el derecho. Se pueden utilizar jacks normales con 3 o 4 polos.
Nombres y funciones de las partes (mando a distancia) a Botón STANDBY/ON g a b Púlselo para poner la unidad en modo de reposo (standby) o encenderla (on). b Botones de selección de entrada Se utilizan para seleccionar la fuente de reproducción. oo El botón LINE no tiene ninguna función. c Botón INFO c h d j e l f i k m Púlselo para mostrar información, incluyendo sobreconversión (página 72). d Botón UPCONVERT Púlselo para cambiar el ajuste de sobreconversión.
Pantalla Al encender Nombre de la fuente de reproducción Z c NT-505 Después de que aparezcan mensajes como los de arriba, en la pantalla se mostrará la fuente de entrada. Información de la fuente de reproducción La pantalla de información de fuente de reproducción aparecerá después de encender la unidad y también después de que transcurran aproximadamente 7 segundos sin ninguna operación en una pantalla de ajustes de configuración.
Pantalla (continuación) Pantalla de información sobre el formato de reproducción Pulse el botón INFO del mando a distancia durante la reproducción para mostrar la información sobre el formato de reproducción. Ejemplo cuando la fuente de reproducción es USB, COAX1, COAX2, OPT1 o OPT2 oo Las pantallas de información de la señal de entrada y de la señal reproducida serán iguales si el ajuste de sobreconversión es “OFF” (desactivada). Formato de la señal de entrada PCM 44.
Funcionamiento básico 1 Ponga el interruptor POWER en su posición ON para encender la unidad. 3 Ponga en marcha el dispositivo de reproducción. Consulte el manual de instrucciones de dicho dispositivo. 4 Ajuste el volumen. Cuando utilice las salidas de línea Cuando LINE OUT LEVEL esté ajustado en VARIABLE, gire el mando VOLUME de esta unidad para ajustar el volumen. Cuando LINE OUT LEVEL esté ajustado en cualquier otra opción, no podrá ajustar el volumen desde esta unidad.
Tecnología inalámbrica Bluetooth® Notas sobre Bluetooth® NOTA Cuando utilice esta unidad con un teléfono móvil u otros dispositivos Bluetooth, ambos no deberán estar alejados uno de otro más de 10 metros. Dependiendo de las circunstancias de utilización, sin embargo, la distancia de transmisión efectiva podría ser inferior. No está garantizada la comunicación inalámbrica con todos los dispositivos compatibles con la tecnología inalámbrica Bluetooth.
Emparejamiento con otro dispositivo Bluetooth Reproducción desde un dispositivo Bluetooth El emparejamiento de esta unidad con otro dispositivo Bluetooth es necesario la primera vez que se utiliza y cuando se conecta a un dispositivo Bluetooth diferente por primera vez. oo Empareje esta unidad la primera vez que la utilice y cuando quiera conectarla con un nuevo dispositivo Bluetooth (página 75). 1 Gire el mando SOURCE para seleccionar Bluetooth.
Tecnología inalámbrica Bluetooth® (continuación) Cambiar el dispositivo conectado 1 Pulse el mando SOURCE para mostrar en pantalla DEVICE SELECT. La línea inferior de la pantalla mostrará el nombre del último dispositivo conectado. Ejemplo de pantalla MENU DEVICE SELECT Player_1 Nombre del último dispositivo conectado 2 Gire el mando SOURCE para mostrar en pantalla los dispositivos Bluetooth ya emparejados. oo La unidad puede recordar un máximo de ocho emparejamientos de dispositivos.
Ajustes de configuración 1 Pulse el botón MENU para abrir la pantalla del 3 Pulse el mando SOURCE. menú. 2 Gire el mando SOURCE para mostrar el apartado que quiera ajustar. ES oo También puede pulsar el botón ENTER del mando a distancia. oo El valor seleccionado en ese momento se muestra en la pantalla. 4 Gire el mando SOURCE para cambiar el valor del ajuste. oo También puede utilizar los botones arriba y abajo (k, j) del mando a distancia.
Ajustes de configuración (continuación) Sobreconversión (UPCONVERT) Filtro digital PCM (DIGITAL FILTER (PCM)) Se utiliza para activar el circuito de sobreconversión cuando se reciben señales PCM. Establece el tipo de filtro digital utilizado al convertir señales PCM de digitales a analógicas. oo Consulte la página 69 para más información sobre las relaciones entre las frecuencias de muestreo de entrada y las frecuencias de muestreo después de la sobreconversión.
Filtro digital DSD (DIGITAL FILTER (DSD)) Salida de línea (LINE OUT SELECT) Establece el tipo de filtro digital utilizado al convertir señales DSD de digitales a analógicas. Se utiliza para seleccionar los terminales por los que va a salir el audio analógico. oo No es posible la salida por los terminales RCA y XLR a la vez.
Ajustes de configuración (continuación) Brillo de la pantalla (DIMMER) MENU DIMMER BRIGHT DARK Pantalla oscura. Función de ahorro de energía automático (AUTO POWER SAVING) Esta unidad tiene una función de ahorro de energía automático. oo La función de ahorro de energía automático viene activada de fábrica. MENU AUTO POWER SAVING ON SLIGHTLY BRIGHT Iluminación atenuada. BRIGHT Iluminación brillante. OFF La función de ahorro de energía automático está desactivada. AUTO OFF Se apaga automáticamente.
Reproducción de música en un ordenador Instalación del controlador (driver) Acerca del modo de transmisión Esta unidad puede conectarse a ordenadores que funcionen con los sistemas operativos indicados a continuación. No se garantiza el funcionamiento con otros sistemas operativos (a noviembre de 2017). Esta unidad puede transferir datos mediante modo Isochronous (isócrono) o Bulk Pet. Las frecuencias de muestreo que se pueden transmitir son 44,1, 48, 88,2, 96, 176,4, 192, 352,8, 384, 705,6 y 768 kHz.
Reproducción de música en un ordenador (continuación) Reproducción de archivos de audio desde un ordenador 1 Conecte el puerto USB de la parte posterior de esta unidad al ordenador con un cable USB. 5 Comience a reproducir un archivo de audio en el ordenador. Conseguirá mejor calidad de sonido si pone al máximo el volumen de salida del ordenador y ajusta el volumen de escucha desde el amplificador estéreo.
MQA (Master Quality Authenticated) Solución de problemas MQA es una galardonada tecnología británica que proporciona el sonido de la grabación máster original. El archivo MQA máster está totalmente certificado y es lo suficientemente pequeño como para transmitirse por secuencias (streaming) o descargarse. Si tiene un problema con esta unidad, por favor dedique un momento a revisar la información que le proporcionamos a continuación antes de solicitar servicio técnico.
Solución de problemas (continuación) Conexiones con un ordenador El ordenador no reconoce esta unidad. ee Consulte la página 81 para más información sobre los sistemas operativos compatibles. No está garantizado el funcionamiento con sistemas operativos no compatibles. Restablecer los ajustes predeterminados 1 Mientras mantiene pulsado el botón MENU, ponga el interruptor POWER en ON (activado). Se produce ruido.
Especificaciones Salidas de audio analógico Terminales Terminales XLR. . . . . . . . . . . . . . . . . . . . . . . . . . . . . . . . 1 par (izda./dcha.) Terminales RCA. . . . . . . . . . . . . . . . . . . . . . . . . . . . . . . . . 1 par (izda./dcha.) Impedancia de salida. . . . . . . . . . . . . . . . . . . . . . . . . . . . . . . . . . . . XLR: 188 Ω RCA: 150 Ω Nivel de salida máximo (1 kHz/escala completa, a 10 kΩ) FIXED 0dB. . . . . . . . . . . . . . . . . . . . . . . . . . . . . . . . . . . . . . .
WARRANTY/GARANTIE/GARANTÍA Warranty provisions (United States and Canada only) Length of Warranty The parts and labor warranty will be effective for one (1) year from the date of the original purchase for products not used for commercial purposes. For products used commercially, the warranty is ninety (90) days for magnetic heads and optical pickups, one (1) year for all other parts and ninety (90) days for labor.
oo Les dommages résultant de causes autres que des défauts de produit, y compris le manque d’aptitude technique, de compétence ou d’expérience de l’utilisateur. oo Les dommages de toute unité ayant été modifiée ou dont le numéro de série a été effacé, modifié ou retiré. Frais pris en charge par TEAC TEAC prendra en charge tous les frais de pièces et main d’oeuvre pour les articles couverts par la garantie. Les frais d’expédition sont évoqués dans la section suivante.
WARRANTY/GARANTIE (United States and Canada only/États-Unis et Canada uniquement) Model/Modèle : NT-505 Serial No./N° de série Owner’s address/Adresse du propriétaire Date of purchase/Date de l’achat Dealer’s name/Nom du revendeur Owner’s name/Nom du propriétaire Dealer’s address/Adresse du revendeur Z Japan: TEAC CORPORATION 1-47 Ochiai, Tama-shi, Tokyo 206-8530, Japan Phone: +81-42-356-9156 USA/Latin America: Onkyo U.S.A. Corporation 18 Park Way, Upper Saddle River, NJ 07458, U.S.A.