9A10020800 Z ? SR-L35 OWNER’S MANUAL MANUEL DU PROPRIÉTAIRE ENGLISH CD Receiver FRANÇAIS
IMPORTANT SAFETY INSTRUCTIONS CAUTION: TO REDUCE THE RISK OF ELECTRIC SHOCK, DO NOT REMOVE COVER (OR BACK). NO USER-SERVICEABLE PARTS INSIDE. REFER SERVICING TO QUALIFIED SERVICE PERSONNEL. The lightning flash with arrowhead symbol, within an equilateral triangle, is intended to alert the user to the presence of uninsulated “dangerous voltage” within the product’s enclosure that may be of sufficient magnitude to constitute a risk of electric shock to persons.
WARNING : TO PREVENT FIRE OR SHOCK HAZARD, DO NOT EXPOSE THIS APPLIANCE TO RAIN OR MOISTURE. CAUTION < DO NOT REMOVE THE EXTERNAL CASES OR CABINETS TO EXPOSE THE ELECTRONICS. NO USER SERVICEABLE PARTS ARE WITHIN! This product has been designed and manufactured according to FDA regulations “title 21, CFR, chapter 1, subchapter J, based on the Radiation Control for Health and Safety Act of 1968“, and is classified as class 1 laser product.
Contents Thank you for choosing TEAC. Read this manual carefully to get the best performance from this unit. IMPORTANT SAFETY INSTRUCTIONS . . . . . . . . . . . . 2 Before Use . . . . . . . . . . . . . . . . . . . . . . . . . . . . . . . 4 Compact Disc . . . . . . . . . . . . . . . . . . . . . . . . . . . . . 5 Remote Control Unit . . . . . . . . . . . . . . . . . . . . . . . . 6 RESET Switch . . . . . . . . . . . . . . . . . . . . . . . . . . . . . . 6 Wall Mounting . . . . . . . . . . . . . . . . . . . .
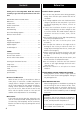
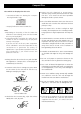
Compact Disc Discs which can be played on this unit: • Conventional audio CDs bearing the “Compact Disc Digital Audio” logo: ? < Never use such chemicals as record sprays, antistatic sprays or fluid, benzine or thinner to clean the discs. Such chemicals will do irreparable damage to the disc’s plastic surface. < Discs should be returned to their cases after use to avoid dust and scratches that could cause the laser pickup to “skip.
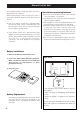
Remote Control Unit The provided Remote Control Unit allows the unit to be operated from a distance. When operating the remote control unit, point it towards the REMOTE SENSOR on the front panel of the unit. < Even if the remote control unit is operated within the effective range, remote control operation may be impossible if there are any obstacles between the unit and the remote control.
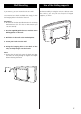
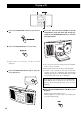
Wall Mounting If you want to, you can mount the unit on a wall. You need to have hooks available that snugly fit into the hanging holes in the back of the unit. Use of the folding supports For better stability in using the unit on a table or other flat surface, you can pull out the pair of hinged supports, as shown. Precaution: < Be aware of the best possible direction for receiving AM broadcasts (this unit has no AM anntena you can turn around). 1.
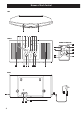
Names of Each Control TOP A B C D E F G H I J K FRONT REMOTE CONTROL A H J K P Q N M L M N O P Q L REAR U T R 8 S V
A STANDBY/ON switch Press this switch to switch the unit between power on and standby. The equipment draws nominal nonoperating power from the AC outlet with its STANDBY/ON switch in the STANDBY position. B OPEN/CLOSE button Press this button to open and close the CD compartment. C TIMER/SLEEP button Use this button to set the timer or sleep timer. Use this button to change the display mode. E CD compartment Press the OPEN/CLOSE button on top of the unit to open the CD compartment.
Playing a CD 1 2 3 4 5 1 Press the STANDBY/ON switch to turn the unit ON. 4 Put a disc onto the center spindle in the CD compartment, with the label side facing you, and press the OPEN/CLOSE button to close the CD compartment. 2 Press the FUNCTION button to select “CD”. < When no disc is in the unit, “no dISC” will be displayed. 3 Press the OPEN/CLOSE button (L) to open the CD compartment. < CD’s must be pressed securely onto the Spindle, until a “CLICK” is heard.
E F CD A To stop playback Press the STOP button (H) to stop playback. A B D Search for a part of a track During playback, hold down the SKIP/SEARCH button (.m or ,/) and release it when the part you want to listen to is found. ENGLISH B To suspend playback temporarily (pause mode) Press the PLAY/PAUSE button (y/J). Playback stops at the current position. To resume playback, press the PLAY/PAUSE button (y/J) again.
Programmed Playback 1 3 2 Up to 20 tracks can be programmed in the desired order. < Shuffle playback does not work during program playback. < Insert a disc and select “CD” before beginning programming. 4 Repeat step 2 and 3 to program more tracks. < You can program up to 20 tracks. < To cancel the program mode, press the STOP button (H). 4 When the selection of track numbers has been 1 Press the MEMORY/CLOCK ADJ button in the stop mode. “MEMORY” indicator blinks, and “P-01” appears on the display.
MEMORY/CLOCK ADJ .m,/ STOP To cancel the program playback mode Press the STOP (H) button. “MEMORY” indicator disappears, but the programmed contents aren’t lost. To add a track to the end of the program In the stop mode, press the MEMORY/CLOCK ADJ button repeatedly until “00” appears on the display. Select a track number by pressing the SKIP/SEARCH button, and then press the MEMORY/CLOCK ADJ button. The track is added to the end of the program.
Repeat Playback Shuffle Playback REPEAT/PRESET SHUFFLE Every time the REPEAT/PRESET button is pressed, the REPEAT indicator lights or blinks, and the mode is changed as follows : Tracks can be played randomly. Press the SHUFFLE button in the stop or play mode. repeat one track repeat all the tracks (off) Repeat one track Press the REPEAT/PRESET button once during playback. The repeat indicator blinks. The track being played will be played repeatedly.
Listening to the Radio 1 3 2 4 1 Press the STANDBY/ON switch to turn the unit ON. Selecting stations which cannot be tuned automatically (manual selection). Press the TUNING button repeatedly until you find a receivable station. ENGLISH 2 Press the FUNCTION button to select “TUNER”. If the reception is poor AM broadcast Turn around the unit to find the best position for AM stations. 3 Press the BAND button to select FM or AM.
How to Preset Stations 4 3 4 1 How to select Preset Stations 2 1 2 In each band, up to 10 stations can be stored in preset memories. 1 Press the BAND button to select FM or AM. 1 Press the BAND button to select FM or AM. 2 Operate the TUNING button to tune in a station to be stored as a preset station. 2 Press the REPEAT/PRESET button repeatedly and select a preset channel. 3 Press the MEMORY/CLOCK ADJUST button.
Listening to the External Sources 1 Sleep Timer 2 TIMER/SLEEP The unit automatically switches from power on to standby at a specified time. 1 Press the STANDBY/ON switch to turn the unit When the power is on, press the TIMER/SLEEP button repeatedly until the desired time appears on the display. Use the SLEEP button when using the remote control unit. ON. ENGLISH You can connect external sources such as VCR deck or TV to the AUX IN jacks. 2 Press the FUNCTION button repeatedly to select “AUX”.
Clock Adjustment DISPLAY MEMORY/CLOCK ADJ .m,/ 1 Press the DISPLAY button to select clock display. “:” blinks in the clock display. 5 Press the .m or ,/ button to set the current hour. < In the TUNER mode, use the TUNING button. < If the unit is in standby mode, press and hold the MEMORY/CLOCK ADJUST button for 2 or more seconds, and continue the procedure from step 3 . < Press the STOP button to cancel the time setting. (In the TUNER mode, press the DISPLAY button.
Timer (1) DISPLAY MEMORY/CLOCK ADJ .m,/ Adjust the clock before setting the timer. Setting the timer 4 Press the MEMORY/CLOCK ADJUST button. The minute blinks on the display. 1 Press the DISPLAY button once or twice to ENGLISH select the timer mode. The “TIMER” indicator blinks on the display. 5 Press the .m or ,/ button to set the start time (minute). 2 Within 4 seconds, press and hold the MEMORY/CLOCK ADJUST button for 2 or more seconds. The “TIMER” and hour blinks on the display.
Timer (2) TIMER/SLEEP Activating the timer Press and hold the TIMER/SLEEP button for 2 or more seconds until “TIMER” indicator appears on the display, and press the STANDBY/ON switch to switch the unit back to standby. The unit will turn on at the specified time every day, and will return to stanby in one hour from the start time. For the timer to start playback of a CD, press the FUNCTION button to select CD, insert a disc and adjust the volume before switching the unit from power on to standby.
Troubleshooting If you have problems with your system, look through this chart and see if you can solve the problem yourself before calling your dealer or TEAC service center. General No power e Check the connection to the AC power supply. No sound. e Adjust the volume. e If muting is on, press the MUTING button. The sound is noisy. e The unit is too close to a TV set or similar appliances. Install the unit further from them, or turn them off. Cannot listen to any station, or signal is too weak.
Sommaire Nous vous remercions pour l’achat d’un appareil TEAC. Lire ce manuel avec attention pour obtenir les meilleures performances possibles de cet appareil. Avant utilisation . . . . . . . . . . . . . . . . . . . . . . . . . . . 22 Disques compacts . . . . . . . . . . . . . . . . . . . . . . . . . . 23 Boîtier de télécommande . . . . . . . . . . . . . . . . . . . . 24 Commutateur RESET . . . . . . . . . . . . . . . . . . . . . . . 24 Accrochage au mur. . . . . . . . . . . . . . . . . . . . . . . . .
Disques compacts Disques pouvant être lus avec ce lecteur: • CD audio classiques, portant ce logo sur l’étiquette: ? • Disques CD-R et CD-RW correctement finalisés Remarques: < Selon la qualité du disque et/ou la qualité de l’enregistrement, certains disques CD-R et CD-RW risquent de ne pas pouvoir être lus. < Placer toujours le disque sur le plateau, la face imprimée sur le dessus (les disques compacts ne sont enregistrés que sur une seule face.
Boîtier de télécommande Le boîtier de télécommande fourni permet la commande à distance defourni permet la commande à distance de l’appareil. Pour l’utilisation du boîtier de télécommande, le diriger vers le détecteusation du boîtier de télécommande, le diriger vers le détecteur de télécommande du panneau avant de l’appareil.
Accrochage au mur Il vous est loisible d’accrocher l’appreil au mur. Il vous faut des crochets qui s’engagent juste bien aux trous d’accrochages dans le dos de l’appareil. Emploi des supports pliants Pour plus de stabilité de l’appareil lors de son emploi sur une table ou autre surface plate, on peut déplier les supports, comme l’indique l’illustration.
Nomenclature DESSUS A B C D E F G H I J K DEVANT TÉLÉCOMMANDE A H J K P Q N M L M N O P Q L DERRIÈRE U T R 26 S V
A Commutateur STANDBY/ON Appuyez sur cette touche pour allumer l’appreil ou pour le remettre en mode d’attente. Cet appareil consume du courant même quand il est éteint (en mode STANDBY). B OPEN/CLOSE button Appuyez sur cette touche pout ouvrir ou fermer le compartiment à disque. C Touche TIMER/SLEEP Utiliser cette touche pour régler le minuteur ou le minuteur de mise en veille. D Touche d’affichage Utilisez cette touche pour changer le mode d’affichage.
Lecture du CD 1 2 3 4 5 1 Appuyer sur le commutateur d’alimentation pour allumer l’appareil. 4 Insérer le disque sur la broche centrale, face imprimée vers vous, et fermer le compartiment en appuyant sur la touche OPEN/CLOSE. 2 Appuyer sur la touche FUNCTION pour choisir “CD”. < Si il n’y a pas de disque dans l’appareil “no dISC”. 3 Appuyez sur la touche OPEN/CLOSE (L) pour ouvrir le compartiment à disque.
E F CD A Pour l’arrêt de la lecture Appuyer sur la touche STOP (H) pour arrêter la lecture. A B D Recherche d’une section de piste Durant la lecture, tenir appuyer la touche SKIP/SEARCH (.mou,/) et relacher quand vous avez atteint la section de piste désirée. B Pour un arrêt momentanné de la lecture (mode E Touche DISPLAY Durant la lecture, appuyez cette touche répététivement pour changer le mode d’affichage tel qu’il suit: FRANÇAIS pause) Appuyer sur la touche PLAY/PAUSE (y/J).
Lecture programmée 1 3 2 4 Jusqu’à 20 pistes peuvent être programmer dans l’ordre désiré. Répéter l’étape 2 et 3 pour programmer d’autre pistes. < La lecture aléatoire ne fonctionne pas durant la lecture programmée. < Choisir un disque et “CD” d’avance. < Vous pouvez programmer jusqu’à 20 pistes. < Pour annuller la programmation, appuyer sur la touche STOP (H). 1 Appuyer sur la touche MEMORY/CLOCK ADJ durant le mode arrêt.
MEMORY/CLOCK ADJ .m,/ STOP Pour vérifier l’ordre de programmation En mode d’arrêt, appuyez sur la touche MEMORY/CLOCK ADJ répététivement, pour voir les numéros de pistes entreposés en mémoire. Pour recouvrir un programme En mode arrêt, appuyer la touche MEMORY/CLOCK ADJ répététivement jusqu’ à temps que le numéro de piste à changer est affiché. Sélectionner un numéro de piste en appuyant sur la touche SKIP/SEARCH, et appuyer ensuite sur la touche MEMORY/CLOCK ADJ.
Lecture répétitive Lecture aléatoire REPEAT/PRESET SHUFFLE Chaque fois que la touche REPEAT/PRESET est appuyée, l’indicateur REPEAT s’allume ou clignote et le mode est changé tel qu’il suit : Les pistes peuvent être jouées aléatoirement. Appuyez sur la touche SHUFFLE mode arrêt (stop) ou en mode lecture (play). répétition d’une piste répétition de toute les pistes (off) Répétition d’une piste Appuyer sur la touche REPEAT/PRESET une fois durant la lecture. L’indicateur de répétition clignote.
Ecoute radio 1 3 2 4 1 Appuyer sur le commutateur STANDBY/ON pour allumer l’appareil. Sélection des stations impossibles à régler automatiquement (réglage manuel). Appuyez sur la touche TUNING d’une façon répétitive autant de fois que nécessaire d’enfilée pour que la station souhaitée soit trouvée. 2 Appuyez sur la touche FUNCTION pour sélectionner le “TUNER”. Si la récepion est mauvaise FRANÇAIS Transmission AM Tourner l’apparail pour trouver la meilleure position pour les postes AM.
Comment préréglé une station 4 3 4 Sélection des stations préréglées 1 2 1 2 Pour chaque bande, jusqu’à 10 stations peuvent être entreposer en mémoire. 1 Appuyez sur la touche BAND pour sélectionner FM ou AM. 1 Appuyez sur la touche BAND pour sélectionner FM ou AM. 2 En agissant sur la touche TUNING, cherchez une station à mémoriser. 2 Appuyez sur la touche REPEAT/PRESET répététivement pour choisir une station préréglée. 3 Appuyez sur la touche MEMORY/CLOCK ADJ.
Ecoute à partir d’une source externe 1 Minuterie sommeil 2 TIMER/SLEEP Il est possible de connecter des appareils externes tels qu’une VCR ou un téléviseur aux prises d’entrée AUX IN. 1 Appuyer sur le commutateur d’alimentation STANDBY/ON pour allumer l’appareil. L’appareil peut être programmé pour qu’il passe en mode d’attente à une heure spécifiée. Quand l’appareil est allumé, apuyer sur la touche TIMER/SLEEP répététivement jusqu’à temps que l’heure désirée est affichée.
Réglage de l’horloge DISPLAY MEMORY/CLOCK ADJ .m,/ 1 Appuyez sur la touche DISPLAY pour choisir l’affichage de l’horloge. “:” clignote dans l’afficheur de l’horloge. 5 Appuyez sur la touche .m ou ,/ pour régler l’heure. < En mode de TUNER, utilisez la touche TUNING. < Si l’appareil est en mode d’atttente, maintenez pressée la touche MEMORY/CLOCK ADJ pendant 2 secondes ou plus et continuez la procédure à partir de l’étape 3 . < Appuyez sur la touche STOP pour annuler le réglage de l’heure.
Minuterie (1) DISPLAY MEMORY/CLOCK ADJ .m,/ Régler l’horloge avant de régler la minuterie. Réglage de la minuterie 4 Appuyez sur la touche MEMORY/CLOCK ADJ. Les minutes clignotent. 1 Appuyer sur la touche DISPLAY pour changer le mode de minuterie. Le témoin “TIMER” clignote. 5 Appuyer sur la touche .m ou ,/ FRANÇAIS our régler le temps du démarrage (minute).
Minuterie (2) TIMER/SLEEP Activation de la minuterie Appuyer et retenir la touche TIMER/SLEEP pour 2 secondes ou plus jusqu’à ce que le témoin TIMER s’allume dans l’afficheur, et appuyer sur la touche STANDBY/ON pour se mettre en mode d’attente (Standby). L’appareil s’allumera à l’heure spécifiée chaque jour et se remettra en mode d’atttente au bout de 60 minutes en comptant de l’heure spécifiée.
Guide de dépannage En cas de problème, commencer par chercher dans ce tableau pour voir si on peut trouver soi-même la solution avant de contacter le revendeur ou le centre de service client TEAC. Généralité L’appareil ne s’allume pas. e Vérifiez que l’appareil est bien branché à la source d’alimentation CA. Aucun son ne sort des enceintes. e Réglez le volume. e Si la fonction “Silence” est active, appuyez sur la touche MUTING. Bruits parasites.
Z TEAC CORPORATION 3-7-3, Nakacho, Musashino-shi, Tokyo 180-8550, Japan Phone: (0422) 52-5081 TEAC AMERICA, INC. 7733 Telegraph Road, Montebello, California 90640 Phone: (323) 726-0303 TEAC CANADA LTD. 5939 Wallace Street, Mississauga, Ontario L4Z 1Z8, Canada Phone: (905) 890-8008 TEAC MEXICO, S.A. De C.