Z UD-H01 ENGLISH FRANÇAIS USB Audio D/A Converter ESPAÑOL OWNER’S MANUAL MODE D’EMPLOI MANUAL DEL USUARIO What’s in the Box. . . . . . . . . . . . . . . . . . . . 4 Before Use. . . . . . . . . . . . . . . . . . . . . . . . . . . 5 Connections . . . . . . . . . . . . . . . . . . . . . . . . 6 Identifying the Parts. . . . . . . . . . . . . . . . . 8 Playback. . . . . . . . . . . . . . . . . . . . . .
CAUTION: TO REDUCE THE RISK OF ELECTRIC SHOCK, DO NOT REMOVE COVER (OR BACK). NO USER-SERVICEABLE PARTS INSIDE. REFER SERVICING TO QUALIFIED SERVICE PERSONNEL. The lightning flash with arrowhead symbol, within an equilateral triangle, is intended to alert the user to the presence of uninsulated “dangerous voltage” within the product’s enclosure that may be of sufficient magnitude to constitute a risk of electric shock to persons.
WARNING: TO PREVENT FIRE OR SHOCK HAZARD, DO NOT EXPOSE THIS APPLIANCE TO RAIN OR MOISTURE. CAUTION < DO NOT REMOVE THE EX TERNAL CASES OR CABINETS TO EXPOSE THE ELECTRONICS. NO USER SERVICEABLE PARTS ARE WITHIN. < IF YOU ARE EXPERIENCING PROBLEMS WITH THIS PRODUCT, CONTACT TEAC FOR A SERVICE REFERRAL. DO NOT USE THE PRODUCT UNTIL IT HAS BEEN REPAIRED. For U.S.A. This equipment has been tested and found to comply with the limits for a Class B digital device, pursuant to Part 15 of the FCC Rules.
What’s in the Box If one of the following is missing or damaged, contact your dealer or our customer service/ technical support (stated on the back cover).
Before Use CAUTION Placement of the unit < Avoid placing it in high temperature environments such as in direct sunlight or close to a source of heat. Also, do not place the unit on an amplifier or any other device that generates heat. Doing so may cause discoloration, deformation, or malfunction. Sound Etiquette What is music to you may be noise to others. Even a little sound can be clearly heard on a silent night. Low sound passes through floors and walls easily, and may annoy others unintentionally.
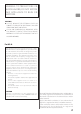
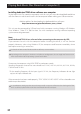
Connections After all connections are complete, connect the power cord’s plug to the AC wall socket. < Read the instructions of each device that you intend to use with this unit. < To avoid hum and noise, do not bundle the connection cords. < Be sure to connect each plug securely. Stereo amplifier or Powered speaker Computer Audio input (LINE IN, etc.) R L R L Connect one of these cables.
A Analog audio output terminals Output 2-channel analog audio signals. Connect the XLR or RCA terminals with the stereo amplifier or speakers. Use commercially available cables. XLR: Balanced XLR cables RCA: RCA audio cables Connect the R terminal on this unit to the right (R) terminal of the amplifier and the L terminal on this unit to the left (L) terminal of the amplifier. B Digital audio input terminals Input digital audio.
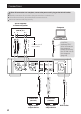
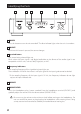
Identifying the Parts A B C D E F A POWER Press this button to turn the unit on and off. The blue indicator lights when the unit is turned on. B SOURCE Each time this button is pressed, the source changes. C Input indicators The source being selected lights up. Blinks when the input signal is not digital audio data or the format of the audio signal is not compatible with this unit, such as Dolby Digital, dts, or AAC.
Playback 1 Press the POWER button to turn the unit power ON. < If a power amplifier is connected, turn on the power amplifier last. 2 Press the SOURCE button repeatedly to select a source. Each time the SOURCE button is pressed, the source changes as follows: USB (USB input for computers) COAXIAL (Coaxial digital input) OPTICAL (Optical digital input) The input indicator of the selected source and the indicator of the input sampling frequency light up.
Playing Back Music Files Stored on a Computer (1) Installing dedicated TEAC driver software on a computer To play back music files stored on a computer with this unit, you must download dedicated driver software from our website and install it on the computer before making your USB connections. http://www.teac.co.jp/audio/software_teac_e.
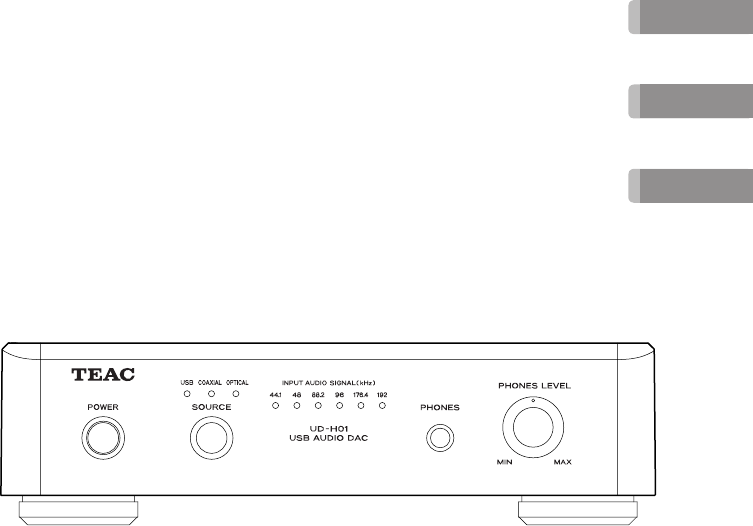
Playing back music files stored in the computer 1 Connect the unit to the computer using a USB cable. < Use a cable with a connector that fits the USB port on USB cable the unit. 2 Turn the computer power ON. < Confirm that the operating system has started properly. 3 Press the POWER button to turn the unit power ON. 4 Press the SOURCE button repeatedly to select “USB”. 5 Start playback of the music file on the computer.
Playing Back Music Files Stored on a Computer (2) < The computer and this unit cannot be used to control each other. < When playing back a music file using the USB connection, do not attempt any of the following operations. Doing so could cause the computer to behave irregularly.
Troubleshooting If you experience any problems with the unit, please take a moment to look through this chart before asking for repairs. If you still have a problem, contact your dealer or TEAC customer service/technical support (stated on the back cover). No power. General Check the connection to the AC power source. If the AC source is a switched outlet, make sure that the switch is turned on. Make sure power is supplied to the AC outlet by plugging in another item such as a lamp or a fan.
Specifications Analog audio output Jacks. . . . . . . . . . . . . . . XLR jacks (2 channel) x 1 RCA jacks (2 channel) x 1 Output impedance. . . . . . . . . . . . . . . XLR: 100 Ω RCA: 47 Ω Maximum output level (1 kHz, full scale, 10 kΩ) XLR (Gain: 0 dB): 2.0 Vrms RCA: 2.0 Vrms Frequency response. . . 5 Hz to 55 kHz (–3 dB) Sampling frequency: 192 kHz Signal-to-noise ratio (S/N). . . . . . . . . . . . 115 dB Total harmonic distortion. . . . 0.
For European Customer Disposal of electrical and electronic equipment (a) All electrical and electronic equipment should be disposed of separately from the municipal waste stream via collection facilities designated by the government or local authorities. (b) By disposing of electrical and electronic equipment correctly, you will help save valuable resources and prevent any potential negative effects on human health and the environment.
Contenu de l'emballage Si un des articles suivants manque ou est endommagé, contactez votre revendeur ou notre ser vice clientèle/technique (coordonnées au dos de la couverture). Cordon d’alimentation x 1 Câble audio RCA x 1 ATTENTION < N ’e x p o s e z p a s ce t a p p a re i l a u ruissellement ni aux éclaboussures. < Ne placez aucun objet contenant du liquide, tel qu’un vase, sur l’appareil. < N’installez pas cet appareil dans un esp ace conf iné comme une bibliothèque ou similaire.
Avant l’utilisation ATTENTION Emplacement de l'unité < Évitez de la placer dans des environnements soumis à de hautes températures comme en exposition directe aux rayons solaires ou près d'une source de chaleur. Ne placez pas non plus l'appareil sur un amplificateur ou tout autre dispositif générant de la chaleur. Cela pourrait causer une décoloration, une déformation ou un mauvais fonctionnement.
Raccordements Une fois tous les branchements faits, raccordez le cordon d'alimentation à une prise secteur. < Lisez les modes d'emploi de tous les appareils que vous comptez employer avec cette unité. < Pour éviter tout ronflement ou bruit parasite, ne regroupez pas les câbles de connexion. < Assurez-vous que chaque fiche est bien enfoncée. Amplificateur stéréo ou enceinte amplifiée Ordinateur Entrée audio (LINE IN, etc.) R L R L Branchez un de ces câbles.
A Prises de sortie audio analogique Produisent 2 canaux d'audio analogique. Raccordez les prises XLR ou RCA à l'amplificateur stéréo ou à des enceintes. Utilisez des câbles du commerce. XLR : câbles XLR symétriques RCA : câbles audio RCA Branchez la prise droite (R) de cette unité à la prise R de l'amplificateur et la prise gauche (L) de cette unité à la prise L de l'amplificateur. B Prises d'entrée audio numérique Reçoivent l'audio numérique.
Identification des parties A B C D E F A POWER Appuyez sur cette touche pour allumer et éteindre l’unité. Le témoin bleu s'allume quand l'unité est sous tension. B SOURCE Chaque fois que l'on appuie sur cette touche, la source change. C Témoins d'entrée Celui de la source qui entre est allumé. Clignote quand le signal entrant n'est pas un signal de données audio numériques ou si son format n'est pas compatible avec cette unité, comme du Dolby Digital, dts ou AAC.
Lecture 1 Appuyez sur l’interrupteur d’alimentation POWER pour allumer l’unité. < Si un amplificateur de puissance est connecté, allumez-le en dernier. 2 Appuyez répétitivement sur la touche SOURCE afin de sélectionner une source.
Lecture de fichiers musicaux conservés sur ordinateur (1) Installation du pilote logiciel dédié sur un ordinateur Pour lire avec cette unité les fichiers musicaux conservés sur un ordinateur, vous devez télécharger le pilote logiciel dédié depuis notre site web et l'installer sur l'ordinateur. http://www.teac.co.jp/audio/software_teac_e.
Lecture de fichiers musicaux conservés dans l'ordinateur 1 Branchez l'unité à l'ordinateur à l'aide d'un câble USB. Câble USB < Utilisez un câble dont le connecteur correspond au port USB de l'unité. 2 Mettez l'ordinateur sous tension. < Vérifiez que son système d'exploitation a normalement démarré. 3 Appuyez sur l’interrupteur d’alimentation POWER pour allumer l’unité. 4 Appuyez répétitivement sur la touche SOURCE afin de sélectionner “USB”.
Lecture de fichiers musicaux conservés sur ordinateur (2) < L'ordinateur et cette unité ne peuvent pas se contrôler l'un l'autre. < Lors de la lecture d'un fichier musical à l'aide de la connexion USB, n'essayez aucune des opérations suivantes. Cela pourrait entraîner un comportement irrégulier de l'ordinateur.
Guide de dépannage Si vous rencontrez des problèmes avec l'unité, veuillez prendre un moment pour parcourir ce tableau avant de solliciter une réparation. Si le problème persiste, contactez votre revendeur ou le service clientèle/technique de TEAC (coordonnées au dos de la couverture). Générales Pas d’alimentation. Vérifiez le branchement à l'alimentation secteur. Si la prise secteur est commutée, assurez-vous que son interrupteur est bien enclenché.
Caractéristiques techniques Sortie audio analogique Prises. . . . . . . . . . . . . . . . . . . . . XLR (2 canaux) x 1 RCA (2 canaux) x 1 Impédance de sortie. . . . . . . . . . . . . XLR 100 Ω RCA : 47 Ω Niveau maximal de sortie (1 kHz, pleine échelle, 10 kΩ) XLR (gain : 0 dB) : 2,0 Vrms RCA : 2,0 Vrms Réponse en fréquence. . 5 Hz à 55 kHz (-3 dB) Fréquence d'échantillonnage : 192 kHz Rapport signal/bruit (S/B). . . . . . . . . . . . .
Pour les consommateurs européens Mise au rebut des équipements électriques et électroniques (a) Tout équipement électrique et électronique doit être traité séparément de la collecte municipale d’ordures ménagères dans des points de collecte désignés par le gouvernement ou les autorités locales.
Qué hay en la caja Si alguno de los siguientes accesorios falta o está dañado, póngase en contacto con su distribuidor o con nuestro servicio de atención al cliente/servicio técnico (los encontrará en la contraportada). PRECAUCIÓN < No exponga este aparato a salpicaduras ni goteras. < No coloque objetos que contengan líquidos, como por ejemplo vasos, sobre el aparato. < No instale este aparato en lugares cerrados tales como estanterías o similares.
Antes de su utilización PRECAUCIÓN Emplazamiento de la unidad < Evite colocarla donde le dé la luz solar directa o cerca de una fuente de calor. Igualmente, no coloque la unidad sobre un amplificador ni sobre cualquier otro aparato que genere calor. Si lo hace puede ocasionar descoloramiento, deformación o anomalías de funcionamiento en la unidad.
Conexiones Después de hacer todas las conexiones, conecte el cable de corriente a la toma de electricidad. < Lea las instrucciones de cada componente que vaya a utilizar con esta unidad. < Para prevenir ruidos y zumbidos, no agrupe los cables de las conexiones. < Asegúrese de que todos los conectores están bien conectados. Amplificador estéreo o altavoces autoamplificados Ordenador Entrada de audio (ENTRADA DE LÍNEA, etc.) R L R L Conecte uno de estos cables.
A Terminales de salida de audio analógico Por ellos sale el audio analógico de 2 canales. Conecte los terminales XLR o RCA al amplificador estéreo o a los altavoces autoamplificados. Utilice cables de los disponibles en establecimientos comerciales. XLR: cables XLR balanceados RCA: cables de audio RCA Conecte el terminal R de esta unidad al terminal derecho (R) del amplificador y el terminal L de esta unidad al terminal izquierdo (L) del amplificador.
Identificación de las partes A B C D E F A POWER Pulse este botón para encender y apagar la unidad. El indicador azul se ilumina cuando la unidad está encendida. B SOURCE Cada vez que se pulsa este botón, cambia la fuente de sonido. C Indicadores de entrada La fuente de sonido que está entrando se ilumina. Parpadea cuando la señal de entrada no son datos de audio digital o el formato de la señal de audio no es compatible con esta unidad, como es el caso de "Dolby Digital", "dts" o "AAC".
Reproducción 1 Pulse el botón POWER para encender la unidad. < Si la unidad está conectada a un amplificador, encienda el amplificador lo último. 2 Pulse el botón SOURCE repetidamente para seleccionar una fuente de sonido.
Reproducir archivos de música almacenados en un ordenador (1) Instalación del software controlador específico (driver) en un ordenador Para reproducir con esta unidad archivos de música almacenados en un ordenador, deberá descargar el software controlador específico (driver) desde nuestro página web e instalarlo en el ordenador. http://www.teac.co.jp/audio/software_teac_e.
Reproducción de los archivos de música almacenados en el ordenador 1 Conecte la unidad al ordenador usando un cable USB. Cable USB < Use un cable con un conector que valga para el puerto USB de la unidad. 2 Encienda el ordenador. < Confirme que el sistema operativo ha se ha iniciado correctamente. 3 Pulse el botón POWER para encender la unidad. 4 Pulse el botón SOURCE repetidamente para seleccionar “USB”. 5 Comience la reproducción del archivo de música en el ordenador.
Reproducir archivos de música almacenados en un ordenador (2) < El ordenador y esta unidad no se pueden utilizar para controlarse el uno al otro. < Cuando reproduzca un archivo de música usando la conexión USB, no intente ninguna de las siguientes operaciones. Si lo hace podría provocar anomalías de funcionamiento en el ordenador.
Solución de posibles fallos Si tiene problemas con esta unidad, por favor dedique unos minutos a leer esta información antes de solicitar una reparación. Si el problema persiste, póngase en contacto con su distribuidor o con el servicio de atención al cliente/servicio técnico de TEAC (los encontrará en la contraportada). General No hay corriente. Compruebe la conexión a la corriente. Si la toma de corriente es un enchufe con interruptor, asegúrese de que el interruptor está encendido.
Especificaciones Salida de audio analógico Terminales . . . Conectores XLR (2 canales) x 1 Conectores RCA (2 canales) x 1 Impedancia de salida. . . . . . . . . . . . . XLR: 100 Ω RCA: 47 Ω Nivel de salida máximo (1 kHz, escala completa 10kΩ) XLR (ganancia: 0 dB): 2.0 Vrms RCA: 2.0 Vrms Respuesta de frecuencias. . . . . . 5 Hz a 55 kHz (–3 dB) Frecuencia de muestreo: 192 kHz Relación señal ruido (S/N) . . . . . . . . . . . . 115 dB Distorsión armónica total. . . . 0.
Para consumidores europeos Deshacerse de aparatos eléctricos y electrónicos (a) Todos los aparatos eléctricos y electrónicos deben ser eliminados separados del resto de basura común y únicamente en los “puntos limpios” o bajo los procedimientos especificados por el gobierno o autoridades municipales locales.
Z TEAC CORPORATION 1-47 Ochiai, Tama-shi, Tokyo 206-8530 Japan Phone: (042) 356-9156 TEAC AMERICA, INC. 7733 Telegraph Road, Montebello, California 90640 U.S.A. Phone: (323) 726-0303 TEAC CANADA LTD. 5939 Wallace Street, Mississauga, Ontario L4Z 1Z8, Canada Phone: (905) 890-8008 TEAC MEXICO, S.A. DE C.V. Río Churubusco 364, Colonia Del Carmen, Delegación Coyoacàn, CP 04100, México DF, México Phone: (5255)5010-6000 TEAC UK LTD.