
Operation Manual


Initial System Setup
By the following initial system setup, you will connect the BRC and the SMR to each
other and to your network and also do basic settings to prepare the operation.
The data interchange between BRC and SMR of the WAP is realized by a WLAN
connection. Benefits of the WLAN connection are the definite identification between
the connected partners and the transmission by radio signals, which do not require
visible connection between transmitter and receiver and offer a wide operation area.
You may even control your SMR from a neighbour room, just depending from your
WLAN network capabilities.
BRC and SMR both do transmit and receive data. BRC and SMR each are individual
network devices, which need to be setup accordingly. The setup is a simple step by
step procedure, setting up BRC and SMR in one turn by a guiding “wizard”. Its a
very easy dialog system to support you for the most common settings. Please keep
in mind, BRC as well as SMR are individual network devices, which require to
be setup each for network connection, eventhough the simple setup
procedure may be suggestive of just installing one device/system!
Please follow the below mentioned steps for connecting BRC and SMR:
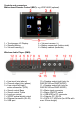
● Power ON the SMR. The SMR will
boot and after apprx. 1 Minute it
shows flashing green/blue indicator.
This means the SMR is in config
mode and awaiting the following
settings.
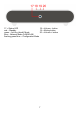
● Power on the BRC. "Language
Setting" will be displayed. Select
your preferred language and follow
the screen instructions. After this
procedure, the BRC root screen
welcomes you in your selected
language.
● Next, the time zone screen
appears. Select your time zone and
confirm the required daylight saving
option for your area.
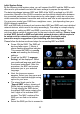
● The wizard leads you to the
“Search SMR” screen, showing all
SMRs that are available for setup.
To help identify the SMR device,
the default SMR name contains the
last 6 digits of its individual MAC
number. The MAC number of the
SMR you can find on its bottom
label.
● Select the SMR you like to connect to.
10