WAP-V6000 INSTRUCTION MANUAL
Copyright Notices Copyright (c) 2009 by TEAC Europe GmbH – All Rights Reserved. The Product “TEAC WAP-V6000“ (hereinafter referred to as the "Product") includes OpenSource software packages. These Open-Source software packages are subject to specific licenses, disclaimers and notices, which are reproduced on the CD-ROM provided with the Product (see “Licenses.txt”). Please refer to those licenses, disclaimers and notices for your exact rights hereunder as well as to the following Open-Source Notices.
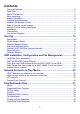
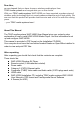
Contents Copyright Notices..................................................................................................2 Dear User,.............................................................................................................5 About This Manual................................................................................................5 After unpacking.....................................................................................................5 Safety Information .............
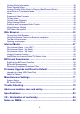
Viewing Photo Information ..................................................................................38 Photo Viewing Effect ..........................................................................................38 Viewing Photos While Music is Playing (BackGround Music)..............................40 View Photo in Thumbnails Mode.........................................................................43 Video........................................................................................
Dear User, we are pleased that you have chosen a wireless media player from TEAC media systems and congratulate you on this choice. With your TEAC media systems WAP-V6000 you have acquired a modern piece of wireless audio technology that is in equal measure attractive and of high quality. We are sure that this product will provide useful service and a lot of fun over the coming years. ...
Safety Information ATTENTION: Failure to follow these safety instructions could result in fire, electric shock, or other injury or damage. ● Read these instructions ● Keep these instructions ● Heed all Warnings ● Follow all instructions ● Do not use this apparatus near water. ● Clean only with dry cloth ● Do not install near any hear sources such as radiators, stoves, or other apparatus (including amplifiers) that produce heart.
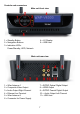
Controls and connectors Main unit front view 1 = Standby Button 2 = Navigation Buttons 3 = Indication LEDs: Power/Standby, HDD, Network 4 = LC-Display 5 = USB Host Main unit rear view 1 = Wlan Antenna 1 2 = Composite Video Output 3 = Audio Output Right Channel 4 = Ethernet Lan Terminal 5 = Wlan Antenna 2 6 = Connector for Power Supply 7 = S/PDIF Optical Digital Output 8 = HDMI Output 9 = S/PDIF Coaxial Digital Output 10 = Audio Output Left Channel 11 = USB Host 7
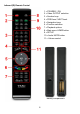
Infrared (IR) Remote Control 1 = STANDBY / ON 2 = Video OUTPUT selection 3 = Number keys 4 = PREVious / NEXT track 5 = Navigation keys 6 = Function selection 7 = Playback options 8 = Main menu HOME button 9 = SETUP 10 = Audio MUTE button 11 = Volume control Battery compartment 8
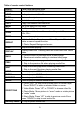
Table of remote control buttons Button POWER HOME MUTE OUTPUT COPY MENU A-B SLOW ZOOM REPEAT STOP DISPLAY BACK PREV NEXT VIDEO MUSIC PICTURES iMedia DIRECTIONS OK/Play Pause FUNCTION DESCRIPTION Turn On/Off “WAP-V6000”. Hotkey to return to Main Menu. Mute audio output. Switch the video output type Copy USB content into local HDD Go to the Menu of DVD films. Set/Cancel A-B repeat mode. Slow forward / backward the media with speed 1/2x, 1/4x,1/8x… Zoom video or photo. 1.
REWIND FORWARD SUB & LANG VOLUME+/BGM NUMBERS RECORD :/ SORT SETUP 2. Enter the highlight item. Fast backward the media file with speed 2x, 4x, 8x… Fast forward the media file with speed 2x, 4x, 8x… Select different subtitles and languages when playing video file. Increase/Decrease the volume. 1. Add/Remove a music file as background music. 2. Add/Remove a music station from “My Media” as background music. 1. Input number with the key value. 2. Go to 00%-99% progress of current video or music file.
Installation Following descriptions explain how to install the WAP-V6000 with basic setup. Install your WAP-V6000 in this order: 1. Connect WAP-V6000 2. Set Up WAP-V6000 3. Install software on your computer from Installation CD 4. Configure your Twonkymedia Server to work with the WAP-V6000 Connections Make sure you have the appropriate cables for connecting. Take care to watch the colors of the plugs on the cable. For Video, WAP-V6000 offers digital HDMI or analogue Composite connections.
Start-Up Follow these steps to start-up your WAP-V6000 Turn on the TV Screen. Set the video sources selector on your TV to match the connection from your WAP-V6000. For example, if you used HDMI, set the TV to use “HDMI” Input. 1. Turn on WAP-V6000. The LED on the front panel of the WAP-V6000 lights up to show that it is powered on. 2. Check the TV display. The default display of WAP-V6000 is Composite(CVBS). If you use HDMI, take the remote control and push OUTPUT Key.
Note: When you cycle through the “Output” Key, the WAP-V6000 will tell you which mode you are at. Above is an example of cycling to “HDMI” mode. Please press “OK” if HDMI mode is what you want to select. It will switch to the original mode automatically if idle for 15 seconds. 4. After reaching the main menu for the first time, we do recommend you to setup your WAP-V6000 to fully suit your system environment.
Setup Menu For setup, simply press the SETUP hotkey on the remote control or select “Setup” from the main menu by LEFT/RIGHT and confim by OK button. In Setup Main Menu, select Wired or Wireless to set up for your network. Wired Network Setup 1. Select Network Wizard from set up main menu to start setup wizard 2. Select “Wired” and follow the on screen instructions. Note: If you connect to a network using DHCP, WAP-V6000 automatically detects your network.
Wireless Network Setup Attention: WAP-V6000 supports present wlan standards 802.11b, 11g and 11n. A wireless connection of 802.11b or 802.11g standard can work well if you want to play music or view photos. For demanding video streaming, especially when streaming HD contents, a wired Lan or high performance 802.11n Wlan connection between the mediaserver and WAP-V6000 is recommended. Please check your wlan router's standard to know about its possible limitations. 1.
6. If the network you choose is encrypted, a “Lock” icon displays on the network. 7. Select “Key Value”, and have your password ready to enter. 8. Input your password and choose “Enter” to save. 9. Follow the onscreen instructions to complete the setting. Note: With each network, there are signal strength indicators in 3 colors; red, yellow and green. It is recommended to play high-bit-rate video only when the signal turns into green or to re-adjust the two antennas of WAP-V6000 accordingly.
When Wireless Network is hidden If you can’t find the ESSID (Network Name) on the “ESSID Device List”, follow these steps to configure wireless network manually. 1. Select Wireless Setup. 2. Select Network type as “Infrastructure” mode. 3. Press “Back” to accept the setting or press “OK” to change the setting. 4. Enter a value of up to 32 characters for the SSID by on-screen keyboard. 5.
HDD Installation, Configuration and File Management Hard Disk Drive Installation WAP-V6000 supports 3.5” SATA HDD as internal storage. By installing the HDD inside, you can copy and delete media files via computer to local HDD and record streams to HDD. Attention: We recommend you to have a new HDD to install. You can chose to let WAP-V6000 automatically format the HDD to EXT3 and erase your existing files. Follow the instructions below to set up HDD. 1. Make sure WAP-V6000 is turned off. 2.
5. Insert the HDD into the case cover as below direction. 6. Put the HDD on the cover and fix the HDD firmly by the WAP-V6000 accessory HDD screws in the four holes. 7. Connect the SATA data cable from HDD to the WAP-V6000 board. 8. Connect the HDD power cable from HDD to the WAP-V6000 board. 9. Re-install the bottom tray to the top cover of the WAP-V6000 by its 4 original screws. 10. Now you can operate your WAP-V6000 again, including the installed HDD.
WAP-V6000 HDD Format Wizard After HDD installation is completed, WAP-V6000 will detect your HDD compatibility and perform formatting if necessary. Follow below steps to complete the format process. 1. Turn on WAP-V6000 and your TV. 2. HDD Format Wizard will detect if your HDD is formatted for best compatibility. 3. Click “Yes” if you are sure you want to initialize the process. If you do not want to format the HDD, go to “No“. 4. Wait few seconds for the process to be complete. 5.
ATTENTION: WAP-V6000 will format your HDD as EXT3 format for best performance. This file format can not be recognized by Windows system originally. Note: By default, WAP-V6000 will check the format of the HDD if the HDD was initialized by WAP-V6000 with EXT3 format. The data in the HDD, which is not with EXT3 file system, may still be able to be played by WAP-V6000. This way, functions like copy via USB and network will NOT be working. There is a setting option to avoid HDD format checking after power-on.
3. Highlight the file you want to copy, and then press COPY key on the remote control. 4. The WAP-V6000 will ensure you whether you want to copy, press “Yes” if you want to move on. Note: The WAP-V6000 only support USB hosts copy to local HDD, you are not able to delete files copied to HDD by using this feature.
Copy/Delete files from computer to WAP-V6000 (Local Hard Disk) WAP-V6000 supports Samba protocol. You can copy/delete files on each WAP-V6000 internal HDD available in your local network by using your computer. Samba Server function WAP-V6000 supports a Samba server function which shares your local storage space with client computer over the network. For computer with Windows OS, it’s well known as “My Network Places“. The following is an example on how to do this through Microsoft Windows XP. 1.
7. After login is successful. Now you can copy/delete media files between your computer to WAP-V6000 local HDD by using your computer mouse. Note: please go to “System Setup“ “Harddisk Share Setup“ for setup options on SMB server.
Network Protocols to Play Media To browse and playback the audio, photo and video media files stored on your computer (connected to your network) or NAS, WAP-V6000 offers various access solutions like NFS, SMB and UPnP. UPnP Mediaserver installation on computer For UPnP access to your media files, a media server software is required. The media server is beneficial to have the media contents sorted according your individual requirements, independant from their “physical“ arrangements in subdirectories. E.g.
2. Select “My Media” and enter “Add New Entry”. Edit Dialogue will pop up. 3. Key in the nickname (for example “nfs”) and the URL of your target source. The url link must be in following arrangement. nfs://ip/export_directory (for example, nfs//192.168.2.112/mnt/hd_a2) The 192.168.2.
the mnt/hd_a2 is the sub folder name of your target source. 4. After the URL is saved, go back to the menu of “My Media”, and you will find the protocol at “My Media” list. 5. Enter into the menu, and select the files you want to play. In this case, you don’t need to put in any username or password.
Samba Client Protocol The Samba Client allows the WAP-V6000 to access media files from samba shares on computers on the network. Go to Setup -> System Setup -> Other Settings -> Network Option -> Samba Client to turn on this option. As long as the network is linked, there is no additional set up to enable this feature. Following steps show how to access media through the Samba Client Protocol. 1. Get into “My Media” in the main menu.
2. All available sources will be shown on the same menu list layer (including local HDD, USB storage, UPnP Server and folders at local area network (those you can find through your Windows computer at the path of “My neighborhood”) Local HDD UPnP server Samba client Total 28 sources found = Samba client protocol = UPnP Server 3. Get into the source you want to select.
4. When access the NAS through Samba client, if there is request to key in user name and password, the dialogue will pop out. Key in User name and Password to login NAS. 5. After input of username and password, you can get into your target source and select the media files you want to play. Note: The performance of high bit rate files (>30 Mbps) might have some lag through Samba Protocol, therefore we don’t suggest to play high bit rate files with this protocol.
Play Multimedia Files Music Supported Music Formats Format AAC+ AAC-LC AC3 / Dolby Digital 5.
To Play Music 1. Select “My Media” from Main Menu to enter server list, or press MUSIC hotkey on remote control. . 2. All available file sources will be listed on the My Media list, including files stored at Twonkymedia server in your computer, at USB flash stick, at USB external Hard disk drive, local hard disk drive or at other UPnP servers. Please select the media you like to use and press the OK button on the remote control.
4. If you select Twonkymedia server, the music files will organize by “Album”, “Artist”, or “Genre” etc., automatically for your convenience; or you can select “All Music” to see all music files. You may also select “Files” to view the music files that organized in several subfolders as on your computer. 5. Please use “Up” and “Down” buttons on the remote control to navigate those folders, and select the entry by press OK or “Right” button on the remote control. OK on a music track will start playback.
Cover pictures: WAP-V6000 supports cover display for each audiofile with ID3 tag. To achieve cover display, you can import a cover picture into each audio file, using your PC. This and more ID3 tasks can be proceeded comfortably by a wellknown freeware software, e.g. MP3tag (Win), ID3X (MAC) or EasyTAG (Linux).
Skip to Next or Previous File: Press “Next” or “Down” buttons to skip to next music file. Press “PREV” or “UP” buttons to skip to previous music file. Fast Forward: Press “>>(FF)” button to fast forward the music file. Press several times to switch the speed. Fast Rewind: Press “<<(REW)” button to fast backward the music file. Press several times to switch the speed. Repeat and Repeat All You can turn on the repeat function to continuously play individual music or music within a folder.
Photos Supported Photo Format Format BMP EXIF SUPPORT GIF JPEG JPEG2000 PNG TIFF Windows Media Photo File Extension BMP JPEG, JPEG, JPE, TIFF, TIF GIF JPEG, JPG JPG, JPEG, JPE PNG TIFF, TIFF WDP, HDP To view photos 1. Select “My Media” from Main Menu to enter server list, or press “PHOTO” hotkey on remote control. 2.
4 If you select “Twonkymedia server”, you may select “Files” to view the image files that organized in several subfolders as on your computer, or select “All Photos” to see all shared image files. Please use “Up” and “Down” buttons on the remote control to navigate those folders, and select the option by press OK or “Right” button on the remote control. 5 Select the folder that contains the image files or the subfolders you want, and press OK, or “Right” button on the remote control to play it.
Note: icon stands for a folder; icon stands for a file. Playing a Photo Slideshow To start playing a photo slideshow (all photos in one folder), you need to press OK Button twice(!!) on the remote to enable this function. 1. Navigate to the first photo of each folder and press OK button to view this photo. 2. Press again the OK button if you want to enable Photo Slide Show feature. The PLAY icon will display when the Photo Slide Show is enabled. 3. Press STOP button to stop the function.
2. When the image screen is larger than TV screen, press “Zoom” again and press “directions” buttons to move the image. 3. Press “Zoom” button and press “Right” button to shrink the image Rotate: Press “Rotate” button while viewing the photo to enable rotate function.
Viewing Photos While Music is Playing (BackGround Music) The WAP-V6000 is capable of displaying photos and playing background music simultaneously. Follow below steps to add music to “BGM” (Back Ground Music) list. 1. Enter music files list 2. Use “Up” and “Down” buttons on the remote control to navigate music files, and press “BGM” hotkey on remote control to invoke “BGM” tool bar.
Add music to BGM list. Music added successfully 5. To play BGM files, please select “BGM PLAY”button on “BGM” tool bar; to stop playing BGM, please select “BGM PAUSE” button. 6. To remove music files from BGM list, please select “delete” icon on the file you want to remove. 7. To check the selection for BGM, please select “BGM list” icon to view all music files in the list.
8. After BGM setting is complete, you can go to “Photo” folder to view photo, and press “BGM” hotkey to evoke the BGM function.
View Photo in Thumbnails Mode You can view thumnails of several photos at a time. To enable the thumbnail mode, please do the following: 1. Go to “Setup Main Menu”. 2. Select “Other Settings”. 3. Choose “Thumnail” on “Photo Display Setup” Menu. 4. After go back to the folder, you will now view several photos displayed at a time.
Video Supported Video Formats Format DivX 3 DivX 4 DivX 5 HD DiVX 5 SD DivX 6 HD DivX 6 SD H. 264 AVC MPEG4 part 10 (HD) H.
To play video 1. Select “My Media” from Main Menu to enter server list, or press “VIDEO” hotkey on remote control. 2. All available file sources will be listed on the server list, including files stored at TEAC media systems media server in your computer, at USB flash stick, at USB external Hard disk drive, local hard disk drive or at other UPnP servers. Please select the media server you want to use and press “OK” button on remote control. 3.
4. If you select “TEAC media systems DMS”, you may select “My Folder” to view the video files that organized in several subfolders as on your computer, or select “All Videos” to see all shared video files. Please use “Up” and “Down” buttons on the remote control to navigate those folders, and select the option by press “OK” or “Right” button on the remote control. 5.
Control Video Playback Volume Control: Press “Vol+” or “Vol-” buttons to control the volume Mute: Press “Mute” button to mute or un-mute the video. Pause and Play: Press OK button while video is playing you can pause the music by pressing OK button again can resume the music Skip to Next or Previous File Press “Next” or “Down” buttons to skip to next video file. Press “PREV” or “UP” buttons to skip to previous music file. Fast Forward: Press “>>(FF)” button to fast forward the video file.
Slow backward Press “Slow” button and press “Left” button to slow backward the video file. Press “Left” button several times to switch the speed. Viewing Video Information Press “Info” button to get video information. Video Viewing Effects Zoom in and Zoom Out: While video is playing, press ZOOM button to enable zoom in/ zoom out function. 1. Press “Zoom” button and press “Left” button to enlarge the video screen. 2.
Repeat and Repeat All You can turn on the repeat function to continuously play individual video or video within a folder. Press “Repeat” button once to repeat playing current video file. Press “Repeat” button twice to repeat all video files in current folder. Press “Repeat” button for third time again to disable the repeat mode. Subtitles and Languages/Audio-Tracks If you are playing “VOB” files or “AVI” files, “SUB” button and “LANG” button are available for the subtitle and language switching.
Video Resume Playing The WAP-V6000 supports resume video playing to the previous point where the video is interrupted. The device needs to keep powered on to enable this function. The default setting is that it will ask you everytime whether you want to resume the playing when you are back to the interrupted file. If you want to change the setting, please follow below instructions: 1. Go to “System Set Up “ 2. Select “Other Setting”, and highlight “Video Resume Playing”.
Play Next Video Automatically The default setting is the all the video files in one folder will be played continuously until the last file and then return to the main menu. If you want to play only the selected file and then return to the main menu, please go to “Other Settings” and set “Play Next Video” to disable the function. Search Video The WAP-V6000 provides two options to seek the video frame. One is to seek by percentage of total file length; and the other is to seek by time.
DVD Menu Navigation The WAP-V6000 support viewing DVD files as you are playing a DVD menu. Follow below steps to enable DVD menu navigation feature. 1. When you select a DVD file, choose the item with disk icon and press OK 2. The Menu will appear. Use the navigation buttons on the remote control to select the item you want.
Web Browser To open the Web Browser Wherever you stay in the user interface, press ‘Home’ button on the remote control to return to the main menu as shown below. Select the icon which shows ‘Web Browser’ and press ‘ok’. The homepage of the web browser will be displayed, then you can surf the web using the remote control or keyboard and mouse. An optional USB keyboard and mouse can be plugged to facilitate the web surfing.
Tool bar of the browser Opening a web page Press ‘File’ → ’Move page’ → Enter the web address you like to go. Tab function Tabs can be opened and switched when you like to look at different web pages more efficiently. Press ‘File’ → ’Switch tab’ → Select a tab to be opened.
Previous, Next and Home Pages Press ‘History’ → ’ Back’ or ‘Forward’ or ‘Home’. View of the pages The web page being loaded can be stopped or reloaded by choosing the icon from ‘View’. Text size can be changed, and the whole page can be zoom in or out for more convenient view by the users.
Bookmark function Bookmarks can be added, loaded and deleted by using ‘Bookmark’ 56
Internet Media Play Internet Radio - Live 365™ Live365™ is an Internet radio service that provides unlimited on-demand access to thousands of radio stations. The audio is streamed directly over the Internet. Follow below steps to access the radio stations: 1. Make sure your network setting is correct and be able to access internet. 2. Select “media” from main menu or press “media” button on the remote control. 3. Select “Live 365” and press “OK” button on remote control.
4. Select a catalog you prefer from list, or select “All Broadcasts” to browse all radio stations. 5. Select a radio station from list, and press “OK”, “Play”, or “Left” button to play it. Note: stands for a web radio station.
Play Internet Radio - My Radio 1. Make sure your network setting is correct and be able to access internet 2. Select “iMedia” from main menu or press “iMedia” button on the remote control. 3. Select “My Media” and press “OK” button on remote control. 4. Select “My Radio” and press “OK” to enter. 5. There are some radio stations listed as default; you can select one of the stations from list and play it. 6. You can also add your favorite radio station manually by select “Add New Entry”.
7. Select “Add New Station” or “Add New Folder” to configure a new radio station or Folder; then enter related information of this new radio station or Folder. Play Internet Video - My Video 1. Make sure your network setting is correct and be able to access internet 2. Select “iMedia” from main menu or press “iMedia” button on the remote control. 3. Select “My Media” and press “OK” button on remote control.
4. Select “My Video” and press “OK” to enter. 5. There are also some internet video stations listed as default; you can select one of the stations from the list and play it. Note: stands for a web video station. You can press the Zoom key on the remote, and zoon in/out icon will show up. .
Viewing Youtube Content You can use the WAP-V6000 to view Youtube content. To view YouTube content, follow these steps: 6. Make sure your network setting is correct and be able to access internet 7. Select “iMedia” from main menu or press “iMedia” button on the remote control. 8. Select “Youtube” and press “OK” button on remote control. WAP-V6000 lists the Youtube content in 7 categories, Choose the item you will view and press “OK”. Note: The Youtube content on WAP-V6000 is streamed from www.youtube.
Add/Delete the Internet Radio/TV Station Lists You can manage the iMedia list at the WAP-V6000 onscreen menu. 1. Go into the “Favorites”. 2. Press the MENU key on the remote control. The Menu list will pop up. You can now add. modify, delete and backup your list iMedia list.
BitTorrent Downloader The model WAP-V6000 incorporates the BitTorrent download function. Make sure the local 3.5” HDD is already installed before enabling this feature. (Please refer to HDD Installation as mentioned in this operation manual). Enabling the BitTorrent Function After the HDD is installed, follow below steps to start the download. 1. Go to the “Setup Main Menu”, and highlight “BitTorrent Setup” 2. Select “Enable BitTorrent”. 3.
Add New Torrent Seed and Start Downloader 1. Go to “iMedia” and select “BitTorrent” Have your .torrent seed file ready at USB storage or local HDD. Insert your USB storage to the WAP-V6000, Enter into “BitTorrent”. 2. Select “Add New Torrent” and press “OK” 3. Enter into the location where the .torrent file to be selected is stored.
4. Select the torrent files and press “OK” . 5. New downloading activity will appear on the menu. Make sure that WAP-V6000 is connected to Internet, to keep Bit Torrent active.
The downloaded files will be stored in the path: MyMedia\HDD Disk 1\bt, please refer to the following screenshots.
BitTorrent Management The BitTorrent Control Menu offers you the ability to start, stop, set priority and remove the files. You can press MENU key on the remote control to enter the control menu. 1. Use Navigation key to select the torrent files you want to manage. 2. Press “MENU” key in the remote control, the “BT Control” Menu will appear. 3. Use Navigation key on the remote to select the function you want to perform.
Removing Completed Download Files If the files have been downloaded completely, there may be some other data along with the main torrent files. You can highlight the files and press “OK” to view all the data contents. 1. Highlight the download completed files To view all the data contents press OK. You can press “Display” key on the remote to view the files info. 2.
Firmware Upgrade and Reset to Default Upgrade by Using USB Flash Disk WAP-V6000 supports using USB storage for updates. Follow the steps below to check for product updates: 1. Have your USB storage ready, download by computer the latest firmware from www.teac.de to USB storage. 2. Insert the USB flash to the USB port of WAP-V6000. 3. Go to “Set Up Main Menu” “Version” and choose ‘Firmware upgrade” 4.
Miscellaneous Settings The user interface language and other settings in your WAP-V6000 are configured in the “System Setup” of the “Setup Main Menu”. Please select the item that you want to configure and press OK button or “Right” button on remote control to enter the related sub-page. After configuration, press Back button or “Left” button to leave the setup menu and save the configurations that you changed.
Language Here you can chose your preferred user interface language. Language Table Item Name Language Settings Action English/German/French/Italian/Spanish/ Portugese/Turkish/Netherlandish/ Select Serbian/Hewbrew/Traditonal Chinese TV Mode Setup This provides you a menu to change the TV mode setting, including the Video output, TV system and aspect ratio.
TV Mode Setup Table Item Name Settings Action Video Output P-SCAN YPbPr/ S-Video/ HDMI Select TV System NTSC/480p/720p60/1080i60/ 1080p24/1080p60 Select Aspect Ratio 4:3 PS/ 16:9/ 4:3 LB Select Note: For some video film which is with 24 frames per second, you may see poor quality on the display. Please select 1080p24 as the TV output mode, and make sure your TV set support 1080p24 before the trial.
Video Setup The Video Setup provides you settings to enhance the video quality to best match with other sources on your screen. Video Setup Table Item Name Settings Action Brightness 0 ~ 32 Adjust Contrast 0 ~ 32 Adjust HUE 0 ~ 32 Adjust Saturation 0 ~ 32 Adjust Other Settings The “Photo Display Setup” , “Video Resume Playing” and “Play Next Video” Are explained in the related chapters for media playback.
Other Settings Table Item Name Settings Action Screen Saver OFF/ 1 min~30 min Select Photo Display Setup List / Thumbnail Switch Slide Show Time 1 sec ~ 3 min Select Music Auto Play Repeat All/ OFF/ One Time Select Video Resume Playing Ask/Always/Off Switch Play Next Video Enable/Disable Switch Hard Disk Share Setup If you have installed a Hard Disk Drive into your WAP-V6000, you can see the “Hard Disk Share Setup” here to configure your HDD Settings.
Check HDD Format: The device will check the HDD format every time it is powered on. This can be disabled by selecting the option below. Note: Please remember if you have disabled this function, in case you need new formatting of the HDD, once you replaced the HDD in your WAP-V6000! LCD Settings Here, the contrast of the front LCD panel text display can be adjusted.
Bit Torrent Setup Go to Setup Bit Torrent Setup to configure the relevant items. The items to be configured are listed as follows: Enable Bit Torrent The Bit Torrent function can be turned off by this option. Max Upload Connection To limit a maximum number of bit torrends at a time to comply with the performance of your network or your internet connection.
Trouble Shooting No Television display or Poor Display. 1. Make sure your TV is turned on and switched to the correct input. 2. Make sure WAP-V6000 is turned on and switched to the correct TV mode. 3. If the TV Mode that you are using is not the right one for your television, you may not be able to see the display on television. To fix this problem, push “Output” key on the remote control. You can cycle through each of the possible TV modes to find and select the correct one. 4.
WAP-V6000 does not find the UPnP media server. 1. Verify that the TwonkyMedia Server software was installed on your computer. 2. Verify that WAP-V6000 and the computer running the software are on the same subnet and that they can communicate with each other. In most cases, this means that the first three fields of the two IP address should be the same. 3. Make sure you have setup the media server for importing media files.
Fast forward or slow forward is not working Please note if you have enabled the “Transcoding” function, the “fast forward”, “fast backward”, “slow forward”, and “slow backward” functions will not work due to limitation. Can not add music files to BGM list? Please make sure you did not add more than 500 music files to BGM list since the capacity of BGM list is 500 files.
Advice on location, care and safety ● To connect your WAP-V6000 with power supply system, please make sure to have a socket close to your sound-system. ● If the WAP-V6000 is not in use for a longer period of time, be sure that the power source is disconnected from your system. ● Do not use alcohol, benzene, thinner or acids to clean the cabinet. ● Do not place your WAP-V6000 near radiators, airconditioning or radiocontrolled systems.
down) or other environmental influences may reduce the capacity of the batteries. So use batteries within the limits of the specification only and take them out of the device, if it is not used for a longer period of time or run from wall outlet. ● Prior to take batteries out of the unit, you have to switch off the device and disconnect it from the charging adapter. Check charging adapters for their model number prior using it for charging the device.
Specifications: ● Wireless AV Player with infrared (IR) remote control ● On/Standby, Volume and all control funktions driven by remote control ● Battery case for 2x AAA-Batteries ● LC-Display and navigation buttons on main unit for funktions control and audio playback without TV screen ● User interface language selection: GB, D, F, I, E, P, TR, NL, SRB, HE, CN. ● Playback sources: optional Harddisk (internal, SATA), USB, Lan, Wlan.
CE – Declaration of conformity We herewith declare, the TEAC media systems WAP-V6000 wireless audio player complies with the following norms or normative documents: EMC directive 1999/5/EC ETSI EN 301 489-1 V1.6.1:2005, ETSI EN 301 489-17 V1.2.1:2002; EN 55022:2006: EN 61000-3-2:2006, EN 61000-3-3:1995 + A1:2001 + A2:20, EN 61000-4-2:1995 + A1:1998 + A2:20, EN 61000-4-3:2002 + A1:2002, EN 61000-4-4:2004, EN 61000-4-5:1995 + A1:2001, EN 61000-4-6:1996 + A1:2001, EN 61000-4-11:2004; ETSI EN 300 328 V1.7.