
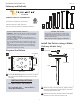
Installation Sheet


1.2
Installation Instructions for
Pathway and Bollards
920OA_OB
GP I :ENERAL RODUCT NFORMATION
This product is suitable for wet locations.
Pathway models are 12VAC input only.
Refer to product specsheet for dimming information.
CAUTION RISK OF FIRE-
This product must be installed in accordance with
the applicable installation code by a person familiar
with the construction and operation of the product
and the hazards involved.
Use minimum 90°c supply conductors.
OUTDOOR
2A
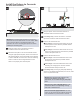
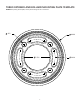
Attach the stake to the base plate by tightly screwing
down the provided stake bolt through the center hole
of the base plate and the stake.
Reattach the base plate assembly to fixture and tighten
down the set screws (reversal of Section 1A).
1
STAKE
STAKE BOLT
BASE PLATE
2
Install the Fixture using a Stake
(Pathway Models Only)
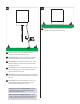
1A
Loosen the four set screws on fixture(Do Not Remove)
base with the provided Allen wrench and remove the
base plate.
1
Prepare the Fixture
ALLEN
WRENCH
1
1
1 1
For Stake Install - see section 2
For Concrete and
other Hard Surfaces
INSTALLATION OPTIONS:
- see section 3
BASE PLATE
SET SCREW
For low-voltage pathway luminaires:
WARNING – Risk of Electric Shock. Install all luminaires
10 feet (3.05 m) or more from a pool, spa, or fountain.
Unit low voltage cable is to:
a) be protected by routing in close proximity to the
luminaire or fitting, or next to a building structure such
as a house or deck;
b) not be buried except for a maximum 6 inches (15.2
cm) in order to connect to the main low voltage cable;
and
c) have the length cut off so that it is connected to a
connector within 6 inches (15.2 cm) from a building
structure, a luminaire, or fitting.
1